No Stick Grilled Sockeye Salmon

At my home, we love to grill. This undoubtedly comes from living in South Florida for 20+ years before relocating to NJ. There, we grilled several times a week and we’ve continued that now that we live in the northeast.

One thing I love to grill is fish. No mess in the kitchen, no fishy smell for several days – easy peasy! I know what typically intimidates folks about grilling fish is that it can stick and be a huge disaster. It really doesn’t have to be that way.

First, there are many products on the market you can place your fish on when grilling. Everything from a cedar plank to a silicone mat to a rectangular grill pan.

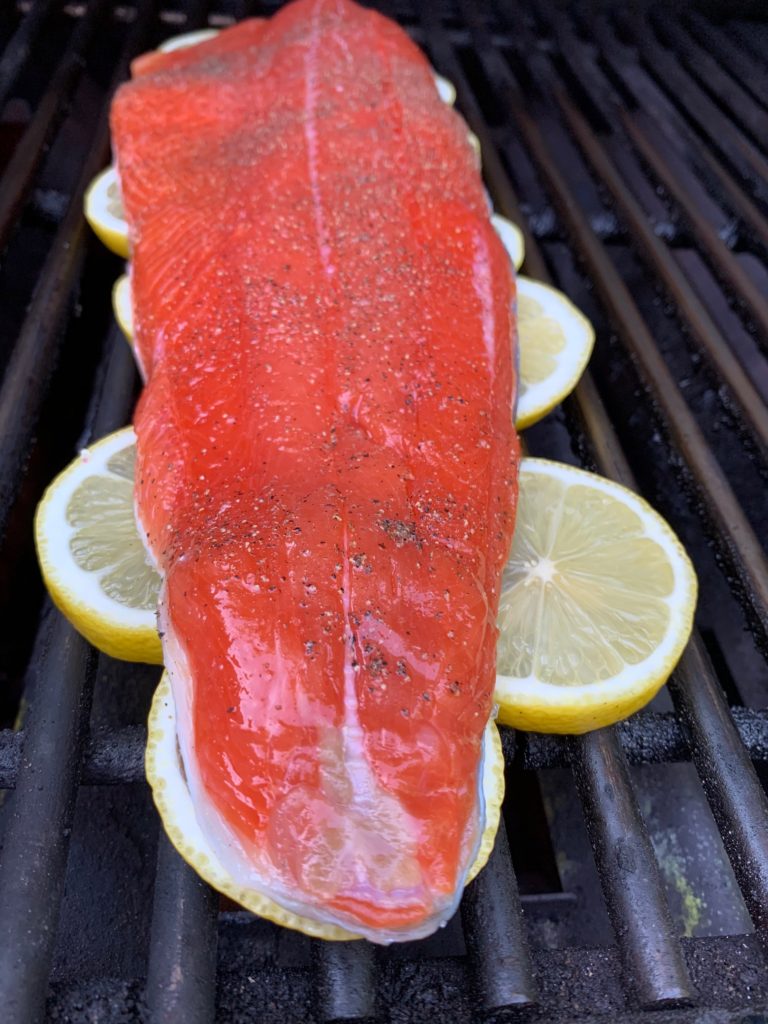
Second, pick the ‘right’ fish. As a starting point, salmon is a great fish to grill as you can place on the grates skin side down which help protects the flesh from sticking.

Third, put the fish on the medium-hot grill, close the lid and leave it alone! The fish needs time to form an outer ‘crust’ which will make it way easier to flip or remove from the grill, but in order for that to happen, you need to leave it alone to cook for a bit!

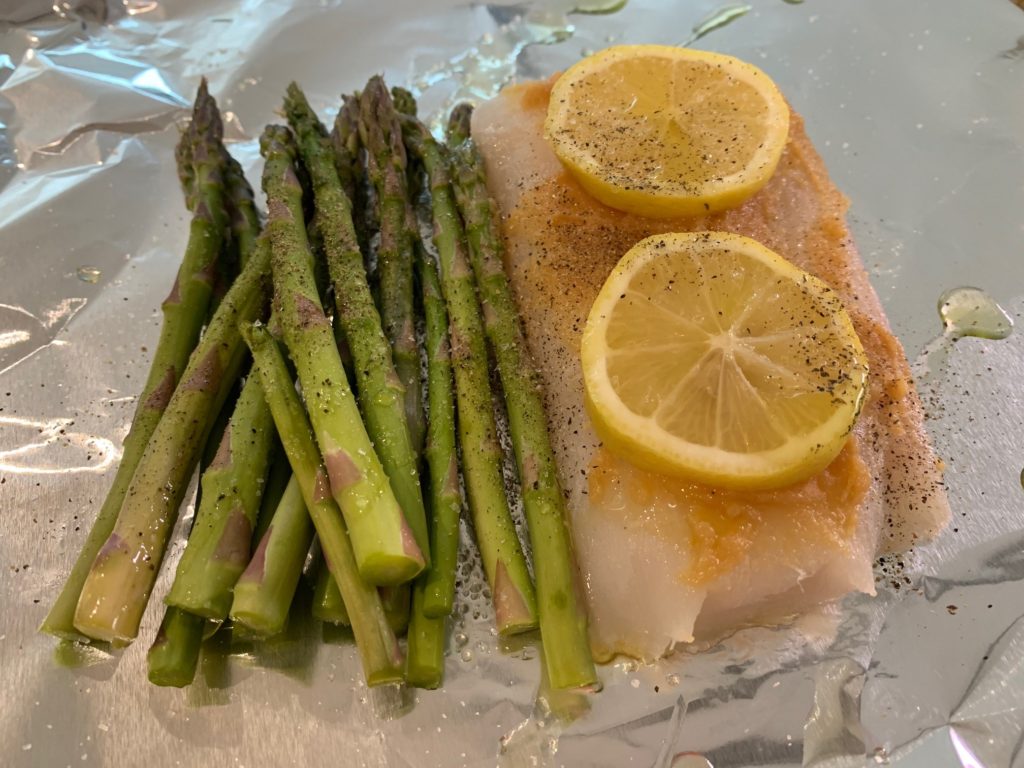
Finally, one of my favorite tricks to ensure fish won’t still to the grill is to place the fish on lemon slices. The lemon helps protect the fish from the direct grates and also flavors it as it cooks. A winning recipe in my book!

Ingredients:

  • 1 ½ – 2 pounds of sockeye salmon (I use a whole side)
  • Juice of one lemon
  • Olive oil for coating
  • Pinch of salt and black pepper
  • Zest of one lemon
  • 8-10 slices of lemon
  • 2 lemons, halved (optional)

Directions:

  1. Light a grill to medium-high heat. Allow the grill to get up to temperature with the lid closed.
  2. Place the salmon skin side down on a work surface or platter. Pour the lemon juice and the oil then add the salt, pepper and zest and massage that mixture all over the flesh of the fish.
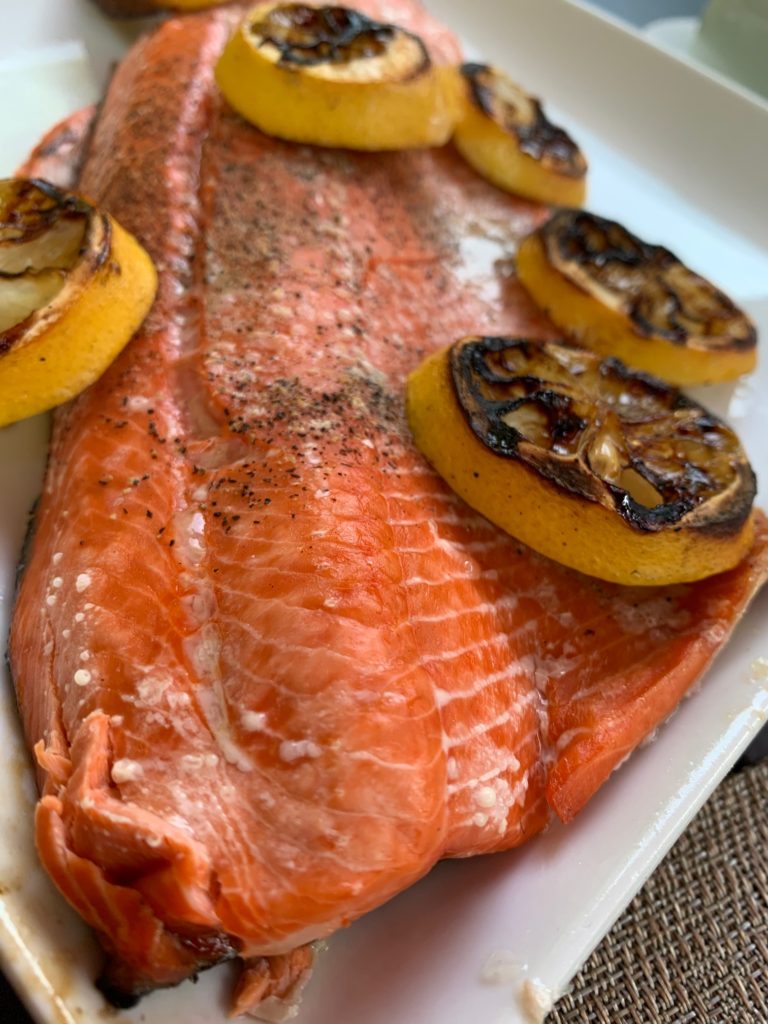
  3. Open the lid of the grill and place the lemon slices, two side by side, horizontally on the grill grates (see pic for a visual). Place the salmon skin side down onto the lemon slices. Close the grill lid and cook for 8-10 minutes, until the flesh is firm but not dry. If using, place the four lemon halves, flesh side down, on the grill for the last 5 minutes of the fish cooking time.
  4. Remove the fish from the grill, peel off the skin (this will be very easy after grilling) and serve with a squeeze of the grilled lemons.

Serves 2-4 depending on your side dishes.

Easy Miso Cod en Papillote

Easy Miso Cod en Papillote

It feels wrong to even call this a recipe, but, if I don’t document it, I’ll forget how tasty it is and that I should make it more often! It’s even keto-friendly!

This is a very simple process and prefect for a weeknight meal of cod cooked in an aluminum foil packet on the grill. No oven to turn on, no messes to clean up!

I had wild caught cod on hand but this would be delicious with many non oily fish like mahi mahi, bass, sole, halibut or haddock. I had miso paste in the fridge so I used some of that along with lemon juice and olive oil, but some ginger dressing or even some Italian dressing would work great also.

Ingredients:

Two 4-6 ounce cod filets

2 Tbsp. each miso paste, olive oil and lemon juice

4 slices of lemon, seeds removed

20-30 raw baby asparagus spears

Salt and pepper

Uncooked Fish Packet

Directions:

Turn your gas grill to medium flame (or turn the oven on to 375 degrees).

Cut two large pieces of aluminum foil and lay them on a work surface. Lightly coat each foil piece with cooking spray.

Place a cod filet and 10-15 asparagus spears in the center of each of the foil pieces. Spoon the miso paste over the fish then drizzle the fish and asparagus with olive oil then lemon juice. Season with a big pinch of salt and pepper. Place two slices of lemon over each fish filet then wrap the foil tightly over the fish and asparagus to create an air tight packet.

Place the foil packets on the grill, close the grill lid and cook for 15 minutes. Carefully remove the packets from the grill using a large spatula and equally carefully unwrap the foil packets.

Dish can be served right in the foil packets or transferred to a plate for a low carb meal. We served ours with basmati rice.

Makes two servings.

Lobster Mac and Cheese for Two

When I go through the trouble of making lobsters for dinner, I always make an extra one for leftover lobster recipes later. One of my favorite, most decadent, way to use cooked leftover lobster is to make lobster mac and cheese. It’s luxurious, delicious and a perfect food.

I’ve taken my usual large batch lobster mac and cheese recipe and recreated it for two people. I bake the pasta in individual, perfect-sized, baking dish.

Note that this could also be made using cooked shrimp or no seafood at all.

Topping Ingredients:

  • 1 Tbsp. butter
  • 2 Tbsp. Panko breadcrumbs (could also use standard breadcrumbs but the topping will be less crunchy)
  • Pinch of cayenne pepper

Pasta Ingredients:

  • Meat of one cooked 1 ¼ – 1 ½ pounds lobster
  • 4 Tbsp. butter, divided
  • 2 Tbsp. all-purpose flour
  • Big pinch each, salt and pepper
  • ½ cup heavy cream
  • 1 ½ cups whole milk
  • 1 ½ cups extra sharp Cheddar cheese, freshly grated
  • ½ cup grated Parmesan cheese
  • ½ pound elbow macaroni, or other tubular pasta, cooked 2 minutes less than recommended in package directions, drained

Topping Directions:

  1. Microwave the butter until melted and bubbly, add the Panko and cayenne and combine well. Set aside.

Pasta Directions:

  • Preheat oven to 400 degrees.
  • In a small saucepan over medium-low heat, melt 2 tablespoons of butter then and add the lobster meat. Warm for 2-3 minutes, tossing the lobster in the butter to coat and warm evenly. Set aside.
  • Place the remaining 2 tablespoons of butter in a medium saucepan over medium heat and allow to melt. Add the flour and cook for 2 minutes, whisking constantly to create a roux. Season with salt and pepper.
  • Stir the heavy cream and the milk into the butter/flour roux and bring to a simmer. Cook the sauce for 2-3 minutes, whisking often, until thick and bubbly.
  • Slowly add the cheeses, a handful at a time, and stir until fully incorporated, about 2 minutes.
  • Add the cooked pasta to the cheese sauce and mix well.
  • Gently fold in the lobster meat and the butter it was cooked in (why not?).
  • Add cheesy pasta to two individual baking dishes (could use one larger baking dish).
  • Sprinkle with the Panko mixture and bake pasta for 15 minutes until panko mixture has lightly browned. Serve at once.

Makes 2 servings.

Chocolate Chip and Walnut Pie

If you’ve followed this blog or my social media posts for a while, you’ll know I’m a huge fan of pies. From berry to citrusy to chocolatey pies, I like them all (not pumpkin, never pumpkin).

This pie, originally published by Nestle Toll House, is pretty amazing as it combines chewy, fudgy chocolate chip cookie texture inside a buttery, flaky crust. I used classic walnuts in this but please use whatever nuts you like. Pecans or macadamia would be particularly awesome.

If the thought of making your own pie crust stops you from trying this recipe, simply use a store-bought pie shell.

Ingredients:  

  • 2 large eggs
  • ½ cup all-purpose flour
  • ½ cup granulated sugar
  • ½ cup packed brown sugar
  • 1 ½ sticks butter, softened
  • 1 cup semi-sweet chocolate chips
  • 1 cup chopped walnuts (could use other unsalted nuts)
  • 9” deep-dish pie shell, unbaked (use this homemade fail-proof crust recipe or use store-bought)
  • Good quality vanilla ice cream (optional but recommended)

Directions:

  • Preheat oven to 325 degrees F.
  • In the bowl of an electric mixer, beat the eggs of medium-high speed until light and fluffy, about 2 minutes.
  • Add the flour, granulated sugar, brown sugar and the softened butter and beat to fully incorporate into the egg mixture.
  • Add the chips and walnuts and blend to just combine.
  • Add the mixture to the unbaked pie shell.
  • Bake the pie for 55 to 60 minutes or until toothpick inserted in the center of the pie comes out clean. Cool on wire rack.
  • Serve warm with ice cream (if using).

Pie serves 6-8.

Simple Berry Cobbler in a Cast Iron Pan

Simple Berry Cobbler in a Cast Iron Pan

I’m obsessed with desserts that feature berries. That’s been true since I was a kid as my family loves to pick fresh berries.

Last weekend, I have a bunch of week-old berries (yes, my guy over-bought again!) so I decided to turn them into a cobbler that I baked right in my cast iron pan for a no fuss dessert.

Note that I simply doubled my Very Berry Cobbler recipe for this and it’s easy-to-make and delicious. Even better topped with good quality vanilla ice cream while the cobbler is still warm.

Filling Ingredients:

  • 2-3 pints (5-6 cups) mixed berries (I used blackberries, blueberries and raspberries)
  • 2/3 cup granulated sugar
  • 2 Tbsp. freshly-squeezed lemon juice
  • 2 Tbsp. cornstarch

Crust Ingredients:

  • 2 cups all-purpose flour
  • ½ cup granulated sugar, divided
  • 4 tsp. baking powder
  • 1 tsp. salt
  • 6 Tbsp. cold butter, cut into small pieces
  • 1 cup milk
  • 2 large egg
  • 1 tsp. ground cinnamon (optional)

Directions:

  1. Preheat oven to 375F.  Coat 10 or 12-inch cast iron pan (or other baking dish) with cooking spray or softened butter.
  2. Combine berries, 2/3 cup sugar, lemon juice and cornstarch in a medium bowl. Spoon into the prepared pan.
  3. Stir together the flour, ½ cup less 2 Tbsp. sugar, baking powder and salt in a medium bowl.  Cut in the butter with a pastry cutter, or two knives, until mixture resembles coarse meal.
  4. In a small bowl, whisk the milk and eggs. Add the egg mixture into the flour mixture and combine until just blended – do not overmix.
  5. Drop batter by tablespoonfuls over the berry mixture.
  6. Mix cinnamon (if using) and remaining 2 Tbsp. sugar in a small bowl. Sprinkle sugar mixture over the batter.
  7. Bake for 40 minutes or until golden brown. Serve with vanilla ice cream or whipped cream.

Makes 6-8 servings.

Classic Gin Gimlet

Classic Gin Gimlet

I love cocktails with big lime flavors and the classic gin gimlet is one of my favorites. It couldn’t be simpler to make:

Ingredients:

2 ounce good quality Gin, I used Aviation

1 ounce fresh lime juice

1 ounce simple syrup

Lime peel (optional)

Directions:

Add ice to a cocktail shaker then all the ingredients. Shake well/hard for 15 seconds, then pour in a cute glass over ice then add a lime peel, if using.

Makes 1 cocktail.

Blueberry Pie Bars

Last week I totally overbought in terms of berries and had a ton of blueberries on hand that were becoming less fresh by the day. I love blueberry pie and frequently make this Crumb Top Blueberry Pie and it’s admittedly pretty perfect.

I found this recipe on Pinterest and thought it’d be a bit different from the typical pies I make…and it was easy! It’s simple to make and turned out amazing with a crust similar to shortbread, a filing that’s blueberry-packed and nice crunch on the top from the set aside crust crumbles saved for the topping.

The bars bake in an 11×7 dish, so it’s not a huge amount like you’d get from a 13×9 dish, which is nice when there’s only two of you at home.

These blueberry pie bars would be awesome as a hostess gift or to bring to a potluck. Delish!

Cheers,

Veronique

Dutch Oven No Knead Bread

Dutch Oven No Knead Bread

I’ve been meaning to try out one of the gazillion no-knead bread recipes on Pinterest since I’ve been on reduced work hours and home with no work trips and finally gave it a go last weekend.

I started the dough the afternoon before I was going to bake since the rising time is sooooo long, 8-18 hours.

When I woke up the morning I was going to bake, I couldn’t wait to see what was happening under the plastic wrap. Like magic, my dough had risen and was literally alive! I punched it down and plopped it on a floured piece of parchment paper and molded it into a ball with floured hands.

Dough Fermenting

As indictated in the recipe directions, I’d placed my Dutch oven in the oven for 30 minutes then removed it and carefully lifted my dough using the corners of the piece of parchment and placed it in the Dutch oven with the cover on.

Dough Right Before Going Into the Oven

The aroma of bread baking is like no other and this was no exception. I followed the recipe and baked my bread for 45 minutes with the lid on then 15 minutes with the lid off. Next time I make it, I might add two-three minutes to the with-lid cooking time as the bread was moist inside (which I love), but might be even better with a bit more time in the oven.

The exterior was perfectly crusty and the inside nice and chewy and fantastic. I highly-recommend this recipe by RED STAR YEAST.

Cheers, Veronique

DoubleTree Signature Cookie Recipe

Social media went crazy when, earlier this month, Hilton shared its DoubleTree cookie recipe. For those of us who often stay at DoubleTree by Hilton properties, it’s alway such a treat to receive a warm cookie at check-in time. I often wondered “what do they put in these cookies?” as they’re so so so tasty! There’s a texture thing that I thought might be coconut, but it’s in fact rolled oatmeal!

Here’s the link to the recipe and I’ve made a few observations:

300 degrees is lower a temperature than I’m used to baking at. My cookies baked in 25 minutes, so start checking the browning at 20-23 minutes, knowing it could take a few additional minutes.

I had pecans instead of walnuts so I used the pecans and the cookies were fantastic. Not the original receipe, but very delish.

I baked 4 cookies and froze the rest as dough balls that, according to the recipe, can be baked right from the freezer.

I like the idea of the lemon juice and will use it in all my cookie recipes going forward.

I ended up with 28 cookies…just couldn’t keep trying to resize them to get to the proposed 26 cookies.

These are amazing cookies!!

Veronique

Hearty Sausage and Orzo Soup

Hearty Sausage and Orzo Soup

We love soup at our home, and I try to make it most Sundays so we can have a bowl during the week. This past week, we’d bought a few packages of fresh hot Italian sausage to freeze, and before they went into the freezer, I grabbed a few links to put in my soup.

Typically, I’d add kale to this soup, but I had a ton of spinach, so I added that instead. Whatever you have on-hand would be perfect.

Ingredients:

  • ¼ cup vegetable oil
  • 4 hot Italian sausage links (could use mild also), taken out of the casings and broken up into bite size pieces
  • 1 medium onion, diced
  • 4 celery ribs, diced
  • 3 carrots, diced
  • 8-ounce package of fresh, chopped mushrooms
  • 1 tsp. each, salt, pepper, dry thyme
  • 48 ounces of chicken broth
  • 14-ounce can of pureed tomatoes
  • 5 ounces baby spinach
  • ½ cup dry orzo

Direction:

  1. Heat oil for 30 seconds over medium-high heat in a large, heavy saucepan. 
  2. Add the sausage and break up the pieces as the sausage cooks, about 5 minutes.
  3. Add the onion, celery and carrots to the pot, turn down the heat to medium and cook for 5 minutes, or until vegetables begin to soften, stirring frequently.
  4. Add the mushrooms and the seasonings and cook for 3 minutes, stirring occasionally.
  5. Add the broth and chopped tomatoes, lower the heat to medium-low, cover the pot partially and simmer for 45 minutes.
  6. Add the spinach and the orzo to the soup and cook for 10 minutes.

Makes 6 servings.