Going Formal for the Holidays

Going Formal for the Holidays

I love really dressing up my table around the holidays. If you’re thinking of pulling out grandma’s silver or unpacking those formal dishes you received at your wedding, here’s how the table should be set for a formal meal:

place-setting

Want a very VIP dinner menu for that special meal? Here’s one I love for the holidays:

Sweet Potato Gnocchi in Sage Brown Butter.

Simple & Festive Prime Rib.

Make-Ahead Twice Baked Potatoes.

Fail-Proof Yorkshire Puddings.

Elegant Key Lime Tart.

Enjoy!

Veronique

Pouding Chomeur in a Mug

Pouding Chomeur in a Mug

in-the-mugFor those of you not familiar with pouding chomeur (unemployed man’s pudding in French), it’s a majorly sweet, decadent, comforting and easy-to-make dessert that originated from Quebec.

Pouding chomeur is cakey on the surface and gooey, carameley on the bottom. It became popular in Quebec during the Great Depression and was typically made in a large baking dish to feed a ton of people using stale bread.

I was craving this delish dessert last night but didn’t want to make my usual large-format recipe, so I searched for a single-serve recipe and found one for a version made in a mug (what’s not to love about that). It came out perfect! I need to reiterate that it’s beyond sweet and really should be served with vanilla ice cream.

Ingredients:

  • 3 Tbsp. all-purpose flour
  • 1 Tbsp. brown sugar
  • ¼ tsp. baking powder
  • 1 pinch of salt
  • 1 Tbsp. butter, softened
  • 2 Tbsp. whole milk
  • 3 Tbsp. maple syrup
  • 1 Tbsp. water
Flour & Butter

Flour & Butter

Directions:

  1. In a 1 ½ cup mug, add the flour, brown sugar, baking powder and salt. Stir to combine with a fork. Add the butter and stir until the batter is crumbly. Add the milk and stir until mostly smooth.
  2. In a separate small bowl, combine the syrup and water. Pour over the batter in the mug.
  3. Place the mug on a plate, in case of spills, and microwave for 1 ½ minutes. Allow to cool 5 minutes before topping with a scoop of vanilla ice cream and eating.

Makes 1 servings.

Cheers,

Veronique

Adapted from this recipe.

Copycat Broccoli Cheddar Soup

Copycat Broccoli Cheddar Soup

Broccoli Cheese Soup

Broccoli Cheese Soup

As you know, if you’ve followed this blog for a while, I’m a huge fan of soups. I’ve been known to crank down the air conditioned in the summer to make soup make sense!

One of my favorite soups is broccoli and cheddar and I think that Panera has some of the best I’ve had. Luckily for me, Pinterest is full of Panera copycat recipes so I looked at a bunch and created this version which is pretty darn perfect.

Ingredients:

  • 4 Tbsp. butter, divided
  • 1/2 Spanish onion, chopped
  • ¼ cup all-purpose flour
  • 2 cups chicken broth, could use vegetable broth for meatless version
  • 2 cups half and half
  • 2 large bunches broccoli, cut/torn in small florets (gave me about 4 cups of small florets)
  • 2 carrots, julienned into small sticks or 4 ounces of a 10-ounce bag of shredded carrots (what I use)
  • ¼ tsp. ground nutmeg
  • ½ tsp. each salt and pepper
  • 8 ounces shredded sharp Cheddar cheese

Directions:

  1. In a heavy skillet over medium heat, cook the onion in a tablespoon of butter until softened, stirring occasionally, about 4 minutes. Set aside for later use.
  2. In a large saucepan over medium heat, melt the remaining butter then incorporate the flour. Cook, whisking often, for 5 minutes – this is called a roux.
  3. Add the broth and the half and half to the roux and whisk to fully combine. Simmer for 20 minutes, stirring often.
  4. Add the cooked onions, the broccoli and the carrots to the soup and cook for 25 minutes over low heat, partially covered.
  5. Add the nutmeg, salt, pepper and the cheddar. Stir until fully-combined then add half the soup to a blender. Purée for 2 minutes then return to the pot. The goal is to have a smooth soup with some florets intact. If you prefer a completely smooth soup – purée the whole thing, in batches.
  6. I add about a tablespoon of grated cheese on my as “garnish”.

Serves 6.


Broccoli Cheese Soup
Serves 6
Panera Broccoli Cheese Soup Copycat Recipe
Write a review
Print
Prep Time
15 min
Cook Time
45 min
Total Time
1 hr
Prep Time
15 min
Cook Time
45 min
Total Time
1 hr
Ingredients
  1. • 4 Tbsp. butter, divided
  2. • 1/2 Spanish onion, chopped
  3. • ¼ cup all-purpose flour
  4. • 2 cups chicken broth
  5. • 2 cups half and half
  6. • 2 large bunches broccoli, cut/torn in small florets (gave me about 4 cups of small florets)
  7. • 2 carrots, julienned into small sticks or 4 ounces of a 10-ounce bag of shredded carrots (what I use)
  8. • ¼ tsp. ground nutmeg
  9. • ½ tsp. each salt and pepper
  10. • 8 ounces shredded sharp Cheddar cheese
Instructions
  1. 1. In a heavy skillet over medium heat, cook the onion in a tablespoon of butter until softened, stirring occasionally, about 4 minutes. Set aside for later use.
  2. 2. In a large saucepan over medium heat, melt the remaining butter then incorporate the flour. Cook, whisking often, for 5 minutes – this is called a roux.
  3. 3. Add the broth and the half and half to the roux and whisk to fully combine. Simmer for 20 minutes, stirring often.
  4. 4. Add the cooked onions, the broccoli and the carrots to the soup and cook for 25 minutes over low heat, partially covered.
  5. 5. Add the nutmeg, salt, pepper and the cheddar. Stir until fully-combined then add half the soup to a blender. Purée for 2 minutes then return to the pot. The goal is to have a smooth soup with some florets intact. If you prefer a completely smooth soup – purée the whole thing, in batches.
  6. 6. I add about a tablespoon of grated cheese on my as “garnish”.
Food & Wine Chickie Insider https://www.foodandwinechickie.com/
Cheers,

Veronique

Carrot & Butternut Squash Bisque

Carrot & Butternut Squash Bisque

carrot-and-butternut-squash-bisqueSimmering soups on my stovetop on Sundays are back! This week, I had some carrots leftover and thought that could pair well with the butternut squash I’d just gotten at the market – orange on orange!

This soup is made with vegetable both but could be made with chicken broth also for a non-vegetarian version. Don’t worry about the size of the chop on your vegetables, all these ingredients, once cooked, will be put through the blender.

This soup would rock at your Thanksgiving table as it can’t be done the day prior, refrigerated then reheated on Turkey Day.

Ingredients:

  • 2 Tbsp. vegetable oil
  • 1 medium Spanish onion, chopped
  • 3 carrots, chopped
  • 1 medium butternut squash, chopped
  • 1 tsp. each salt & pepper
  • ½ tsp. dry sage
  • 4 cups vegetable broth
  • 2 bay leaves
  • ½ cup heavy cream, optional

Directions:

  1. In a heavy saucepan over medium-high heat, sauté the onion, carrots and squash for 15 minutes in the oil, stirring occasionally.
  2. Lower the heat to medium-low and add the seasonings, broth and bay leaves. Simmer, partially covered, for 45 minutes.
  3. Purée with an immersion blender until completely smooth, about 3 minutes. Alternatively, add the soup to a blender and puree until smooth, about 1 minute. Return the puréed soup to a clean saucepan and gently heat for 2 minutes.
  4. Add the cream, if using, and warm for 2 minutes.
  5. Serve in warm bowls with a teaspoon of cream, optional.

Serves 6 as a starter or 4 as a main course.

Baked Penne Parmesan

baked-pastaI love recipes that take me all of 10 minutes to prepare and that will serve a few meals during the week. This beyond-easy pasta dish is one of those recipes that I make on Sundays and portion for lunches during the week.

Ingredients:

Directions:

  1. Preheat oven to 400 degrees.
  2. Cook pasta 1 minute short of indicated on the packaging.
  3. Toss the drained pasta into the marinara sauce.
  4. Add the Mozzarella to the pasta and stir to distribute evenly.
  5. Pour the pasta into a medium baking dish.
  6. Top with the shaved cheese.
  7. Place the dish on a baking sheet to prevent oven drips and bake for 25 minutes.

Makes 2 generous entrée-size servings.

Note: I received a sample container of Sartori Cheese that I will now add to my grocery list.

Crustless Chipotle Cheesy Quiches

Crustless Chipotle Cheesy Quiches

cooked-quichesI’m one of the ambassadors for #FoodieChats, a Monday evening Twitter chat where we socialize with thousands of foodies about all things food! Every week, we welcome a sponsor who informs us, in a fun way, about its products or services. This week, Sartori Cheese is our sponsor, and eventhough I don’t do a lot of product reviews, when Sartori Cheese offered to send me a few of their cheeses, I accepted – who doesn’t love cheese!

My really tough task, was to come up with a recipe featuring the delish cheeses sent to me. REALLY tough…not! I actually came up with two recipes, and I’m sharing the first one below. It’s a quick dish you can make on Sundays that are fast to reheat in the microwave during those busy weekday mornings.

Ingredients:

Directions:

  1. Preheat the oven to 350 degrees.
  2. Coat 6 of the cups of a 12 muffin pan with cooking spray, be generous.
  3. In a medium mixing bowl (for easy pouring, I use an 8-cup measuring cup), whisk the eggs with the water, salt and pepper until fully blended, about 1 minute.
  4. Pour an equal amount of the egg mixture into the 6 muffin cups.
  5. Sprinkle the cheese equally over the egg mixture.
  6. Place the muffin pan on a sheet tray (in case of drips) and bake for about 20 minutes, or until the egg is no longer runny – the quiches will be puffy like a soufflé.
  7. Allow the quiches to cool in the pan for about 5 minutes then unmold and let cool completely.
  8. Store the quiches in an airtight container in the fridge until ready to use – up to a week.
  9. To reheat, place two quiches on a plate, cover with a paper towel and microwave for 60-90 seconds.

Makes 3 servings (2 quiches each).

About Sartori

Sartori, a fourth-generation family owned company, has proudly produced award-winning, artisan cheese for customers worldwide since 1939. Rooted in Plymouth, Wisconsin, Sartori’s emphasis on a high-quality and handcrafted approach to cheesemaking is a timeless family tradition. For more information, please visit www.sartoricheese.com.

Cheers,

Veronique

Get to Know Slawsa Plus Easy Latkes Recipe

Get to Know Slawsa Plus Easy Latkes Recipe

Slawsa Jars
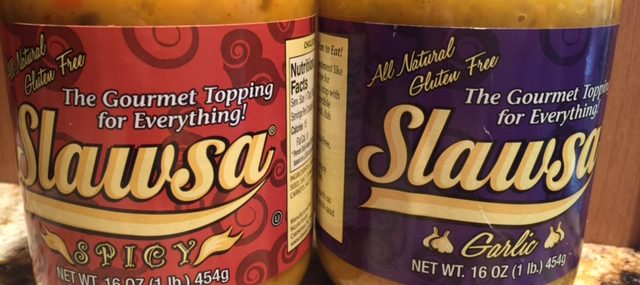
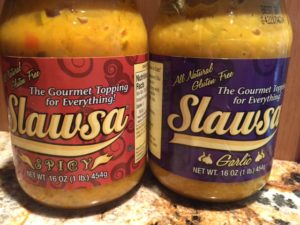
Last week, I was sent samples of a new product called Slawsa that I think are pretty fabulous so I’m sharing a bit about them and also sharing a recipe I made using the product.

About Slawsa

Slawsa breaks the mold of modern condiments and is meant to replace traditional ketchup, mustard, mayo or relish as a compliment to everyday foods.

Slawsa is a cabbage-based relish with a salsa twist. While it contains other vegetables, mustard and vinegar, the mustard and vinegar are not overwhelming, allowing it to be used in various ways.  It begins on the palate as sweet and transfers heat undertones that make it addictive atop grilling fare such as hot dogs, burgers or brats. Slawsa comes in Original, Spicy, Garlic and the new Fire.

The Flavors

Original – The classic, Slawsa Original starts a little sweet and finishes with a little heat that will quickly dissipate. The mustard and vinegar base is not overpowering and Slawsa retains a nice amount of crunch in every bite.

Spicy – The Spicy version isn’t “overly spicy” and more of a medium heat but does have a bit more kick to finish off the bite than the Original.

Fire – Slawsa Fire has a big kick of habanero and is truly for those who love the heat. But no, it’s not ghost pepper hot.

Garlic – The Garlic is truly for garlic lovers as it does have a bold garlic base.

Nutritional Facts

  • all-natural
  • fat-free
  • cholesterol-free
  • gluten-free
  • very low in sodium 
  • kosher
  • vegan

I tried the spicy and the garlic versions and both were unusual and delicious. I used both to create a mock latkes (typically a pan-fried potato pancake).

Easy Sauerkraut Latkes

Ingredients:

  • 1 cup Garlic Slawsa (could replace with sauerkraut)
  • 1 large egg
  • 1 tsp. all-purpose flour
  • ¼ tsp. each salt and pepper
  • ¼ cup vegetable oil, for frying
  • 4 tsp. Spicy Slawsa

Directions:

  1. Using a fine sieve, drain as much liquid from the Slawsa as possible. Place the drained Slawsa in a clean kitchen towel and wring as much of the remaining liquid as possible. Place the Slawsa in a small bowl and add the egg, flour and salt and pepper. Combine without over-mixing.
  2. In a heavy frying pan over high-heat, warm the oil for two minutes – pan should be sizzling hot.
  3. Drop the Slawsa mixture by the teaspoonful onto the oiled frying pan (should make 4 latkes) and cook for 2 minutes or until golden brown (see short video of this live action). Flip the latkes and cook an additional minute.
  4. Place on a double layer of paper towel to rid of excess oil and serve hot or at room temperature with the Spicy Slawsa.

Make 4 Latkes.

Slawsa is available for purchase online or at stores near you.

Cheers,

Veronique

Spuntino Grilled Peach and Burrata

Spuntino Grilled Peach and Burrata

Grilled Peach & Burrata_IMG_3303
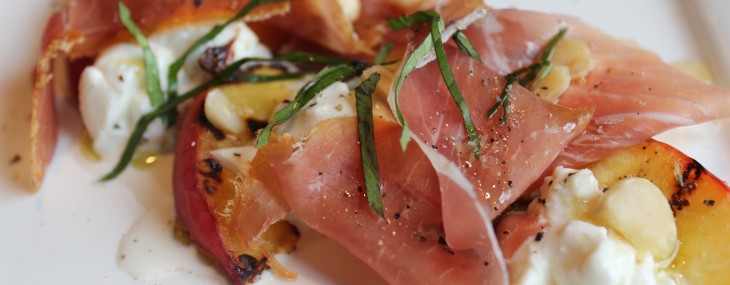
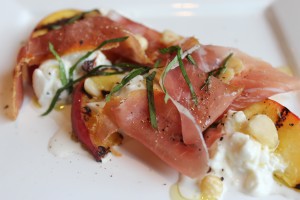
Spuntino Wine Bar & Italian Tapas celebrates National Peach Month with some outstanding food and drinks specials taking advantage of the peak of peach season. One of the specials Executive Chef Josh Bernstein is showcasing is Grilled Peach & Burrata – fresh local grilled peaches, local burrata, Prosciutto di Parma, hazelnuts, basil, honey with extra virgin olive oil. Grilling the peaches caramelizes the sugars in the fruit, deepening the sweetness, while the burrata provides a creamy base balanced with a bit of crunch from the hazelnuts on top. Basil and honey lend a complementary note the sweetness of the peach, rounding out the dish.  

Chef Bernstein shared his recipe with me, and I’m sharing it with you:

Ingredients

  • 1/2 peach, cut in 6 slices and grilled
  • 2 oz. burrata
  • 2 slices prosciutto
  • 1 tsp hazelnuts, toasted and chopped
  • 1 tsp honey
  • 1 tsp extra virgin olive oil
  • 1 tsp basil, chiffonade
  • 1/4 tsp Maldon sea salt
  • 1/4 tsp cracked black pepper

Method

  1. Arrange grilled peaches on a large square plate in a diagonal line.
  2. Spoon burrata on top and in between peaches. Drape prosciutto on top.
  3. Sprinkle chopped hazelnut on top of the burrata.
  4. Drizzle with honey and olive oil.
  5. Garnish with basil, Maldon salt and cracked black pepper.

If you prefer to visit Spuntino for this and other specials, the popular restaurant is located at: 70 Kingsland Road
Clifton, NJ 07014.

Cheers,

Veronique

Sugarpova Chocolate Mousse

Sugarpova Chocolate Mousse

Chocolate Mousse CupA few weeks ago, I was approached by a new chocolate line to create an exclusive recipe using its product. I don’t typically do product reviews, but I was intrigued since the new brand, Sugarpova Premium Chocolates, is by Maria Sharapova, the international tennis sensation, who is the company’s founder.

Sugarpova offers a decadent collection of 100g chocolate bars in Dark, Milk, Dark with Toasted Coconut and Milk with Strawberry. The unique product is non-GMO, Certified Kosher, Halal and made with natural ingredients. The bars have a suggested retail price of $3.99 to $4.99 and are available at www.sugarpova.com.

The samples I received were:

Sugarpova Bars

DARK CHOCOLATE COCONUT – “50% cocoa dark chocolate is made all the richer with the delightful addition of toasted coconut. A match made in heaven, you’re sure to fall in love with this tempting combination”.

MILK CHOCOLATE STRAWBERRY – “Is there anything better than chocolate dipped strawberries? Treat yourself to a taste of luxury anytime with the only bar that combines creamy milk chocolate with the flavor of fresh strawberries”.

70% COCOA DARK CHOCOLATE – “Kick back, relax, and indulge in the full-bodied flavor of 70% premium dark chocolate. Not too sweet, it engages all your senses with every perfect bite”.

MILK CHOCOLATE – “Take a break from the hustle and bustle with a smooth, creamy bite of premium milk chocolate. We won’t tell if it ends up being more than just one bite”.

I wanted to use as many of the bars as I could in my recipe, but since I’m not a coconut fan, I skipped using that one. I thought of doing a mousse as soon as I saw the chocolate/strawberry bar – what a great compliment in flavors! I combined the strawberry bar with the milk chocolate one in the mousse and topped each serving with a healthy grating of the dark chocolate. I plated a couple different ways to showcase the mousse in various portion sizes and appearance.

Ingredients:

  • 1 100g Sugarpova Milk Chocolate bar and 1 100g Sugarpova Milk Chocolate Strawberry bar, chopped into small pieces (could also use 200g semisweet chocolate chips)
  • 1/3 cup plus 1 Tbsp. granulated sugar, divided
  • 2 cups heavy cream
  • 4 large egg yolks
  • 1-ounce piece of Sugarpova Dark Chocolate, optional

Directions:

  1. Place the chopped chocolate in a microwave-safe bowl and microwave on medium power for 30 seconds. Stir and continue to cook for another 30 seconds. Allow to cool while proceeding with the following steps.
  2. In the bowl of an electric mixer, add the tablespoon of sugar to the cream. Beat for 2-3 minutes or until soft peaks form. Set aside.
  3. In a metal or heat-resistant glass bowl placed over a saucepan of barely simmering water, combine the remaining sugar and the egg yolks. Whisk the mixture for 3 minutes until smooth, fluffy and doubled in volume.
  4. Using a rubber spatula, combine the melted and cooled chocolate with the yolk mixture until no eggy streaks are left.
  5. Gently fold half the whipped cream into the chocolate mixture. Once fully combined, add the remaining whipped cream and again, gently fold in. Don’t overmix, you want this light and fluffy – a few darker chocolate streaks are okay.
  6. Pipe or spoon the mousse into single-serving size dishes or glasses and refrigerate until set, at least 2 hours. The mixture will feel a bit runny but that’s okay, the mousse will stiffen after chilling.
  7. Grate the dark chocolate over the individual mousse cups and serve.

About Sugarpova: Sugarpova continues to have double-digit growth year after year since its launch. Currently, the brand has retail penetration in 22 countries all over the world and is sold in a variety of retail partners and online. The founder and international tennis sensation is Maria Sharapova, whose sweet tooth and love for little indulgences, motivated her to create a candy company specializing in gummies and sweets of quality and craftsmanship. For more information, visit http://www.sugarpova.com.

Cheers,

Veronique

Quick and Easy Pesto

Quick and Easy Pesto

Jarred Pesto
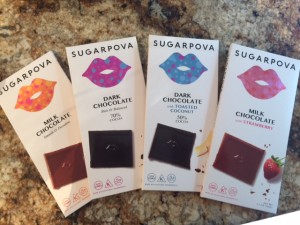
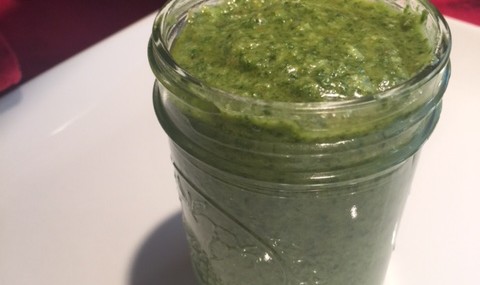
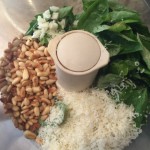
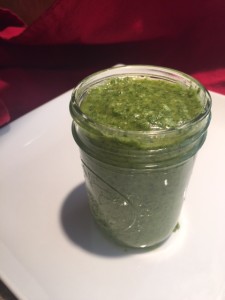
Every spring, I plant basil in my garden as it’s one of my favorite fresh herbs. By mid-summer, I have so much basil that I wonder why I planted so much for a 2-person household. Every summer is the same “why did I plant so much again”.

Luckily, there’s pesto. Yesterday, I picked a whole bunch of basil leaves and made thick, luscious pesto that I’ll toss with gnocchi tonight and freeze in ice cube trays for future use.

This recipe yields about a cup of pesto, but it can easily be doubled if you have tons of basil, like I do.

It’s perfect tossed with pasta, spread on sandwiches or used as a topping for grilled/roasted chicken or fish.

Ingredients

  • 1/3 cup, pine nuts (could use cashews or slivered almonds)
  • 4 cups fresh basil leaves, cleaned, dried and slightly packed
  • ⅓ cup freshly-grated Parmesan cheese
  • 2 garlic cloves, finely chopped
  • 2 tsp. freshly-squeezed lemon juice
  • Zest of half a lemon
  • 2 teaspoons lemon juice
  • ¼ tsp. red pepper flakes, optional
  • ½ cup high-quality olive oil

Instructions

  1. In a small skillet over medium heat, toast the pine nuts for 2-3 minutes until golden brown. Carefully watch this process and shake the skillet periodically to ensure the nuts don’t burn.
  2. In a food processor (could use a blender), add the remaining ingredients, including the nuts, except the oil. Pulse for about a minute then run for about 30 seconds until the ingredients are finely incorporated.
  3. With the food processor running, stream the oil into the pesto until fully emulsified, about 30 seconds. Taste the pesto and add more Parmesan cheese if you want a cheesier pesto.
  4. I store the pesto I’m going to use within a week in a canning jar in the fridge. For anything over a week, I place the pesto in ice cube trays, freeze fully then pop out of the trays, place in zip top bags and freeze for up to a couple months.