Quebec Old Fashioned Doughnuts         

Quebec Old Fashioned Doughnuts         

Growing up in Quebec, many families had their traditional recipes for homemade doughnuts that they would make primarily around the holidays. Some families, especially the large ones, made doughnuts year around as they freeze well placed into freezer bags and can be thawed for impromptu visitors (or just because).

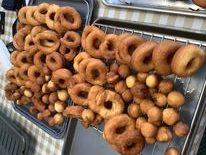
My mom made this giant batch of doughnuts today and I just had to share the yield she gets from that one recipe. These Quebec-style doughnuts, also called croquignoles, are cake like inside and perfectly crunchy from a quick dip in the fryer. The traditional method is to serve these plain or coated in granulated sugar, but the sky’s the limit with the various toppings to add – they’re a delicious blank canvas.

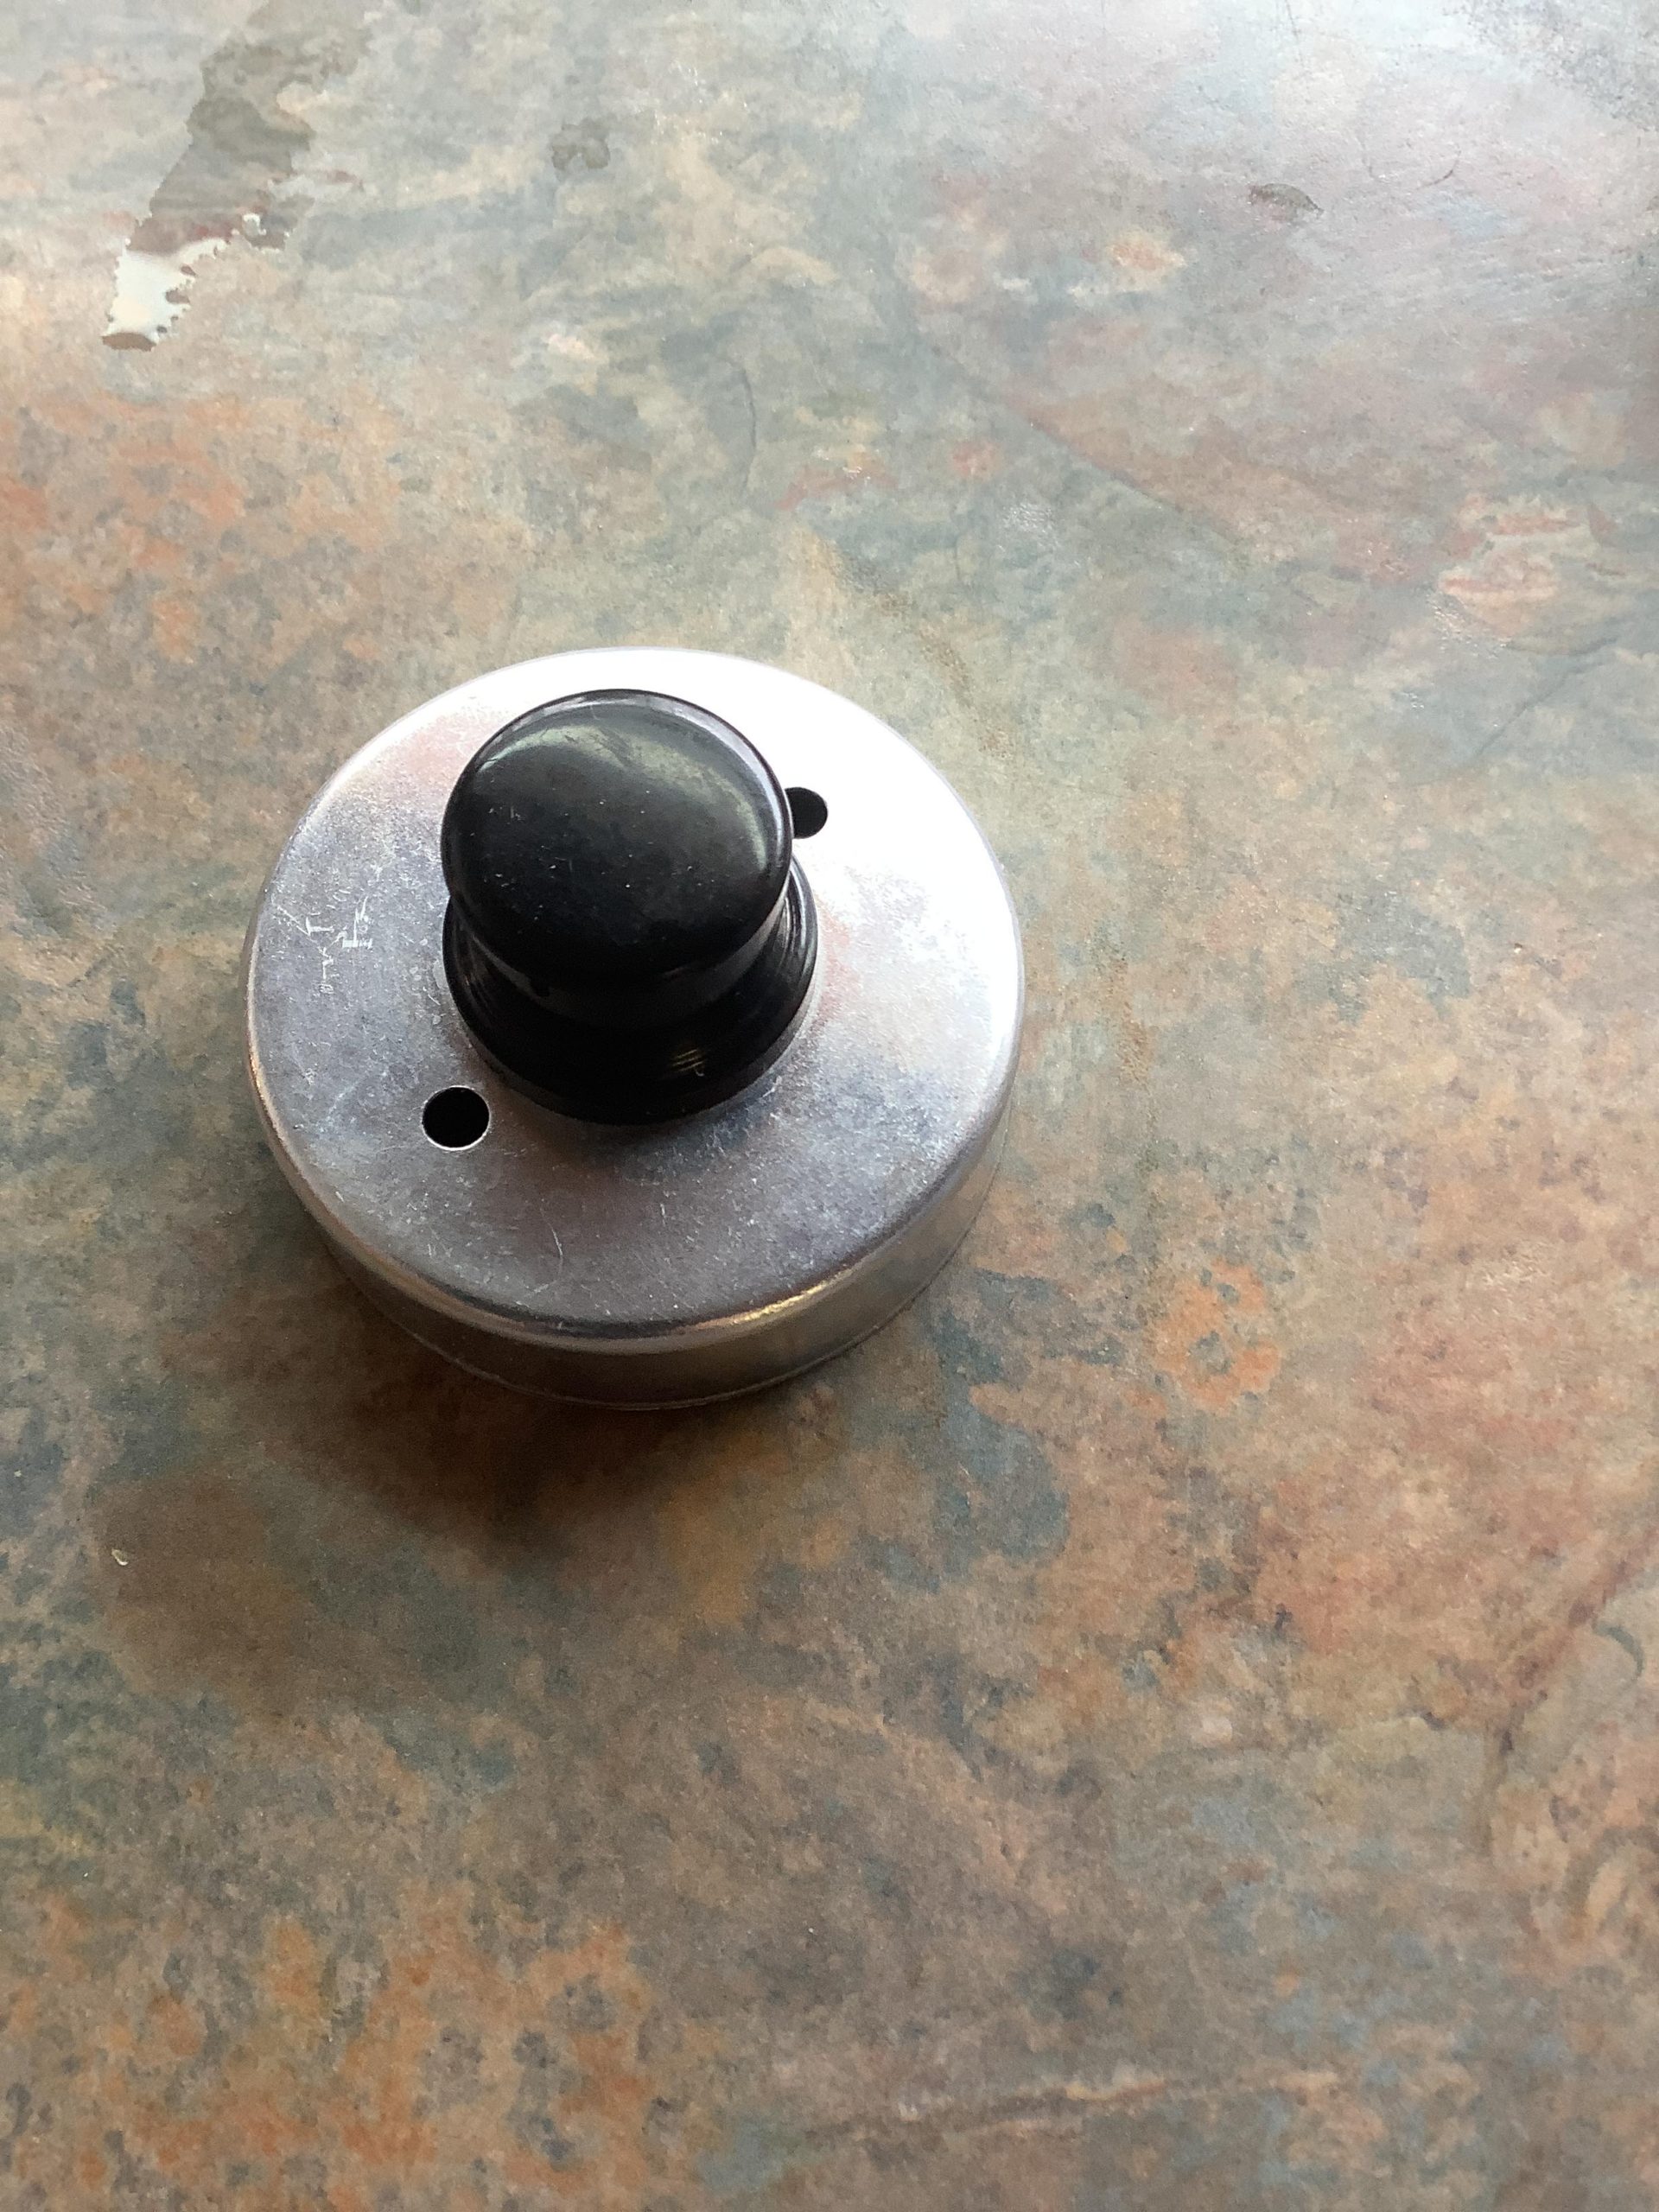
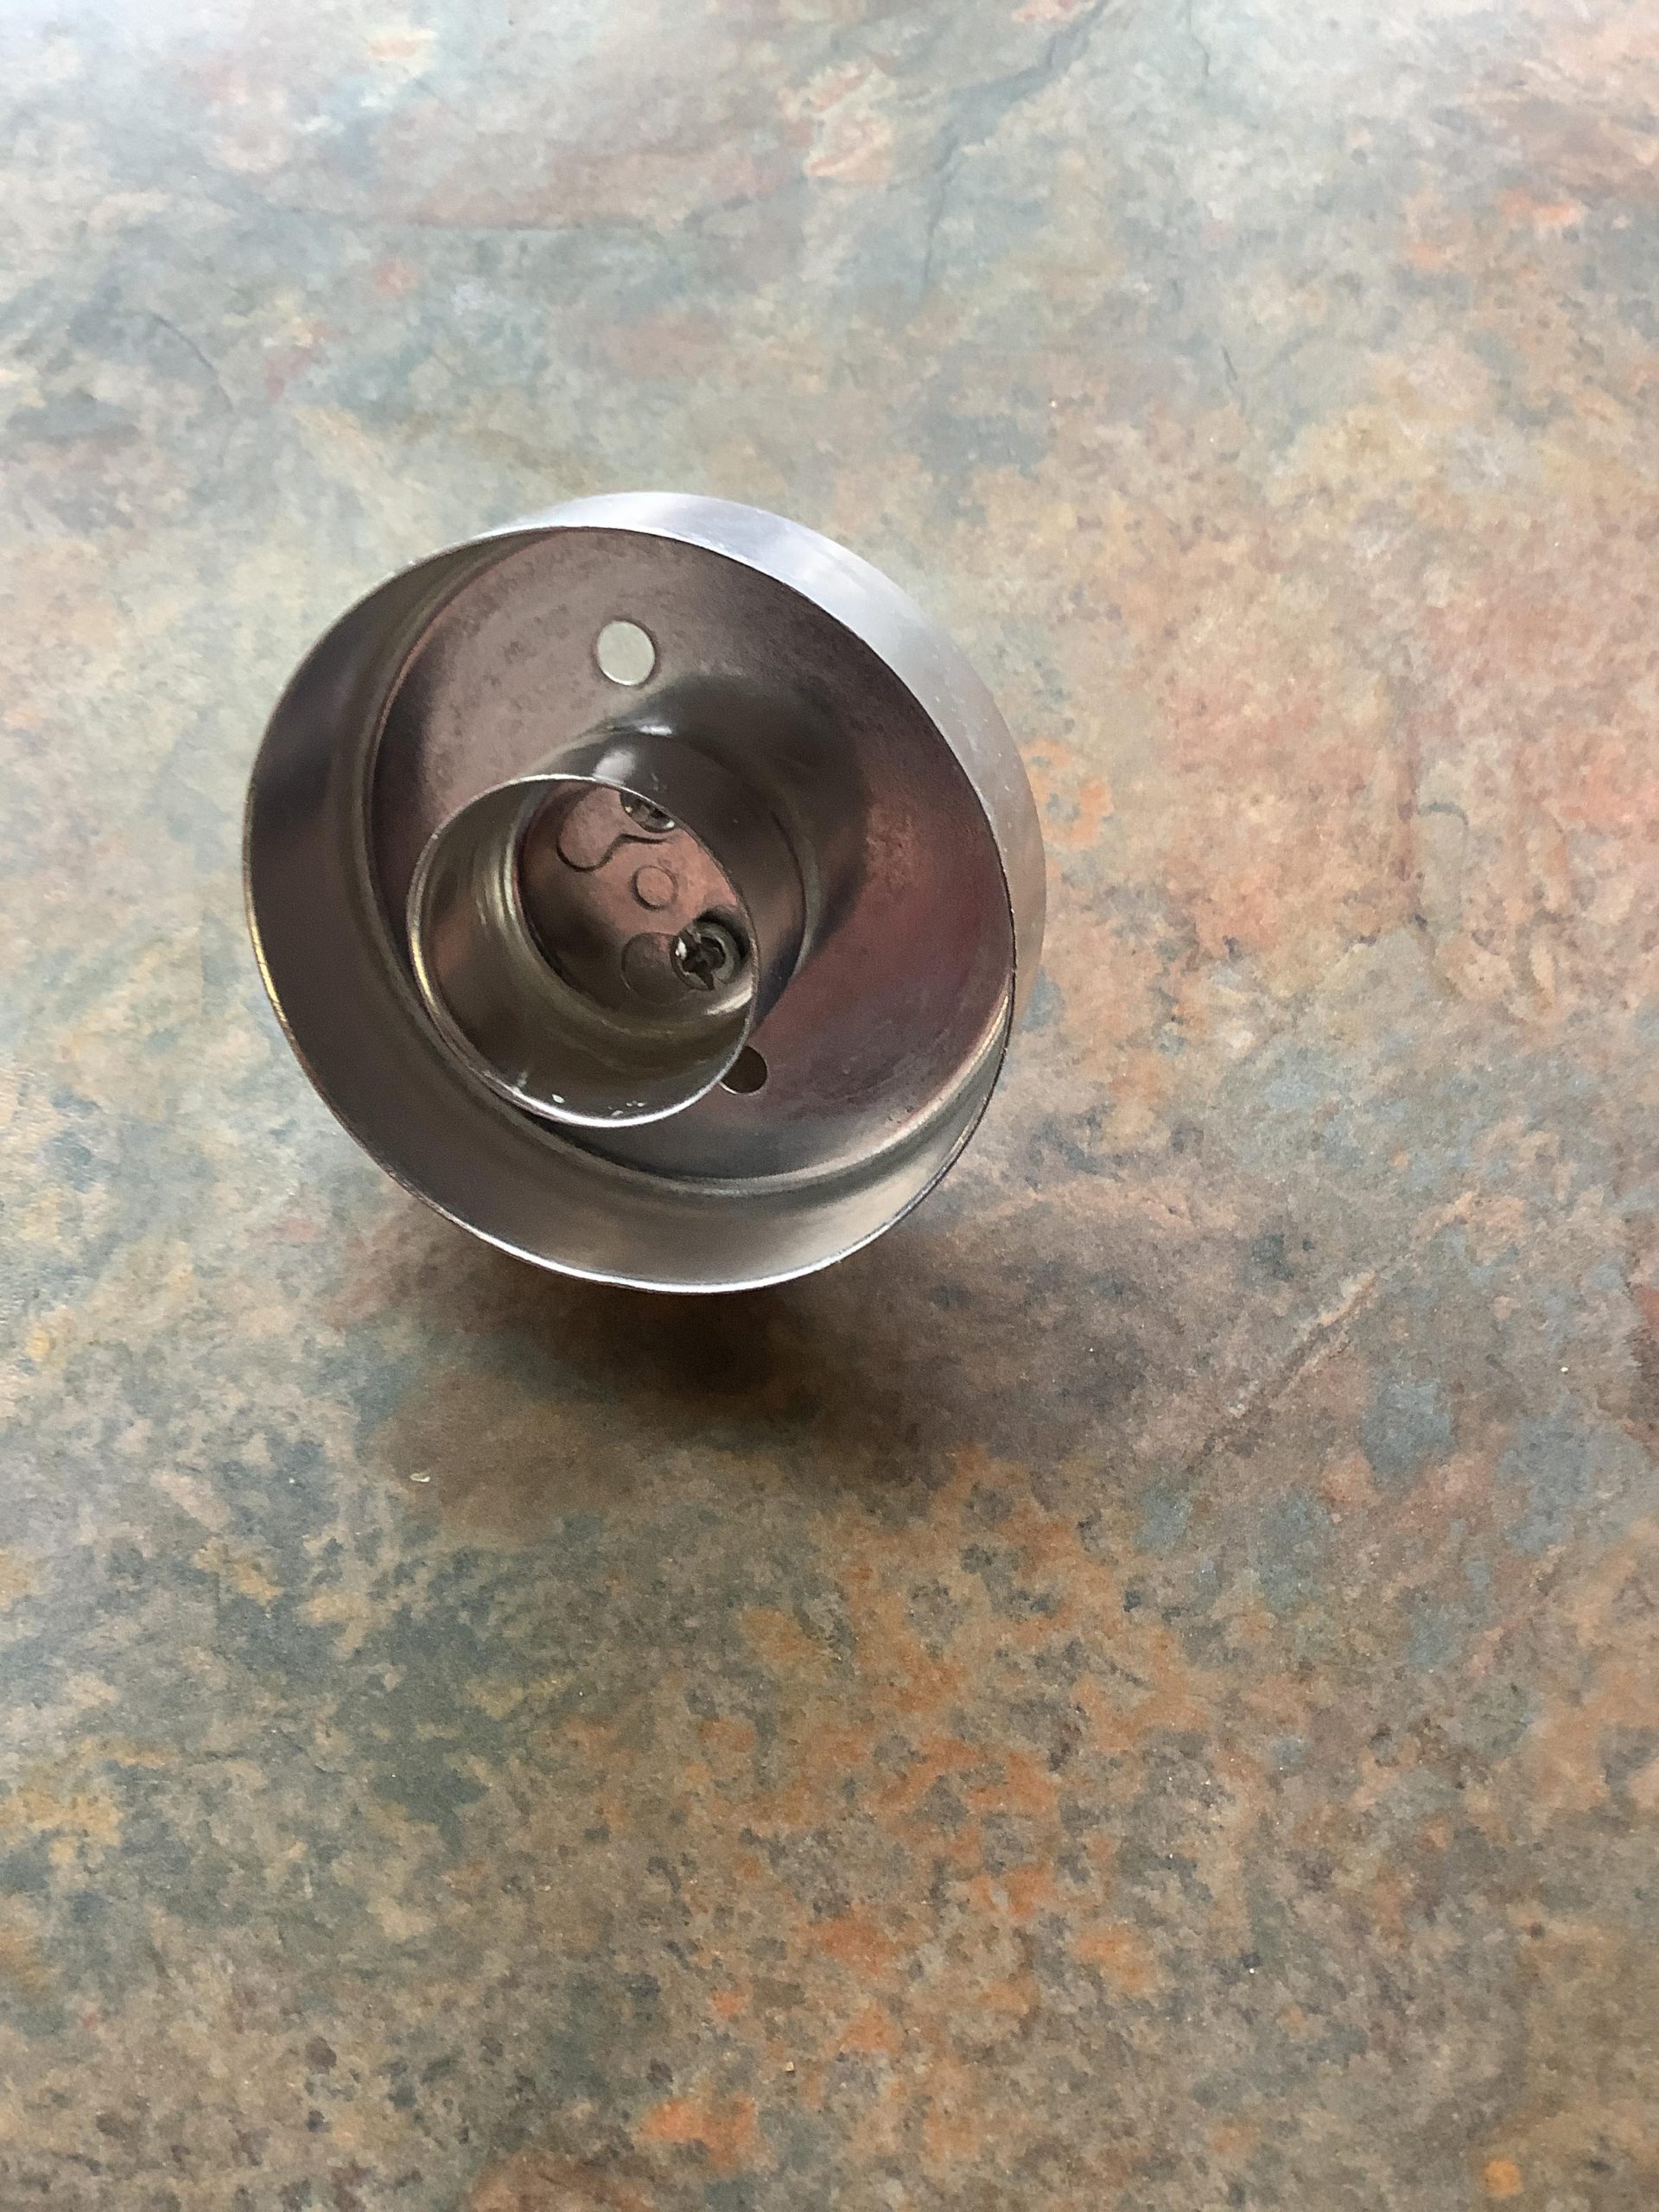
Check out my mom’s doughnut cutter. The benefit of using this type of cutter is that you also get doughnut holes that you can fry to deliciousness. A 4” in diameter glass would also work, but I’d recommend using a smaller cutter to cut a hole in each doughnut.

Ingredients:

  • 5 large eggs
  • 4 cups granulated sugar
  • 4 cups whole milk combined with 1 tsp. baking soda
  • ¼ Tbsp. salt
  • ½ tsp. vanilla extract
  • 10 cups of all-purpose flour combined with 8 tsp. baking powder (plus extra flour for rolling the dough)
  • ½ cup melted butter
  • Crisco or oil for frying
This is What This Recipe Yields

Directions the day prior to making the doughnuts:

  1. In the bowl of an electric mixer, beat the eggs and the sugar until light and fluffy, about 1 minute.
  2. Add the milk mixture, the salt and the vanilla and beat until combined, 30 seconds.
  3. Add the flour mixture, 2 cups at a time, until fully incorporated – don’t overmix.
  4. Add the butter and blend into the dough until fully incorporated.
  5. Cover the dough with cling wrap and refrigerate overnight.
Mom and Her Doughnuts

Directions for frying day:

  1. After the dough’s rested overnight, heavily dust a work surface with all-purpose flour. The dough will be quite sticky, so don’t be shy with the flour dusting.
  2. Divide the dough into 2 batches and place one portion onto the floured work surface. Knead the dough until it’s mostly no longer sticky – don’t over-knead as that’ll create tough doughnuts.
  3. Roll the kneaded dough using a rolling pin to about ½ inch in thickness for bigger doughnuts or ¼ inch in thickness for smaller doughnuts.
  4. Using a doughnut cutter (or a glass 4” in diameter), cut doughnuts out of the dough and place them on a wire rack until ready to fry. Repeat with the second portion of dough.
  5. Fill a large deep skillet or pan 1/3 of the way full of either Crisco or vegetable oil. Bring the oil to 375 degrees over medium-high heat.   
  6. Fry the doughnuts in batches so there’s no crowding in the pan. Bring the oil back up to temperature between each batch. Place the fried doughnuts on layers of paper towels to drain, then move to a wire rack to cool.

Yields about 10 dozen doughnuts.

Lemon Cake with Lemon Buttercream and Creamy Lemon Sauce

My mom’s become quite the food photographer over the years. She’s a great cook and baker and often shares details of her culinary experiments with me and sometimes, I even get pics!

Last week, she had many lemons on hand and fixed a lemon cake with a creamy lemon sauce that sounded so great I’ve decided to share it, along with two of her photos!

Ingredients

Cake:

  • 2 cups all purpose flour
  • 1 ½ tsp. baking powder
  • Pinch of salt
  • Zest of three lemons (reserve 1 tsp. for the buttercream and 1 tsp. for the sauce)
  • 1 ½ cups granulated sugar
  • 1 cup plain yogurt
  • ¼ cup melted butter
  • ¼ cup freshly-squeezed lemon juice
  • 2 eggs
  • ½ tsp. baking soda

Lemon Buttercream:

  • 1 cup butter, softened
  • 5 cups powdered sugar
  • ¼ cup freshly-squeezed lemon juice
  • Reserved 1 tsp. of zest

Creamy Lemon Sauce:

  • 1 cup plain yogurt
  • 2 Tbsp. granulated sugar
  • Reserved 1 tsp. of zest
  • 2 cups fresh berries (optional)

Directions:

For the Cake:

  1. Preheat oven to 350F degrees.
  2. Butter, or coat with cooking spray, an 8”x8” cake pan.
  3. In a small bowl, combine the flour, baking powder, salt and the zest.
  4. In the bowl of an electric mixer, beat the sugar, yogurt, butter, lemon juice and the eggs until just combined. Add the baking soda and mix to incorporate.
  5. Using a large spoon, add the flour mixture to the batter, one spoon at a time, until just combined – don’t overmix! Pour the batter in the prepared pan and bake for 40 minutes or until a toothpick inserted in the cake comes out clean.
  6. Allow to cool in the pan for 15 minutes then unmold and allow to cool completely.

For the Lemon Buttercream:

  1. In the bowl of an electric mixer, cream the butter until light and fluffy, about 2 minutes.
  2. Add the lemon juice and beat for 30 seconds.
  3. One cup at a time, add the powdered sugar until fully incorporated.
  4. Add the zest and beat 30 additional seconds.

For the Creamy Lemon Sauce:

  1. In a small bowl, mix the yogurt, the sugar and the teaspoon lemon zest.

Frost the cake with the lemon buttercream, drizzle with the creamy lemon sauce and serve with berries.

Yields 6 Servings.

Maple Blondies with Maple Icing

Maple Blondies with Maple Icing

I’ve never been much of a Blondies girl – there, I’ve said it. I love chocolate and it seems senseless to make brownies without chocolate. Well, that WAS my mindset until I baked these MAPLE blondies. As a Canadian, maple is queen and tops even chocolate in baked goods, in my humble opinion. I then took this dessert over the top by adding MAPLE icing which gets a bit crackly when it cools and is fabulous – maple2 if you will.

This recipe comes together very easily and I used THIS RECIPE for the Blondies that I found on Pinterest (are we friends there yet?) and created a quick maple icing that I drizzled on while the Blondies were still warm. I’ve frosted cookies with this icing in the past, but on MAPLE Blondies, it’s amazing.

In terms of baking time for the Blondies, less is more. It indicates to bake 30-35 minutes in the recipe, and I went 32 minutes and next time, I’d go 29-30 minutes to get an even chewier texture. I know my oven runs a bit hot too, so test with a toothpick after 29-30 to see how you’re doing with doneness.

Blondies right out of the oven
Making the icing
The finished icing – smells incredible!

Blondies Recipe

Maple Icing Ingredients:

  • 2 Tbsp. butter
  • 1/3 cup pure maple syrup, ideally from Quebec!
  • 1 cup powdered sugar, sifted
  • ¼ tsp. sea salt

Maple Icing Directions:

  1. Allow Blondies to cool for 10 minutes while making the icing.
  2. Over medium-low heat in a small saucepan, melt the butter, add the maple syrup, and stir to combine. Turn the heat off.
  3. Add the powdered sugar and the salt and stir until fully incorporated with no lumps remaining.
  4. Drizzle over the blondies (I placed the hot icing in a zip top bag and cut a small corner and used the bag as a pastry bag – this is optional!) and allow to set for 15 minutes.

Yields 12 Blondies.

Mom’s Strawberry Muffins

Mom’s Strawberry Muffins

My mom, who lives in Quebec, Canada, is so cute. Over the years, she’s learned that I need to see photos of the food she cooks. No photos…it didn’t happen!

Today, she baked strawberry muffins that she made using fresh strawberries she’d frozen last summer for such a recipe. I had her take three different photos of the muffins and she complied and now I can share the recipe and her images with you.

This easy muffin recipe can also be made using raspberries, blackberries or blueberries.

Fresh out of the oven!

Ingredients:

  • 2 1/3 cups all-purpose flour
  • ¾ cup granulated sugar
  • ¼ cup brown sugar
  • 2 ½ tsp. baking powder
  • 1 cup strawberries, either fresh or frozen then thawed, diced into small pieces
  • 1 cup milk
  • 1/3 cup vanilla yogurt
  • 1 large egg, beaten
  • 1 tsp. pure vanilla extract
Just want to cut into it!
Look at the juicy strawberries!

Directions:

  1. Preheat oven to 400 degrees.
  2. Either coat in cooking spray a 12-muffin tin or add paper liners.
  3. In a medium bowl, combine the flour, sugars and the baking powder. Carefully add the strawberry pieces and set aside.
  4. In a separate medium bowl, whisk together the milk, yogurt, egg and vanilla extract.
  5. Pour the liquid mixture over the dry ingredients and carefully incorporate with a spatula or wooden spoon – don’t overmix!
  6. Fill the muffin cups until about 2/3 full and bake until the muffin tops are golden brown and no longer wet on the inside when a wooden toothpick is inserted, about 20 minutes.
  7. Allow to cool 10 minutes before unmolding (if not using the paper liners).

Yields 12 muffins.

Tres Leches Cake

Tres Leches Cake

I picked up some groceries at Whole Foods a few weeks back, and while I don’t typically buy store-made dessert, I peeked a slice of Tres Leches Cake that I had to have. It was absolutely fabulous, so kudos to WF for this treat I hadn’t had in many years.

If you’re not familiar with Tres Leches Cake, it’s a vanilla/white cake popular in Mexico that is soaked in three kinds of milk (tres leches) then frosted in whipped cream. Typically, cinnamon is sprinkled over the cream, but since I don’t like cinnamon (yeah, I know), I dusted some good quality cocoa power on it for the ‘right’ look.

Cake Baking

The recipe I used came out just perfect and wasn’t too sweet, which is sometimes the case with this cake. Another issue I’ve seen with this cake over the years was that some versions use way too much milks which can cause it to collapse. This was NOT the case here.

Baked Cake

Here’s a link to the recipe by Sabrina of Dinner Then Dessert. Next time I make this fabulous dessert, I’ll add a couple more spoons of powdered sugar to the whipped cream.

Three Milks for Soaking

Regarding the 4 cups of whipped cream listed in the recipe. That’s 4 cups of whipped cream made from 2 cups of heavy whipping cream. Just thought I’d clarify.

I’m not sure why I hadn’t made Tres Leches Cake in 30+ years but that won’t happen again as it’s a great dessert. You’ll see in the photos that I used a disposable pan and it’s because I brought this to a potluck where it was well-received.

Please comment if you try this recipe!

Veronique  

Vegan Fudge with Walnuts

Vegan Fudge with Walnuts

Yes, you read that recipe title correctly – VEGAN! My dear friend Sharon’s been living a vegan, unprocessed foods lifestyle for a while now and posts recipes of foods she’s reinventing as vegan that always look tasty and interesting. This past week, she posted a recipe I finally decided to try and post here as it’s perfect for the upcoming holidays – Vegan Fudge!

Photo Credit: Diane Biancamano

The recipe was created by amazing vegan chef/recipe creator/food blogger Dianne Wenz. Dianne and I ran in some of the same circles both being New Jersey food bloggers, before I relocated to Charlotte. Her popular food blog, Dianne’s Vegan Kitchen, is filled with fantastic recipes and tips for adopting and living a vegan lifestyle.

Two things attracted me to this recipe: 1) the fudge looks creamy and velvety 2) the recipe calls for homemade dairy-free condensed milk – WHAT!!?? If find all this intriguing and fantastic.

Photo Credit: Sharon Lewis

Here’s Dianne’s recipe for Vegan HOMEMADE VEGAN FUDGE (WITH DAIRY-FREE CONDENSED MILK). The recipe calls for walnuts, which I think are a must in fudge, but please skip if you don’t like them or if there are food allergies in your homes.

I cannot wait to make this for the holidays and hope you give it a try too!

Cheers,

Veronique

Chocolate Chip and Walnut Pie

If you’ve followed this blog or my social media posts for a while, you’ll know I’m a huge fan of pies. From berry to citrusy to chocolatey pies, I like them all (not pumpkin, never pumpkin).

This pie, originally published by Nestle Toll House, is pretty amazing as it combines chewy, fudgy chocolate chip cookie texture inside a buttery, flaky crust. I used classic walnuts in this but please use whatever nuts you like. Pecans or macadamia would be particularly awesome.

If the thought of making your own pie crust stops you from trying this recipe, simply use a store-bought pie shell.

Ingredients:  

  • 2 large eggs
  • ½ cup all-purpose flour
  • ½ cup granulated sugar
  • ½ cup packed brown sugar
  • 1 ½ sticks butter, softened
  • 1 cup semi-sweet chocolate chips
  • 1 cup chopped walnuts (could use other unsalted nuts)
  • 9” deep-dish pie shell, unbaked (use this homemade fail-proof crust recipe or use store-bought)
  • Good quality vanilla ice cream (optional but recommended)

Directions:

  • Preheat oven to 325 degrees F.
  • In the bowl of an electric mixer, beat the eggs of medium-high speed until light and fluffy, about 2 minutes.
  • Add the flour, granulated sugar, brown sugar and the softened butter and beat to fully incorporate into the egg mixture.
  • Add the chips and walnuts and blend to just combine.
  • Add the mixture to the unbaked pie shell.
  • Bake the pie for 55 to 60 minutes or until toothpick inserted in the center of the pie comes out clean. Cool on wire rack.
  • Serve warm with ice cream (if using).

Pie serves 6-8.

Simple Berry Cobbler in a Cast Iron Pan

Simple Berry Cobbler in a Cast Iron Pan

I’m obsessed with desserts that feature berries. That’s been true since I was a kid as my family loves to pick fresh berries.

Last weekend, I have a bunch of week-old berries (yes, my guy over-bought again!) so I decided to turn them into a cobbler that I baked right in my cast iron pan for a no fuss dessert.

Note that I simply doubled my Very Berry Cobbler recipe for this and it’s easy-to-make and delicious. Even better topped with good quality vanilla ice cream while the cobbler is still warm.

Filling Ingredients:

  • 2-3 pints (5-6 cups) mixed berries (I used blackberries, blueberries and raspberries)
  • 2/3 cup granulated sugar
  • 2 Tbsp. freshly-squeezed lemon juice
  • 2 Tbsp. cornstarch

Crust Ingredients:

  • 2 cups all-purpose flour
  • ½ cup granulated sugar, divided
  • 4 tsp. baking powder
  • 1 tsp. salt
  • 6 Tbsp. cold butter, cut into small pieces
  • 1 cup milk
  • 2 large egg
  • 1 tsp. ground cinnamon (optional)

Directions:

  1. Preheat oven to 375F.  Coat 10 or 12-inch cast iron pan (or other baking dish) with cooking spray or softened butter.
  2. Combine berries, 2/3 cup sugar, lemon juice and cornstarch in a medium bowl. Spoon into the prepared pan.
  3. Stir together the flour, ½ cup less 2 Tbsp. sugar, baking powder and salt in a medium bowl.  Cut in the butter with a pastry cutter, or two knives, until mixture resembles coarse meal.
  4. In a small bowl, whisk the milk and eggs. Add the egg mixture into the flour mixture and combine until just blended – do not overmix.
  5. Drop batter by tablespoonfuls over the berry mixture.
  6. Mix cinnamon (if using) and remaining 2 Tbsp. sugar in a small bowl. Sprinkle sugar mixture over the batter.
  7. Bake for 40 minutes or until golden brown. Serve with vanilla ice cream or whipped cream.

Makes 6-8 servings.

Blueberry Pie Bars

Last week I totally overbought in terms of berries and had a ton of blueberries on hand that were becoming less fresh by the day. I love blueberry pie and frequently make this Crumb Top Blueberry Pie and it’s admittedly pretty perfect.

I found this recipe on Pinterest and thought it’d be a bit different from the typical pies I make…and it was easy! It’s simple to make and turned out amazing with a crust similar to shortbread, a filing that’s blueberry-packed and nice crunch on the top from the set aside crust crumbles saved for the topping.

The bars bake in an 11×7 dish, so it’s not a huge amount like you’d get from a 13×9 dish, which is nice when there’s only two of you at home.

These blueberry pie bars would be awesome as a hostess gift or to bring to a potluck. Delish!

Cheers,

Veronique

DoubleTree Signature Cookie Recipe

Social media went crazy when, earlier this month, Hilton shared its DoubleTree cookie recipe. For those of us who often stay at DoubleTree by Hilton properties, it’s alway such a treat to receive a warm cookie at check-in time. I often wondered “what do they put in these cookies?” as they’re so so so tasty! There’s a texture thing that I thought might be coconut, but it’s in fact rolled oatmeal!

Here’s the link to the recipe and I’ve made a few observations:

300 degrees is lower a temperature than I’m used to baking at. My cookies baked in 25 minutes, so start checking the browning at 20-23 minutes, knowing it could take a few additional minutes.

I had pecans instead of walnuts so I used the pecans and the cookies were fantastic. Not the original receipe, but very delish.

I baked 4 cookies and froze the rest as dough balls that, according to the recipe, can be baked right from the freezer.

I like the idea of the lemon juice and will use it in all my cookie recipes going forward.

I ended up with 28 cookies…just couldn’t keep trying to resize them to get to the proposed 26 cookies.

These are amazing cookies!!

Veronique