Two Cheese Baked Macaroni

Two Cheese Baked Macaroni

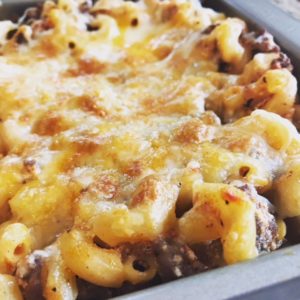
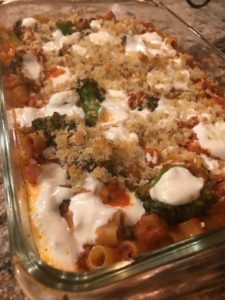
I love making big batches of marinara sauce and freezing some for easy weekday dishes. I took out 2 cups of sauce from the freezer and added it to some cooked ground beef, combined that with leftover Ricotta cheese and the recipe came together in the time it took to boil the macaroni and it’s tasty and satisfying….and cheesy.

Ingredients:

  • ½ pound macaroni pasta (I use Delverde brand)
  • 2 Tbsp. olive oil
  • 1 pound ground beef, I use 20% fat
  • Pinch of salt and pepper
  • 2 cups Easy Marinara Sauce (or other marinara sauce)
  • ½ cup Ricotta cheese
  • I cup grated Mozzarella cheese

Directions:

  1. Preheat oven to 400 degrees.
  2. Cook pasta 1 minute short of the directions state on the packaging.
  3. In a large sauté pan over medium-high heat, warm the oil. Add the beef, the salt and the pepper and cook, stirring frequently, until the meat is no longer pink, about 5 minutes. Lower the heat to medium and add the sauce. Cook for about 10 minutes, stirring occasionally.
  4. Add the cooked pasta and the Ricotta to the sauce and gently toss to combine. Place the pasta in a baking dish, top with the Mozzarella and cook for about 15 minutes, until the cheese is melted and golden brown.

Makes 2 generous entrée-size servings.

Pancetta and Sundried Tomato Creamy Spaghetti

Pancetta and Sundried Tomato Creamy Spaghetti

Here’s a new installment in the “There’s Nothing to Eat in this House” series featuring an easy pasta dish. When lunch plans get cancelled at the last minute and the fridge is low on supplies because I’m heading out of town, I make pasta with pantry and fridge staples.

Pancetta and Sundried Tomato Creamy Spaghetti
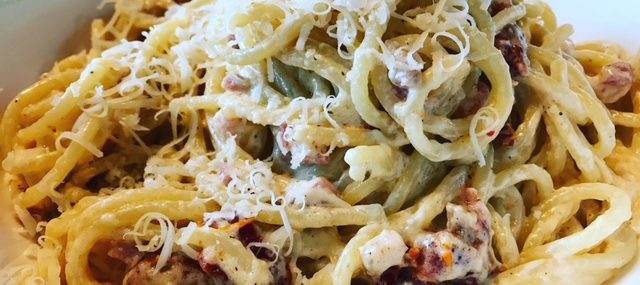
Today, I had some leftover pancetta so I sautéed it with some jarred/in oil sundried tomatoes then added a bit of light cream and freshly-grated Parmesan for a tasty, creamy sauce. I then tossed some Delverde spaghetti (best dried pasta ever) in the sauce and BOOM, there was a tasty, quick lunch ready to eat in 20 minutes.

Ingredients:

  • 1 Tbsp. olive oil
  • 2 Tbsp. diced pancetta
  • 2 Tbsp. chopped sundried tomato
  • ½ cup light cream
  • ¼ cup plus 1 Tbsp. freshly-grated Parmesan cheese, divided
  • 1 ½ cups cooked spaghetti (or other cooked pasta)
  • Pinch each salt and pepper

Directions:

  1. In a large sauté pan over medium-high heat, warm the oil.
  2. Add the pancetta and cook for 2 minutes, until lightly-browned.
  3. Add the sundried tomato and cook for another minute.
  4. Reduce heat to medium-low, add the cream, and cook for a minute, stirring to prevent scorching.
  5. Add the ¼ cup of cheese and cook an additional 30 seconds.
  6. Add the pasta to the sauce and cook for 30 seconds until well-coated in sauce.
  7. Season with salt and pepper then top the pasta with the tablespoon of Parmesan.

Serves one.

Cheers,

Veronique

Seared Salmon & Lemon Labneh

Seared Salmon & Lemon Labneh

Seared Salmon & Lemon Labneh
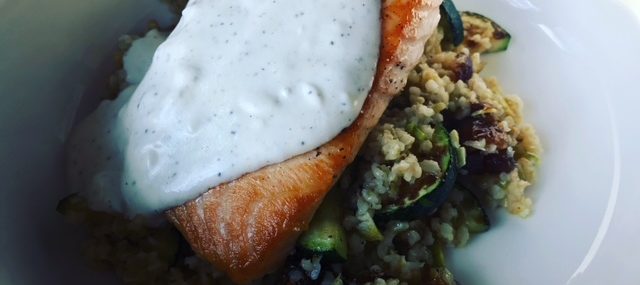
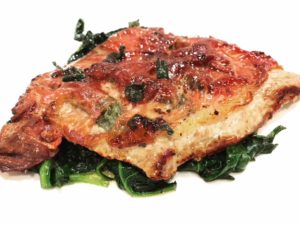
We received this fabulous salmon and simple recipe in our Blue Apron kit this week and it was one of my favorite dishes from the meal program thus far. I loved all the bold flavors and the various texture. I don’t zest my lemon and instead finely chop the rinds it for bigger lemon flavors to match against the salmon.

I’ve written about freekeh before, it’s an ancient grain popular in the Middle East and the Mediterranean that I use in place of rice in hot dishes and salads.

The rich seared salmon paired with the chewy freekeh and dates then topped with creamy, lemony labneh is a sure winner that’ll become a staple dish at our home.

Ingredients:

  • 1 10-ounce skin-on salmon fillet
  • ½ cup cracked freekeh
  • 2 cloves garlic
  • 1 zucchini
  • 4 dried medjool dates
  • ¼ cup labneh cheese
  • 1 pink lemon (or regular lemon if you can’t find pink)

Freekeh Directions:

  1. Heat a medium pot of salted water to boiling on high. Once boiling, add the freekeh and cook, uncovered, 24 to 26 minutes, or until tender. Turn off the heat. Drain thoroughly and return to the pot. Cover to keep warm.

Food Prep Directions:

  1. Using a peeler, remove the rind of the lemon, avoiding the white pith; mince the rind to get 2 teaspoons of zest (or use a zester). Quarter and deseed the lemon.
  2. Halve the zucchini lengthwise, then cut crosswise into 1/4-inch thick pieces.
  3. Peel and roughly chop the garlic.
  4. Pit and roughly chop the dates.

Lemon Labneh Directions:

  1. While the freekeh continues to cook, in a bowl, combine the labneh, the juice of 2 lemon wedges, and a drizzle of olive oil. Season with salt and pepper to taste.

Fish Directions:

  1. Once the freekeh has cooked about 15 minutes, pat the fish dry with paper towels. Transfer to a cutting board, skin side down. Cut into 2 equal-sized pieces; season with salt and pepper on both sides.
  2. In a medium pan (nonstick, if you have one), heat 2 teaspoons of olive oil on medium until hot. Add the seasoned fish, skinless side down. Loosely cover the pan with aluminum foil and cook 4 to 5 minutes on the first side, or until lightly browned. Flip and cook 3 to 4 minutes, or until lightly browned and cooked through.
  3. Leaving any browned bits (or fond) in the pan, transfer to a plate. Cover with the aluminum foil to keep warm.

Zucchini Directions:

  1. To the pan of reserved fond, add the sliced zucchini in an even layer; season with salt and pepper. (If the pan seems dry, add a drizzle of olive oil.) Cook on medium-high, without stirring, 3 to 4 minutes, or until browned and slightly softened.
  2. Add the chopped garlic; season with salt and pepper. Cook, stirring frequently, 1 to 2 minutes, or until softened. Turn off the heat.

Serving Directions:

  1. To the pot of cooked freekeh, add the cooked zucchini, chopped dates, lemon zest, the juice of the remaining lemon wedges, and a drizzle of olive oil. Stir to combine; season with salt and pepper to taste.
  2. Serve the cooked fish with the finished freekeh. Top the fish with the lemon labneh.

Serves 2.

Baked Ditali Pasta and Creamy Tomato Sauce

Baked Ditali Pasta and Creamy Tomato Sauce

pasta and creamy tomato sauce
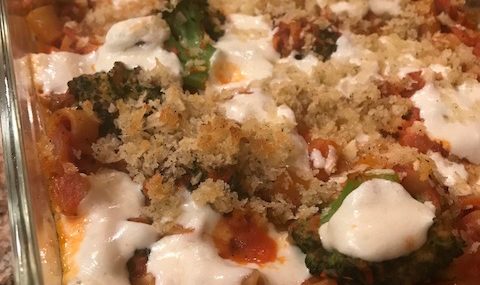
This baked ditali pasta and creamy tomato sauce casserole is delicious and simple to make. This is a Blue Apron pasta recipe that was a huge hit at our home for its taste, ease of preparing and for its cheesy, comforting qualities.

I love that the broccoli and pasta are cooked at the same time in one pot – how fab is that!? The garlic/breadcrumb topping is packed with bold flavors and provides a nice crunch.

Ingredients:

  • 6 ounces ditali (also called ditalini) pasta (or other small tubular pasta)
  • ½ pound broccoli, cut into small florets
  • 1 yellow onion, small diced
  • 1 Tbsp. Italian seasoning (mix of basil, sage, oregano, savory, rosemary, thyme and marjoram)
  • ¼ tsp. crushed red pepper flakes
  • 1 15-ounce can crushed tomatoes
  • ¼ cup heavy cream
  • 1 cloves garlic, finely chopped then smashed into a paste
  • ¼ cup panko breadcrumbs
  • 1 Tbsp. olive oil
  • 1 Tbsp. capers
  • 4 ounces fresh Mozzarella cheese, torn into small pieces

Pasta and Broccoli Directions:

  1. Preheat oven to 475°F.
  2. Heat a large pot of salted water to boiling on high.
  3. Add the pasta and broccoli pieces to the pot of boiling water. Cook, stirring occasionally, 8-9 minutes (or two minutes less than package directions), or until the broccoli is bright green and the pasta is al dente (still slightly firm to the bite). Turn off the heat. Reserving 1/4 cup of the cooking water, drain thoroughly and return to the pot.

Sauce Directions:

  1. While the pasta and broccoli cook, in a large pan, heat a drizzle of olive oil on medium-high until hot. Add the diced onion, Italian seasoning and as much of the red pepper flakes as you’d like, depending on how spicy you’d like the dish to be; season with salt and pepper. Cook, stirring frequently, 2 to 3 minutes, or until slightly softened.
  2. Add the tomatoes (carefully, as the liquid may splatter); season with a pinch of salt and pepper. Cook, stirring occasionally, 3 to 4 minutes, or until slightly thickened.
  3. Add the heavy cream and cook, stirring frequently, 30 seconds to 1 minute, or until thoroughly combined. Turn off the heat and season with salt and pepper to taste.

Casserole Assembly Directions:

  1. Place the garlic paste in a bowl and add the breadcrumbs, olive oil and a pinch each of salt and pepper. Stir to combine and set aside.
  2. To the pot of cooked pasta and broccoli, add the sauce, capers and the reserved cooking water. Season with salt and pepper to taste.
  3. Transfer the pasta mixture to a baking dish (9×9 or 11×7). Evenly top with the cheese and seasoned breadcrumbs.
  4. Bake the casserole 8 to 10 minutes, or until lightly browned and bubbly around the edges. Remove from the oven and immediately drizzle with olive oil. Let stand for at least 2 minutes before serving.

Makes 2 generous entrée-sized portions or 4 side dish portions.

Cheers,

Veronique

Easy Veal Saltimbocca

Easy Veal Saltimbocca

Veal Saltimbocca

Veal Saltimbocca Over Spinach

Veal Saltimbocca is a specialty in Rome and is a simple dish of veal scallopini, wrapped in Prosciutto and fresh sage, sautéed then served in a buttery pan sauce.

When I lived in South Florida, there was a place called La Pergola in Hollywood that was fantastic, in the most perfect old school Italian way. I’d often go there solo with a book and watch the all-male staff work the front of house with flair and a bit of flirtiness. My go-to meal was a tableside Caesar salad and the fantastic Veal Saltimbocca. The veal wasn’t a complicated dish, but it was tender, flavor-packed with sage leaves and spinach and a favorite.

I hadn’t made Veal Saltimbocca in 20 years when an urge for the classic came over me last week. In this version, there isn’t a ton of butter-laden sauce, but it’s still great and a bit lighter. The spinach component from the original dish comes in the form of garlic sautéed spinach, which eliminates the need for pasta for those nights where going low-carb is wanted.  

PS: Don’t like veal? Simply use chicken scallopini.

Veal Saltimbocca

Wrapping Veal with Prosciutto

Ingredients:

  • Large bunch of sage leaves (will need about 15 leaves)
  • 2 veal scallopini (about ½ pound), pounded thinly and evenly
  • 4 slices Prosciutto
  • 4 Tbsp. butter, divided
  • 2 Tbsp. olive oil
  • 2 garlic cloves, sliced thinly
  • 16 ounces baby spinach
  • Pinch of salt and pepper
  • Splash of white wine or Marsala wine
  • Pinch of salt and pepper

Directions:

  1. Preheat oven to 375 degrees.
  2. Press 4-5 sage leaves on each scallopini. Wrap each scallopini with two slices of Prosciutto.
  3. In a large oven-proof skillet over medium-high heat, melt 2 tablespoons of butter. Add the two scallopini to the skillet with the sage leaves side down. Cook for 3 minutes, until the Prosciutto is crispy. Carefully flip the scallopini and cook 2 minutes on the second side. Place the skillet in the oven and cook 5 minutes.
  4. While the scallopini are in the oven, add the olive oil to a sautéed pan over medium-high heat. Add the garlic and cook for a minute, then add the spinach and pinch of salt and pepper. Cook for about 2 minutes and set aside, covered.
  5. Remove the scallopini from the skillet and place on a plate covered in foil. Place the skillet over medium-high heat and add the remaining 2 tablespoons of butter. Chop about 6 sage leaves and add to the butter. Once the sage butter is lightly browned, add the wine and stir to deglaze the pan of the yummy veal bits. Add a pinch of salt and pepper.
  6. To plate, add sautéed spinach to two plates, top with the veal then a drizzle of the sage butter.

Serves 2.

Easy Veal Saltimbocca
Serves 2
An easy and delicious veal dish that originated from Rome.
Write a review
Print
Prep Time
10 min
Cook Time
15 min
Total Time
25 min
Prep Time
10 min
Cook Time
15 min
Total Time
25 min
Ingredients
  1. • Large bunch of sage leaves (will need about 15 leaves)
  2. • 2 veal scallopini (about ½ pound), pounded thinly and evenly
  3. • 4 slices Prosciutto
  4. • 4 Tbsp. butter, divided
  5. • 2 Tbsp. olive oil
  6. • 2 garlic cloves, sliced thinly
  7. • 16 ounces baby spinach
  8. • Pinch of salt and pepper
  9. • Splash of white wine or Marsala wine
  10. • Pinch of salt and pepper
Instructions
  1. 1. Preheat oven to 375 degrees.
  2. 2. Press 4-5 sage leaves on each scallopini. Wrap each scallopini with two slices of Prosciutto.
  3. 3. In a large oven-proof skillet over medium-high heat, melt 2 tablespoons of butter. Add the two scallopini to the skillet with the sage leaves side down. Cook for 3 minutes, until the Prosciutto is crispy. Carefully flip the scallopini and cook 2 minutes on the second side. Place the skillet in the oven and cook 5 minutes.
  4. 4. While the scallopini are in the oven, add the olive oil to a sautéed pan over medium-high heat. Add the garlic and cook for a minute, then add the spinach and pinch of salt and pepper. Cook for about 2 minutes and set aside, covered.
  5. 5. Remove the scallopini from the skillet and place on a plate covered in foil. Place the skillet over medium-high heat and add the remaining 2 tablespoons of butter. Chop about 6 sage leaves and add to the butter. Once the sage butter is lightly browned, add the wine and stir to deglaze the pan of the yummy veal bits. Add a pinch of salt and pepper.
  6. 6. To plate, add sautéed spinach to two plates, top with the veal then a drizzle of the sage butter.
Notes
  1. Not a fan of veal? Use chicken instead!
Food & Wine Chickie Insider https://www.foodandwinechickie.com/
Top Dishes for Mardi Gras Celebrations

Top Dishes for Mardi Gras Celebrations

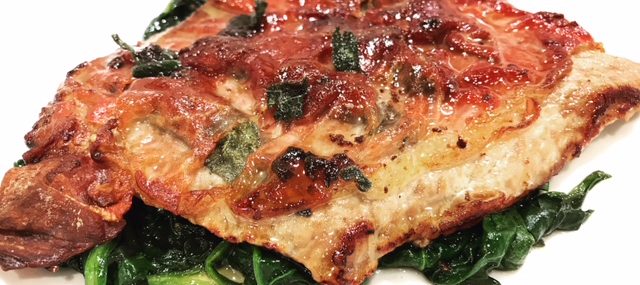
According to Wikipedia, Mardi Gras, also called Fat Tuesday, refers to events of the Carnival celebrations, beginning on or after the Christian feasts of the Epiphany (Three Kings Day) and culminating on the day before Ash Wednesday. Mardi Gras is French for “Fat Tuesday”, reflecting the practice of the last night of eating richer, fatty foods before the ritual fasting of the Lenten season.

I’ve always liked Mardi Gras. When I was a young child in Canada, my grandma used to dress my sister and me up in costumes and take us trick or treating on her street. Back then, kids dressed up just like for Halloween and collected treats.

Now that I’m an adult, the holiday is still centered on treats, in the form of actual food and I don’t miss a chance to celebrate with New Orleans-worthy dishes. Here are some of my top dishes for Mardi Gras celebrations.

Crawfish Bisque

Easy Mardi Gras Beignets

Easy Crawfish Etouffee

New Orleans Jambalaya

Laissez les bons temps rouler!

Veronique


Coconut Milk Roasted Chicken

Coconut Milk Roasted Chicken

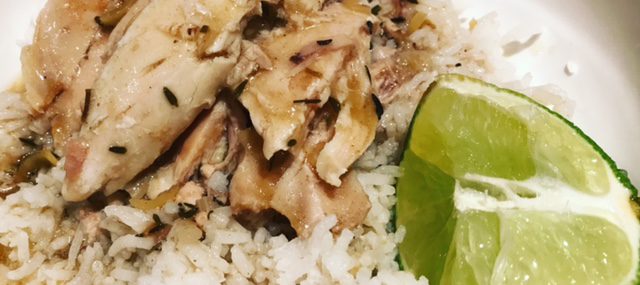
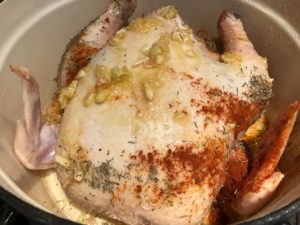
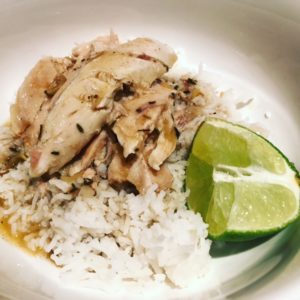
I had a couple of whole chickens in the freezer that I wanted to cook now that fall is here and I need the space in the freezer for bags of foods from my summer crops.

This recipe follows in my goal to make tasty dishes even when “there’s nothing to eat in this house” so I opened the pantry and gathered leftover produce and made a roasted chicken with tons of Thai/Indian flavors that was a huge hit at my home.

I know roast chicken and white rice isn’t the easiest to photograph BUT, this was definitely a tasty dish that took about 20 minutes to prepare (plus roasting time).

Ingredients:

  • 5-6 pound whole chicken, washed under cool water and patted dry with paper towels
  • 1 tsp. each salt and black pepper
  • 3 large garlic cloves, minced
  • 2 Tbsp. finely chopped lemongrass
  • 1 Tbsp. grated ginger
  • 1 tsp. thyme
  • 1 Tbsp. olive oil
  • ¼ cup vegetable oil
  • 2 tsp. smoked paprika
  • 1 tsp. garam masala (use curry powder if you don’t have)
  • ½ tsp. cayenne pepper
  • 1 medium onion diced
  • 13-ounce can coconut milk (I used light)
  • 1 cup chicken broth (or 14.5-ounce can)
  • Slurry – 1 Tbsp. cornstarch whisked with ¼ cup water
  • Squeeze of lime juice (optional)

Directions:

  1. Preheat the oven to 375 degrees.
  2. Rub the chicken all over with salt and pepper.
  3. In a small bowl, combine garlic, lemongrass, ginger, thyme and olive oil to create a paste.
  4. Rub half the garlic mixture on the chicken, reserving the other half. You can use the chicken right away or store it for a day, wrapped in the fridge.
  5. In a large Dutch oven over medium-high heat, allow the vegetable oil to warm for a minute. Add the chicken, breast-side down and brown for about 5 minutes then turn and brown the other side of the chicken for 5 minutes.
  6. Remove the chicken from the Dutch oven to a platter.
  7. To the hot Dutch oven, add the second half of the garlic mixture, the paprika, the garam masala and the cayenne pepper and cook for a minute until fragrant.
  8. Add the diced onion to the spices and cook until softened, about 4 minutes, stirring frequently.
  9. Add the coconut milk and the broth to the onion mixture and stir.
  10. Return the chicken to the Dutch oven, cover and place in the oven. Cook for 1 ½ – 2 hours, until very tender, basting the chicken with the broth periodically.
  11. Remove the chicken from the pot to a serving dish and place the Dutch oven on the stove over high heat. When the broth is simmering, add the corn starch slurry and whisk for 2 minutes until the sauce has thicken.
  12. Carve the chicken and serve with Easy Basmati Rice and the sauce. I love adding a squeeze of lime juice to this dish, but it’s optional.

Serves 6.


Inspired by this recipe.

Salmon with Maple Glaze

Salmon with Maple Glaze

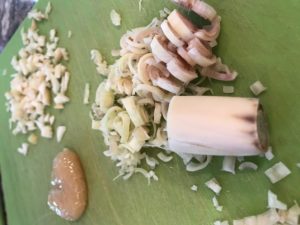
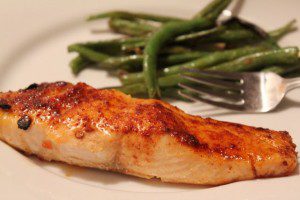
I’m Canadian – you know I have to put maple syrup on things! This is a VERY simple and delicious recipe for salmon, which can be a boring fish. Serve this with green beans or asparagus and you’re in business on busy weeknights.

Don’t have a grill? Live in the frozen tundra and don’t want to go outside? Sear the salmon skin side down in an oven-proof skillet over medium-high heat then finish in the oven at 375 degrees for 15 minutes.

  • 3 Tbsp. brown sugar
  • 1 Tbsp. maple syrup
  • 2 Tbsp. butter
  • 1/4 cup Dijon mustard
  • 2 Tbsp. soy sauce
  • 2 Tbsp. olive oil
  • 1 Tbsp. finely chopped ginger
  • Vegetable oil
  • Salt and pepper
  • 2 salmon fillets, 6 ounces each

Directions:

  1. In a small saucepan over medium-high heat, melt the brown sugar, maple syrup and butter. Remove from the heat and whisk in the mustard, soy sauce, olive oil and ginger.  Let cool.
  2. Preheat grill to medium heat.  Brush salmon skin with vegetable oil and season with salt and pepper to taste.  Place the salmon skin side down on the grill. Brush some of the glaze over the salmon fillets.  Grill for 10 to 12 minutes to medium doneness, with the lid of the grill closed.

Serves 2.

Pulled Pork on a Weber Kettle Grill

Pulled Pork on a Weber Kettle Grill

I’ve been smoking pork shoulder/butt for a few years on the Weber kettle grill since I don’t have a smoker (yet). The pork is always super moist, flavorful and delicious, but a couple weeks ago, I decided to try the method by “MNLang” he posted on Instructables – wow, amazing!!

Smoked Butt

I followed the instructions very closely and I must admit, it was some of the best pulled pork I’ve had, and god knows I get around a pork butt.

Here are his instructions: http://www.instructables.com/id/Pulled-pork-on-a-Weber-kettle-grill/

Once I had my cooked/smoked pork, I made several dishes with it, including fabulous pulled pork sandwiches lightly dressed with my World’s Best BBQ Sauce. I also made some pulled pork quesadillas with grilled onions, sharp Cheddar and Jack cheeses, cilantro and salsa verde.

I hope you try this technique if you have a kettle grill. It’s definitely not a “set it and forget it” method, but it produces some of the best smoked pork you’ll be able to make without a smoker.

Cheers,

Veronique

Easy Shrimp and Grits

Easy Shrimp and Grits

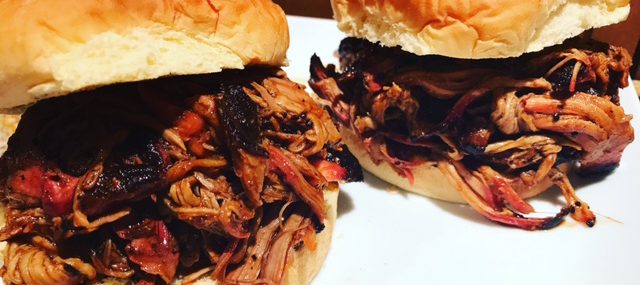
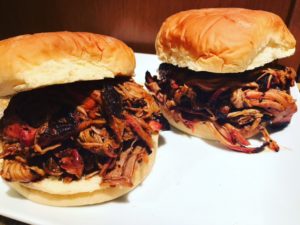
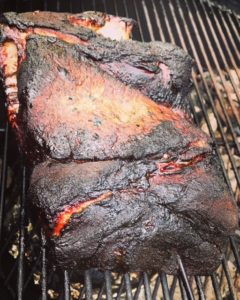
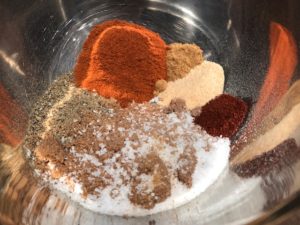
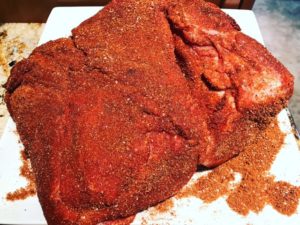
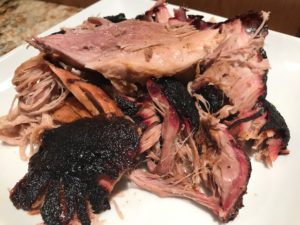
I returned from being on the road for work for nearly a week and the first thing I did when I got home was to get in the kitchen to fix myself some lunch! I miss my kitchen when I’m away (yeah, I know, rough life eating at top restaurants and getting room service) – eating out gets old fast!

Today when I got back from Boston (such a great food town by the way), I made myself a comforting bowl of grits topped with spicy sautéed shrimps. Such yumminess and comfort in a bowl.

I used my Easy Cheesy White Grits recipe and topped that deliciousness with buttery, spicy sauteed shrimps – fabulous!

Ingredients:

  • 3 Tbsp. butter
  • 4 bacon strips, finely chopped OR ¼ cup finely diced pancetta
  • 1 garlic clove, finely minced
  • 2 Tbsp. hot sauce, I used Frank’s Red Hot
  • 12 large shrimps, peeled and deveined, tails removed
  • Easy Cheesy White Grits recipe

Directions:

  1. In a large sauté pan over medium-high heat, melt the butter.
  2. Add the bacon or pancetta to the butter and sauté for 3-4 minutes, until just browned.
  3. Add the garlic to the bacon and cook for a minute, stirring frequently.
  4. Add the hot sauce to the buttery mixture and stir to combine all the ingredients.
  5. Add the shrimps and sauté until cooked, about 2 minutes per side.
  6. Divide the grits between two bowls and top with the shrimps and the sauce.

Makes two servings.