Shrimp, Avocado and Freekeh Bowl

Shrimp, Avocado and Freekeh Bowl

With all my traveling for work, I don’t always have time to grocery shop for weekday lunches. I haven’t posted one of my beloved “there’s nothing to eat in this house” recipes in a while, so he’s a good one that uses mostly pantry items that won’t require a trip to the grocery store.

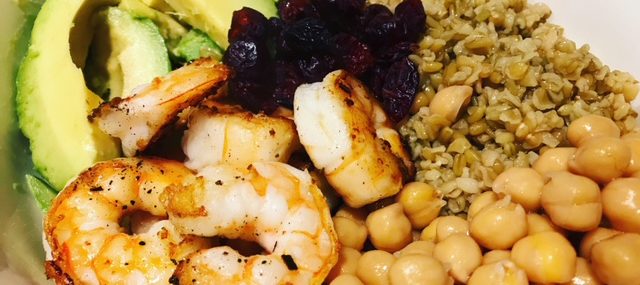
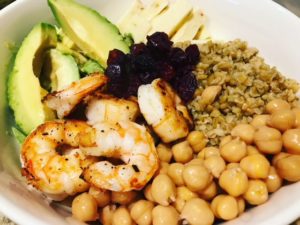
These types of bowls are all the rave right now and for good reason – they’re delicious and so versatile! I like the start with a grain or pasta, this time I’m using freekeh, and add whatever staples you have on hand. Here’s I’m using sliced avocado, canned chickpeas (don’t hate), leftover pepper jack cheese, cranberries and shrimp I thawed from the freezer that I used blackening spices on. Drizzle my favorite dressing and I was good to go in the time it took to cook the freekeh!

For those not familiar with freekeh, it’s an ancient grain that’s long been recognized as a main ingredient in Middle Eastern and Mediterranean cooking. It’s nutty and has great texture and it’s perfect for grain bowls.

Ingredients:
• ½ cup cooked chickpeas
• 1 avocado, sliced
• ¾ cup of cooked freekeh, cooled
• 2 Tbsp. dried cranberries
• 6-8 large shrimp, sprinkled with blackening or Cajun seasoning and cooked for 4-5 minutes then cooled
• 2 ounces pepper jack cheese, cut into bit size pieces
• 4 Tbsp. Easy Greek Vinaigrette (or similar store-bought)

Directions:
Place all the items in a large bowl and coat with the dressing – enjoy!

Serves one very generously or two in more appropriate servings :).

Cheers,
Veronique

Easy Wedge Salad with Blue Cheese Dressing

Easy Wedge Salad with Blue Cheese Dressing

Every summer, I try to reinvent the wheel when I host outdoor parties when it comes to food. What do I serve that’s tasty, different, can be made in advance and that my guests will enjoy? Another challenge is to find a side or starter that’s refreshing in contrast to the heavier food served at grilling parties. My answer, the mighty wedge salad.   

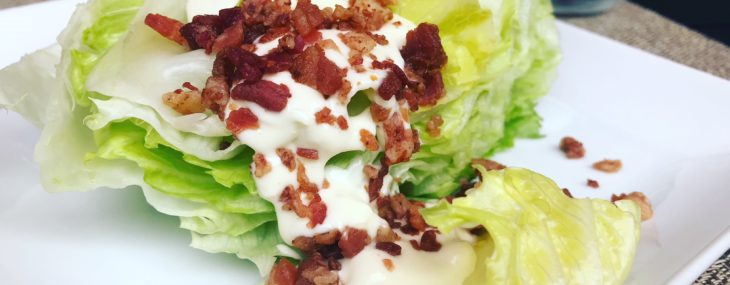
It’s not innovative but it’s pretty close to perfect on hot summer days with its crisp, cold lettuce, decadent blue cheese dressing and fun toppings that can be customized to please your guests.

Another perk of this easy side dish or starter is that it’s very affordable. You can easily get four servings out of a head of iceberg lettuce and I oftentimes get six servings out of a larger head.

A fun way to serve a wedge salad is by serving the toppings on the side so that each guest can add or omit whatever toppings he/she likes…..think salad bar!  

Ingredients:

  • 1 large head of iceberg lettuce, cut into four or six wedges
  • About 2 cups chunky blue cheese dressing, homemade or store-bought
  • 1 cup crumbled blue cheese (optional)
  • 1 cup cooked bacon, crumbled (optional)
  • 1 cup cherry/grape tomatoes, chopped (optional)
  • 3 scallions, chopped (optional)

Directions:

  • Place a wedge of lettuce each on cold salad plate.
  • Drizzle a few tablespoons of blue cheese dressing on each wedge.
  • Optional: Top with crumbled blue cheese, crumbled bacon, tomatoes and scallions.

Serves 4-6 guests.

Easy Wedge Salad with Blue Cheese Dressing
Serves 4
An easy and tasty salad for summer parties that guests will love.
Write a review
Print
Prep Time
10 min
Total Time
10 min
Prep Time
10 min
Total Time
10 min
Ingredients
  1. • 1 large head of iceberg lettuce, cut into four or six wedges
  2. • About 2 cups chunky blue cheese dressing, homemade or store-bought
  3. • 1 cup crumbled blue cheese (optional)
  4. • 1 cup cooked bacon, crumbled (optional)
  5. • 1 cup cherry/grape tomatoes, chopped (optional)
  6. • 3 scallions, chopped (optional)
Instructions
  1. • Place a wedge of lettuce each on cold salad plates.
  2. • Drizzle a few tablespoons of blue cheese dressing on each wedge.
  3. • Optional: Top with crumbled blue cheese, crumbled bacon, tomatoes and scallions.
Notes
  1. A fun way to serve the wedge salad is by serving the toppings on the side so that each guest can add or omit whatever toppings he/she likes…..think salad bar!
Food & Wine Chickie Insider https://www.foodandwinechickie.com/
Two Cheese Baked Macaroni

Two Cheese Baked Macaroni

I love making big batches of marinara sauce and freezing some for easy weekday dishes. I took out 2 cups of sauce from the freezer and added it to some cooked ground beef, combined that with leftover Ricotta cheese and the recipe came together in the time it took to boil the macaroni and it’s tasty and satisfying….and cheesy.

Ingredients:

  • ½ pound macaroni pasta (I use Delverde brand)
  • 2 Tbsp. olive oil
  • 1 pound ground beef, I use 20% fat
  • Pinch of salt and pepper
  • 2 cups Easy Marinara Sauce (or other marinara sauce)
  • ½ cup Ricotta cheese
  • I cup grated Mozzarella cheese

Directions:

  1. Preheat oven to 400 degrees.
  2. Cook pasta 1 minute short of the directions state on the packaging.
  3. In a large sauté pan over medium-high heat, warm the oil. Add the beef, the salt and the pepper and cook, stirring frequently, until the meat is no longer pink, about 5 minutes. Lower the heat to medium and add the sauce. Cook for about 10 minutes, stirring occasionally.
  4. Add the cooked pasta and the Ricotta to the sauce and gently toss to combine. Place the pasta in a baking dish, top with the Mozzarella and cook for about 15 minutes, until the cheese is melted and golden brown.

Makes 2 generous entrée-size servings.

Cheese Stuffed Poblano Peppers

Cheese Stuffed Poblano Peppers

Poblanos are mild chili peppers with lots of great flavor and just a bit of spice. The peppers originated in Puebla, Mexico and can also be found dried, where they’re known as ancho chile.

Cheese Stuffed Poblano

I’m always looking for low-carb side dishes to serve when we grill meats. That’s not easy as we often go to carby sides when we grill…potato salad, mac & cheese, pasta.

Last weekend, I’d made some of my fresh salsa (chopped tomatoes, cilantro, lime juice, jalapeno and minced onion) for another meal and thought…what if I used this tasty salsa to top a stuffed poblano!? This was a well-received and easy-to-make side dish that we served alongside grilled pork chops. One other thing I loved was that I was able to make these in the toaster oven so I didn’t have to heat up the whole kitchen with my standard oven – winning!

You can make these peppers in advance, cool them then reheat them for a few minutes in a 425 degree oven – party perfect!

Ingredients

  • 2 large poblano peppers
  • 1 Tbsp. vegetable oil
  • Pinch of sales and pepper.
  • 4 ounces grated Cheddar/Jack cheese mix
  • Homemade or store-bought salsa
  • 2 Tbsp. Crema Mexicana or sour cream
  • ½ lime

Poblano Cheese Stuffing

Directions:

  1. Preheat oven to 375 degrees.
  2. Find a flat spot on the poblano and lay it on your work surface. With a sharp paring knife, cut the top of the pepper (leaving the end and stem intact) to make an opening for the cheese to go into.
  3. Rub the oil over the peppers then salt and pepper the interior.
  4. Divide the grated cheese between the two peppers, note that you may have too much cheese depending on the size of your peppers.
  5. Place the stuffed peppers on a baking sheet and cook for about 20 minutes, until cheese is melted and beginning to brown.
  6. Top each pepper with fresh salsa and a drizzle of Crema Mexicana (or sour cream). Squeeze the lime over the peppers.

Makes two side dishes.

Baked Ditali Pasta and Creamy Tomato Sauce

Baked Ditali Pasta and Creamy Tomato Sauce

pasta and creamy tomato sauce
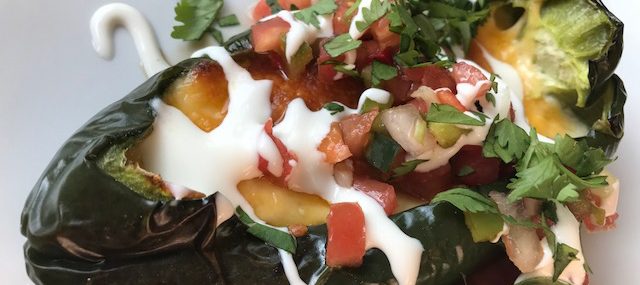
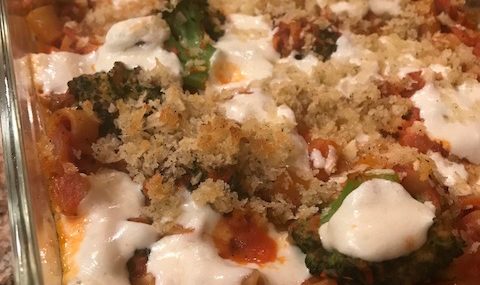
This baked ditali pasta and creamy tomato sauce casserole is delicious and simple to make. This is a Blue Apron pasta recipe that was a huge hit at our home for its taste, ease of preparing and for its cheesy, comforting qualities.

I love that the broccoli and pasta are cooked at the same time in one pot – how fab is that!? The garlic/breadcrumb topping is packed with bold flavors and provides a nice crunch.

Ingredients:

  • 6 ounces ditali (also called ditalini) pasta (or other small tubular pasta)
  • ½ pound broccoli, cut into small florets
  • 1 yellow onion, small diced
  • 1 Tbsp. Italian seasoning (mix of basil, sage, oregano, savory, rosemary, thyme and marjoram)
  • ¼ tsp. crushed red pepper flakes
  • 1 15-ounce can crushed tomatoes
  • ¼ cup heavy cream
  • 1 cloves garlic, finely chopped then smashed into a paste
  • ¼ cup panko breadcrumbs
  • 1 Tbsp. olive oil
  • 1 Tbsp. capers
  • 4 ounces fresh Mozzarella cheese, torn into small pieces

Pasta and Broccoli Directions:

  1. Preheat oven to 475°F.
  2. Heat a large pot of salted water to boiling on high.
  3. Add the pasta and broccoli pieces to the pot of boiling water. Cook, stirring occasionally, 8-9 minutes (or two minutes less than package directions), or until the broccoli is bright green and the pasta is al dente (still slightly firm to the bite). Turn off the heat. Reserving 1/4 cup of the cooking water, drain thoroughly and return to the pot.

Sauce Directions:

  1. While the pasta and broccoli cook, in a large pan, heat a drizzle of olive oil on medium-high until hot. Add the diced onion, Italian seasoning and as much of the red pepper flakes as you’d like, depending on how spicy you’d like the dish to be; season with salt and pepper. Cook, stirring frequently, 2 to 3 minutes, or until slightly softened.
  2. Add the tomatoes (carefully, as the liquid may splatter); season with a pinch of salt and pepper. Cook, stirring occasionally, 3 to 4 minutes, or until slightly thickened.
  3. Add the heavy cream and cook, stirring frequently, 30 seconds to 1 minute, or until thoroughly combined. Turn off the heat and season with salt and pepper to taste.

Casserole Assembly Directions:

  1. Place the garlic paste in a bowl and add the breadcrumbs, olive oil and a pinch each of salt and pepper. Stir to combine and set aside.
  2. To the pot of cooked pasta and broccoli, add the sauce, capers and the reserved cooking water. Season with salt and pepper to taste.
  3. Transfer the pasta mixture to a baking dish (9×9 or 11×7). Evenly top with the cheese and seasoned breadcrumbs.
  4. Bake the casserole 8 to 10 minutes, or until lightly browned and bubbly around the edges. Remove from the oven and immediately drizzle with olive oil. Let stand for at least 2 minutes before serving.

Makes 2 generous entrée-sized portions or 4 side dish portions.

Cheers,

Veronique

Vermont Cheddar Cheese Soup

Vermont Cheddar Cheese Soup

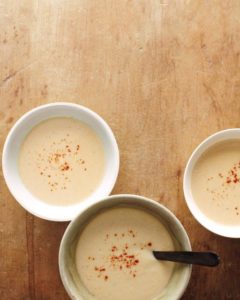
Rich, comforting, decadent…just some words to describe this cheesy soup. To take this soup from starter to entree, I sometimes serve it with a bacon grilled cheese…can there ever be too much cheese?

Ingredients:

  • 1/4 cup (1/2 stick) butter
  • 1 large onion, chopped
  • 2 celery stalks, chopped
  • 2 garlic cloves, minced
  • 1/4 cup all-purpose flour
  • 1/2 tsp. paprika
  • 1/4 tsp. cayenne pepper
  • 4 cups chicken broth
  • 1 1/2 cups half and half (or light cream)
  • 2 1/2 cups white Vermont cheddar cheese, grated (10 ounces)
  • 1/2 tsp. Worcestershire sauce
  • Dash Tabasco
  • 1/4 cup parsley

Directions:

  1. Melt butter in a heavy saucepan over medium-high heat.
  2. Add onions, celery and garlic and sauté 5 minutes.
  3. Mix in flour, paprika, and cayenne pepper and cook, stirring frequently, for 3 minutes.
  4. Gradually stir in broth, bring to a simmer and cook for 2 minutes, stirring frequently. Reduce heat to medium-low, cover and simmer 15 minutes. 
  5. Using a stick blender or standard blender, purée the soup until completely smooth.
  6. Add half and half to soup and bring to a simmer over medium heat. 
  7. Add cheese 1/2 cup at a time, stirring until cheese melts after each additions. 
  8. Add Worcestershire sauce, Tabasco and parsley. 
  9. Season to taste with salt and pepper.

Yields 6 Servings.

Grilled Peach Mascarpone Bruschetta

Grilled Peach Mascarpone Bruschetta

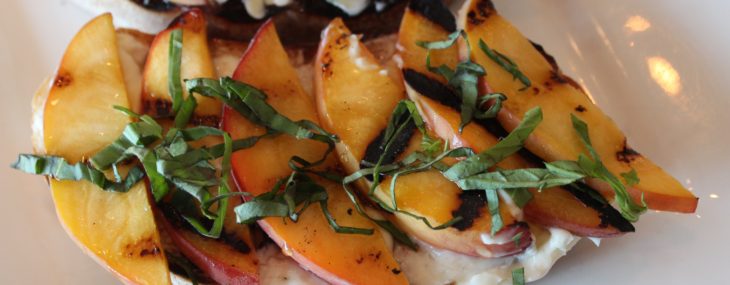
In celebration of National Peach Month in August, Spuntino Wine Bar & Italian Tapas, shared this easy and tasty recipe for grilled peach bruschetta.

Makes 12 bruschetta

Ingredients

    • 1 loaf of rustic bread, cut into 12 slices about 3/4-inch thick 


    • 3/4 cup mascarpone cheese


    • 3 peaches, thinly-sliced and grilled


    • 3 tsp Maldon Sea Salt


    • 1/4 cup honey 


    • 1/4 cup of chiffonaded basil


  • 1/4 cup sliced almonds, toasted

Preparation and Cooking Instructions

    • Place the bread slices on a hot grill for 1 – 2 minutes per side until toasted with some char but not burnt. 


    • Spread the mascarpone cheese on each piece of bread.


    • Place grilled peach slices on top of the mascarpone with Maldon sea salt.


    • Drizzle honey on top of peaches.


  • Garnish with the basil and almonds.
Easy 3 Ingredient Cheesecake Berry Salad

Easy 3 Ingredient Cheesecake Berry Salad

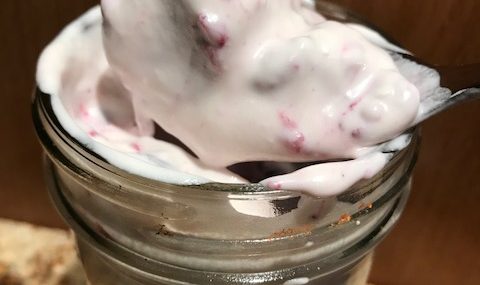
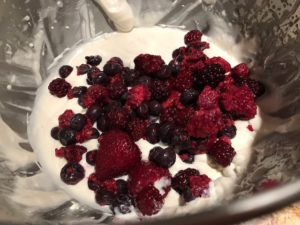
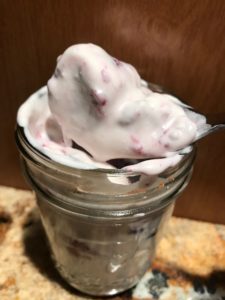
My mom shared this super easy-yet-delicious recipe with me last week and, I agree, it’s a winner. It uses three ingredients, takes mere moments to make and is a great way to use fresh berries when in season. Alternatively, I’ve also tried making this recipe with thawed frozen whole berries and it was great. If using thawed, frozen berries, just be sure to rinse them and dry them using paper towels.

Ingredients:

8-ounce package of cream cheese, softened

½ cup vanilla coffee creamer, I opted for Califia Farms Almond Milk Vanilla Creamer

2 cups berries, any combination works

Directions:

  1. Add the softened cream cheese to the bowl of an electric mixer and beat for 2 minutes until light and fluffy.
  2. Add the creamer and beat for another minute until fully incorporated.
  3. Using a rubber spatula, gently incorporate the berries to the cream cheese mixture. Place in glass serving cups. I like to use small mason jars.

Makes six servings.

Berries & Ricotta by Spuntino Wine Bar & Italian Tapas

Berries & Ricotta by Spuntino Wine Bar & Italian Tapas

July is National Blueberry Month and Spuntino Wine Bar & Italian Tapas will feature specialty cocktails and dishes starring the little blue beauties as their juicy flavor come into full seasonal swing.

This summery dish will be served at the popular restaurant throughout the summer.

Berries & Ricotta

Makes 6

Ingredients:

Whipped Ricotta:

  • 16 oz of Whole Milk Ricotta Cheese
  • 8 oz of Whipped Cream Cheese
  • 1/4 Cup of Confectionary Sugar
  • 3 Tbsp of Honey
  • 1 Tbsp of Simple Syrup
  • 1 tsp of Vanilla Extract
  • 1 tsp of Orange Zest

To Plate:

  • Strawberries
  • Blueberries
  • Raspberries
  • Honey
  • Mint (for garnish)

Preparation:
Blend ricotta, cream cheese and remaining ingredients in food processor until smooth. Transfer to bowl. Cover bowl and refrigerate until set, about 2 – 3 Hours. Divide whipped ricotta mixture among six wine glasses or coupe glasses.  Top with fruit and drizzle with honey.  Garnish with mint. 

Enjoy!

Veronique

Grilled Turkey Wrap – Not Really a Recipe

Grilled Turkey Wrap – Not Really a Recipe

This is the third post in my new series called “Not Really a Recipe”. These will be non-recipe posts that just give ideas on how to fix meals that are tasty and require very little work.

I make wraps for lunch all the time. I fill them with tasty things like avocado, artichoke hearts, heirloom tomatoes and more…the options are endless. I do get to a point where I’m sick of the same old wraps so when that happens, I grill them in my Panini press!

Today I used spicy humus as my ‘glue’ instead of fatty mayo and topped it with sliced turkey, sliced provolone cheese, dried cranberries and pickles. All the ingredients were tucked inside a sundried tomato wrap. Little veg oil on each side, 2 minutes in the hot Panini press and voila – a crunchy on the outside and melty on the inside hot wrap!

Hope this helps break up your monotone lunches a bit!

Cheers,

Veronique