Archives for 2010

There’s Nothing to Eat in this House Part 3

There’s Nothing to Eat in this House Part 3

Linguini with Blue Cheese Sauce

Linguini with Blue Cheese Sauce

Linguini with Gorgonzola and Pine Nuts

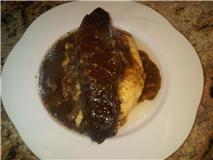
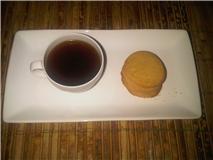
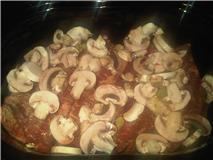
You got it: it’s Friday, the day before my weekly trip to the grocery store, so here we go with the typical “There’s nothing to eat in this house” complaints from my guy.  As you’ll see from the picture of this dish, I wasn’t quick enough with the camera and my starving Marvin ate 75% of the dish prior to picture time.  Guess the leftover ingredients and pantry finds did the trick!

Ingredients:

  • 4 tbsp olive oil
  • 1/2 tsp red pepper flakes
  • 1/2 tsp dried sweet basil
  • Salt & black pepper
  • 1/2 cup milk
  • 2 ounces gorgonzola cheese (or other creamy blue cheese), chopped into small pieces
  • 1 cup linguini, cooked
  • 2 tbsp grated Parmesan cheese
  • 1tsp toasted pine nuts (add pine nuts to a small frying pan and toast over medium-high heat for 2 minutes, shaking the pan to avoid scorching)

Directions:

  1. Heat olive oil in a sauté pan over medium heat for about 20 seconds then add the pepper flakes, basil and salt and black pepper and cook for 30 seconds.
  2. Add the milk and cheese pieces and cook for 3 minutes stirring constantly until a smooth sauce is created.
  3. Toss the cooked linguini into the hot sauce, gently stirring to warm the pasta, about 2 minutes.
  4. Serve pasta with grated Parmesan and toasted pine nuts.

Serves 1.

This is the 3rd installment in the “There’s Nothing to Eat in this House” series (see part 1 here: http://bit.ly/dbucAf and part 2 here: http://bit.ly/cJX6t2).

Chorizo and Manchego Bites – Perfect Little Tapas Item

Chorizo and Manchego Bites – Perfect Little Tapas Item

Chorizo & Manchego Bites

Chorizo & Manchego Bites

Do you ever host hors-d’oeuvres parties and run out of ideas on what to make?  I love the idea of tapas for a home party and often struggle to make tasty bites while also having the freedom to prepare some of the dishes ahead of time.  The Chorizo and Manchego Bites fulfill the easy and tasty requirements and take so little work to prepare.

Ingredients:

  • 4-5 fresh Chorizo sausages (could use other fresh sausages with a bit of heat to them)
  • 1/2 pound – 1 pound Manchego cheese, cut into bite-size cubes

Directions:

  1. Heat your grill to medium-high heat and grill Chorizo sausages for about 6-7 minutes until the exterior of the sausages show some charred bits.  Let rest for 2-3 minutes then cut each sausage into 5-7 bite-size pieces.
  2. While the sausage is grilling, thread about 25 cheese cubes onto toothpicks.  Ensure to push the cheese towards the end of the toothpick where guests hold them to allow room for the Chorizo pieces.
  3. Thread a piece of Chorizo onto the toothpicks, touching the cheese, to allow the cheese to slightly melt from the heat of the hot sausage.  Serve!

Makes approximately 25 perfect bites.

Notes: You can easily double or triple the number of sausages and cheese cubes to allow for a larger group of people.  You could thread the cheese cubes ahead of time and keep refrigerated until party time.  You could also grill the sausages ahead of time, slice them and keep them warm in a foil-covered pan in a 200 degree oven for up to an hour before serving.

Slow Cooker Beef Short Ribs for the Non-Cook

Slow Cooker Beef Short Ribs for the Non-Cook

Beef Short Ribs

Beef Short Ribs

This comforting dish is one that even self-proclaimed non-cooks can whip up for company.   The tender beef with its rich sauce are best served over mashed potatoes.

Ingredients:

  • 1 large Spanish onion, sliced into medium rings
  • 4lb boneless beef short ribs
  • 1 pound button or cremini mushrooms, sliced
  • 1 tsp each – salt, pepper
  • 1/2 tsp each – onion powder, garlic powder, ground thyme
  • 2 bay leaves
  • 1 cup red wine, preferably Cabernet Sauvignon
  • 1 14-ounce can low sodium beef broth
  • 2 tbsp Worcestershire sauce
  • 1 tbs flour
  • 1 tbs butter, softened

Instructions:

  1. Place the onion rings in an even layer in a 7-quart slow cooker (crock pot).
  2. Place short ribs over the onions, ideally in a single layer.
  3. Add the mushrooms to the slow cooker, over the beef.
  4. In a small bowl, combine the salt and pepper and all the spices.  Sprinkle over the meat.
  5. Pour the wine, broth and Worcestershire sauce around the beef.
  6. Cook on LOW for 9-10 hours, then carefully remove the beef from slow cooker onto a platter.
  7. Turn the slow cooker to HIGH and bring cooking liquid to a simmer.  Using a ladle, remove the oily layer of fat from the cooking liquid and discard.
  8. Combine softened butter and flour to form a paste in a small bowl.  Add to liquid in the slow cooker and whisk to form a slightly thickened sauce, about 5 minutes.  Return the beef to the slow cooker to warm up, then serve making sure to discard of the bay leaves.

6 Servings.

Notes: For maximum flavor, sprinkle 1/2 cup all-purpose flour over the uncooked beef then brown the beef in batches in vegetable oil in a sauté pan prior to adding to the slow cooker.  For an interesting twist, add a cup of baby carrots over the onions before cooking.

Interview with South Florida Food and Wine

Interview with South Florida Food and Wine

See the South Florida Food and Wine interview about yours truly, Food & Wine Chickie:  http://bit.ly/cBRpAK

Have a great Sunday!

There’s Nothing to Eat in this House – Maple Sugar Candy

There’s Nothing to Eat in this House – Maple Sugar Candy

Maple Sugar Candy

Maple Sugar Candy

This ‘recipe’ goes into my ‘There’s Nothing to Eat in this House’ sweet treats archive since my guy was in the mood for a sweet treat last night and I didn’t have some of the ingredients required for proper baking on hand.  Don’t shy away from trying this candy if you don’t have a cookie cutter to use as most of the time, when I make it, the softened candy doesn’t make it out of the saucepan!

Ingredient:

  • 1/2 cup maple syrup

Directions:

  1. Pour syrup into a small saucepan over high heat.  Bring to a boil and cook until the syrup forms small bubbles and appears foamy, about 4 minutes.
  2. Remove from the heat and let cool for 2 minutes over a trivet or potholder.  Using a wooden spoon, stir constantly until the syrup thickens to a pale tan, but spreadable consistency (think Nutella consistency) – about 15 minutes.  Don’t stir past this consistency or you’ll not be able to mold the candy (which is okay if you’re not trying to make the candy look cute – what I do 90% of the time).
  3. Coat any medium-sized cookie cutter with cooking spray, then spoon the maple mixture into it.  Use spoon and fingertips to get the mixture completely into the mold, then smooth the top.
  4. Let cool for 30 minutes and unmold.  Enjoy by breaking small pieces.

Makes one candy.

Notes:  I know that when you’re stirring the syrup, before it begins to cool, it seems like the mixture will never turn to the buttery, creamy mixture from the photos, but it absolutely will.  If you cook the syrup too long for the type of saucepan you have, the mixture will harden quickly and you’ll have to enjoy the candy by breaking into small bites – which is completely okay!

Big Fat Chinese Wedding

Big Fat Chinese Wedding

Last weekend, I attended the wedding reception of two dear friends, Danny and Melissa.  They held their reception in New York’s Chinatown at award-winning restaurant, Royal Seafood on Mott Street.

First, I’ve never been to a Chinese reception, so this was an event I’d anticipated for a few weeks.  The banquet room was decked out in red and gold to accommodate over 250 guests.  The room was buzzing with the bride’s Irish family and the groom’s Chinese family and we were made to feel very welcomed to this special event.

For those of you who know me or have read me, you know I can’t allow the food not to be front and center in this post, so here it is.  Ten fabulous courses, creatively prepared and served by a team who knows what it’s doing.  Luckily for me, I was joined at my table by two former co-workers who are Chinese, so customs and traditions were shared along the way, and very much appreciated.  Some thoughts and photos about the food:

Course 1:  A platter of various meats and fish: pork belly, conch, jellyfish and cured meats.  Absolutely divine!

Course 2:  Lobster, lettuce and melon ‘salad’ with tons of eggy mayo.  How great a combination is that!?

Course 3:  Egg rolls and fritters filled with sweet egg custard.  These ain’t your local Chinese restaurant’s egg rolls!

Course 4:  HUGE t-bone steak cooked to perfection (if your perfection is medium-rare) with a flavorful sauce.

Course 5:  Seafood soup that’s accompanied by a tangy vinegar.

Course 6:  Deep-fried pork.  Need I say more???!

Course 7:  Perfectly moist, lacquered skin chicken.  Were the Pringles only served to the American tables?

Course 8:  Whole Chinese bass deboned and filleted tableside.  Can’t possibly have more food!

Course 9 and 10:  Yes, looks like I’ve still got room for  lo mein and fried rice.

What an experience.  So blessed to have been invited to not only share in this very special day for Danny and Melissa, but also in this foodie dream meal.  If you have an opportunity to visit Manhattan’s Chinatown, be sure to stop by Royal Seafood for not only an amazing feast, but a memorable adventure.

Royal Seafood Restaurant

103 Mott St, New York, NY 10013 (between Canal and Hester)

Biscuits Frigidaire (Icebox Cookies)

Biscuits Frigidaire (Icebox Cookies)

Growing up, my mom made the most succulent food one could ever want, but she wasn’t a baker.  In her short baked goods repertoire, is what we French Canadians call “Biscuits Frigidaire”.  Each time I make these icebox cookies, it brings back memories of getting the wax paper-wrapped cookie dough log out of the freezer so we could enjoy fresh baked treats within minutes.  This is truly one of the easiest cookie recipes, but one that yields crisps-chewy golden cookies on a moment’s notice.  Perfect for when unexpected guests stop by for coffee and you need a quick treat to serve.

Icebox Cookies

Icebox Cookies

Ingredients:

  • 1 cup (2 sticks) butter, softened
  • 1/2 cup light brown sugar
  • 1/2 cup granulated sugar
  • 1 egg, lightly beaten
  • 1 tsp pure vanilla extract
  • 2 cups all-purpose flour
  • 1/2 tsp baking soda
  • 1/4 tsp salt

Cookie Dough Directions:

  1. In the bowl of an electric mixer, cream the butter and the two sugars until light and fluffy – 4 minutes.
  2. Add the egg and the vanilla extract and beat to incorporate.
  3. In a medium bowl, sift the flour, the baking soda and the salt.
  4. Add the flour mixture to the butter-sugar mixture in half cup additions, beating to just incorporate between additions, then finally beat until dough begins to come together – no more than 2 minutes total.
  5. Divide the dough in half and place each half on a large sheet of wax paper (dough should be at the top of the sheet – think top of a sheet of paper).  Shape the dough into a log using the wax paper to help smooth the dough (think sushi roll), then wrap each dough log completely with the wax paper and twist each end to seal the logs.  Place logs in the refrigerator for several hours and up to three days (logs can be frozen for up to a month).

Baking Directions:

  1. Preheat oven to 400 degrees.  Line two cookie sheets with parchment paper or lightly spray with cooking spray.
  2. Cut the logs into 1/4 inch thick slices using a sharp, thin-blade knife.  Place the cookies on the cookie sheets approximately two inches apart.
  3. Bake 10-11 minutes or until lightly golden brown. Remove from oven and cool completely on a wire rack (waiting for the cookies to cool completely will be extremely difficult).

Makes about three dozen cookies.

Notes:  Cooled, baked cookies can be stored in an air-tight container at room temperature for a week (you’ll never have these cookies on hand for a week – trust me).  Thaw frozen cookie dough in the refrigerator before slicing.  Want to vary the recipe a bit?  Add mini chocolate chips to one of the dough logs!

2008 J.J. Muller Riesling

2008 J.J. Muller Riesling

'08 J.J. Mueller Riesling

'08 J.J. Mueller Riesling

Value Riesling that’s both on the sweet side but has a nice level of acidity.  Typical apple nose with a honeyed flavor.

Relatively easy to find, and what you’d expect from a sweeter Mosel Riesling.  Had it paired with scallops at North Shore Bistro in Milwaukee (quite yummy by the way) and it was a nice match.

Around $10.

5 Fall Recipes to Warm Up To

5 Fall Recipes to Warm Up To

Autumn is here whether we were ready for summer to end or not.  Embrace the new season with these five comfy recipes:

What are some of your favorite fall recipes?  Please share links, photos or general instructions!

2004 Fattoria La Lecciaia Brunello di Montalcino

2004 Fattoria La Lecciaia Brunello di Montalcino

'04 Fattoria La Lecciaia

Enjoyed this wine last night paired with grilled prime rib and thought it was all you’d want in a Brunello: Big, beefy, silky, complex.  Noseful of black berries, jammy, earthy mouthful and long, slightly tannic finish.

Not sure how many Brunellos of this caliber can be found in this price range, but probably not many.

Around $35.

93 Points Wine Spectator