Red, White and Blue Cake

Red, White and Blue Cake

Red Velvet Cut
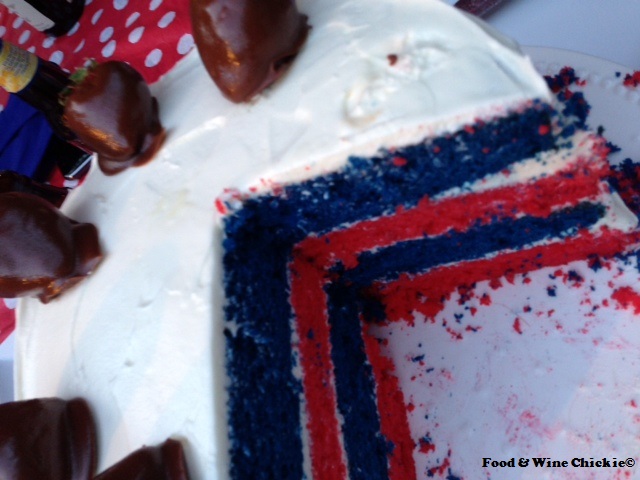
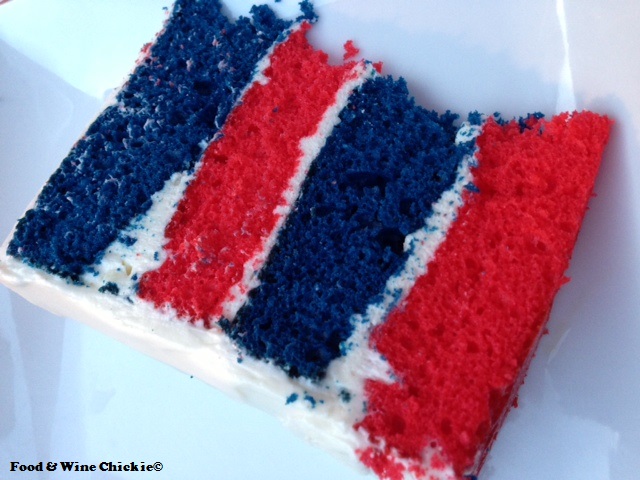
I love red velvet cake, well, the cream cheese frosting actually, so when I was looking for a dessert to make for my 4th of July party, I opted for a red and blue velvet cake.

I love that this cake turned out not…fussy and perfect for a casual outdoor party that involved grilling a whole beef tenderloin.

I made my life easier by baking the four cakes the night before my party so they’d be completely cooled by the time I got around to frosting them with the decadent cream cheese frosting.

Red Velvet Angle
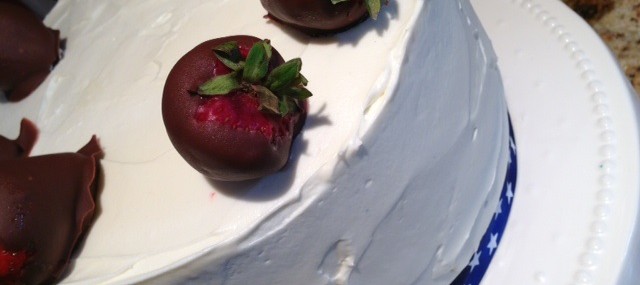
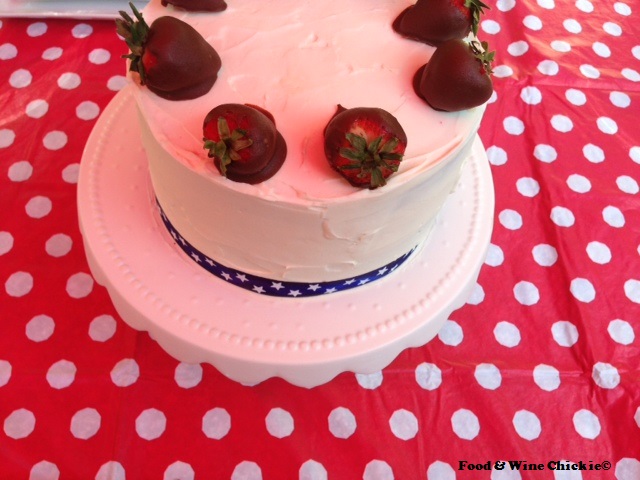
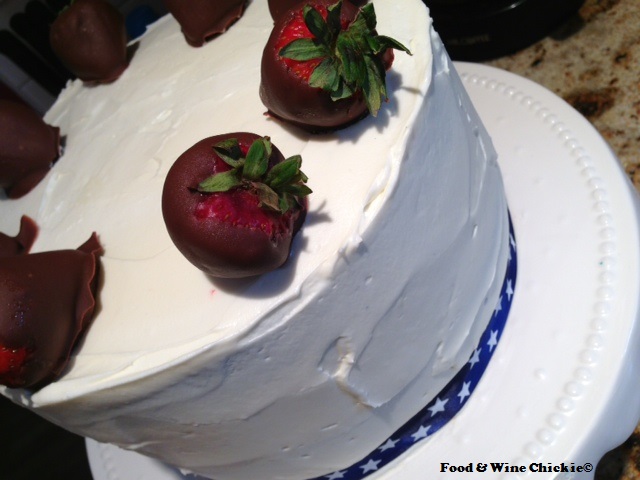
The recipe below is for two red velvet cakes. Make those than make the exact recipe but with 2 ounces of royal blue paste food coloring (I use Wilton). I dipped some strawberries in chocolate for an additional festive touch.

Red Velvet Cake Ingredients:

  • 2 ½ cups cake flour
  • 1 tsp. salt
  • 1 tsp. baking powder
  • 2 Tbsp. unsweetened cocoa powder
  • 2 ounces red food coloring
  • 1 1/2 cups granulated sugar
  • ½ cup (1 stick) butter, at room temperature
  • 2 large eggs, at room temperature
  • 1 tsp. pure vanilla extract
  • 1 cup buttermilk
  • 1 tsp. white vinegar
  • 1 tsp. baking soda

Cream Cheese Frosting Ingredients (enough to cover the whole 4-layer cake):

  • ½ cup (1 stick) butter, at room temperature
  • 2 8-ounce packages cream cheese, at room temperature
  • 1 tsp. pure vanilla extract
  • 3 cups powdered sugar, sifted

Red Velvet Red ClothRed Velvet Cake Directions:

  1. Preheat oven to 350 degrees. Using cooking spray or a bit of softened butter, coat two 9-inch round cake pans.
  2. In a medium bowl, combine the flour, salt and baking powder.
  3. In a small bowl, blend the cocoa powder and the food coloring with a teaspoon to create a smooth mixture.
  4. In the bowl of an electric mixer, cream the sugar and the butter until light and fluffy, about three minutes, scraping down the sides of the bowl with a rubber spatula every minute.
  5. Add the eggs to the butter mixture, one at a time, mixing well after each one.
  6. Add the food coloring mixture and mix well, about 1 minute, scraping down the sides of the bowl with a rubber spatula.
  7. Add half of the flour mixture to the creamed butter mixture, then, add half of the buttermilk. Add the rest of flour mixture, then the rest of the buttermilk. Be sure to scrape down the sides of the bowl with a rubber spatula to ensure the batter in completely blended without white streaks of batter.
  8. In a small bowl, combine the vinegar and the baking soda with a teaspoon to form a bubbly mixture.  Add the mixture to the cake batter and stir gently until just combined.
  9. Divide the batter evenly in each cake pans and place them in the preheated oven. Bake for 25-30 minutes.
  10. Cool the cakes in their pans for 10 minutes then remove the cakes from the pans and allow to cool completely on wire racks.

Red Velvet SliceFrosting Directions:

  1. In the bowl of an electric mixer, cream the butter and cream cheese until light and fluffy, about 3 minutes, scraping down the sides of the bowl with a rubber spatula every minute. Incorporate the vanilla.
  2. Turn off the mixer and add the powdered sugar. Turn mixer on low and blend until the powdered sugar has been incorporated, about 2 minutes, again scraping down the sides of the bowl with a rubber spatula.
  3. Use the frosting right away or refrigerate, covered, until ready to use. To use refrigerated frosting, bring to room temperature then stir thoroughly using a wooden spoon.
  4. Place a red cake on a large platter or cake stand. Cover with a thin layer of cream cheese frosting using an offset spatula or butter knife. Top the red cake with a blue one, ice it, then, repeat the process with the remaining cakes, ensuring that the top layer is the flattest slice – this will ensure a smooth surface for the finished cake.
  5. Crumb coat the entire cake with a thin layer of frosting and refrigerate for 30-60 minutes. Finish icing the cake with the rest of the frosting then refrigerate. Serve within a day at room temperature.

Serves 12.

No-Bake Blueberry Cheesecake

No-Bake Blueberry Cheesecake

Cheesecake 2When I saw this beautiful dessert from the July 2003 issue of Bon Appetit, I knew it would be perfect for me Memorial Day barbecue. I’ve made some changes to the recipe and it’s light, pretty and delicious. I had the perfect quantity of blueberries from a giant container from my local Costco.

Crust with Butter

Crust with Butter

Crust Ingredients:

  • 9 whole Graham crackers or 1 ¼ cups Graham cracker crumbs
  • ½ cup old-fashioned oats (I used 2 envelopes of instant oatmeal and it was fine)
  • 3 Tbsp. brown sugar
  • 1/8 tsp. salt
  • 5 Tbsp. butter, melted
  • 1 tsp. pure vanilla extract

Filling Ingredients:

  • 1/4 cup water
  • 2 envelopes of unflavored gelatin (about 1 tablespoon)
  • 12-ounces cream cheese, softened
  • 1 cup heavy whipping cream
  • 1 cup granulated sugar
  • 1 Tbsp. freshly-squeezed lemon juice
  • 3 cups fresh blueberries
Whipped Cream Over Cheesecake

Whipped Cream Over Cheesecake

Topping Ingredients:

  • 1 cup chilled heavy whipping cream
  • 1 Tbsp. granulated sugar
  • 2-3 cups blueberries
  • 2/3 cup blueberry or strawberry jam
Crust Baked

Crust Baked

Crust Directions:

  1. Preheat oven to 350°F.
  2. Pulse first 4 ingredients in a food processor until mixture is finely ground.
  3. Add butter and vanilla to the crumb mixture and pulse a few times until moist crumbs form.
  4. Press crumb mixture onto bottom and 1 inch up sides of 9-inch-diameter springform pan. Bake crust until deep golden brown, about 12 minutes. Cool.
Blueberries with Jam

Blueberries with Jam

Filling Directions:

  1. Pour 1/4 cup water into small saucepan and sprinkle gelatin over. Let stand 10 minutes.
  2. Stir over very low heat just until gelatin dissolves. Set aside.
  3. Blend cream cheese, cream, sugar, and lemon juice in a food processor until smooth. Add blueberries and puree until smooth with some blueberry bits, about 20 seconds.
  4. With food processor running, add warm gelatin mixture through feed tube and blend well.
  5. Pour filling into crust. Cover with plastic wrap and chill overnight. (Can be made 2 days ahead).
  6. Run knife around pan sides to loosen cake. Release pan sides. Transfer to platter.

Cheesecake 1Topping Directions:

  1. In the bowl of an electric mixer, beat cream and sugar until firm peaks form.
  2. Spread cream mixture thickly over top of cheesecake.
  3. Place blueberries in a medium bowl.
  4. Heat jam in microwave for 20 seconds or until just melted.
  5. Pour jam over blueberries and toss to coat. Mound coated blueberries in center of cream, leaving 1-inch plain border. Chill cake at least 1 hour and up to 1 day.

Serves 10.

Cremini and Spinach Crustless Mini Quiches

Cremini and Spinach Crustless Mini Quiches

Crustless QuichesI’ve been doing the South Beach Diet for a few weeks and found that making breakfast from scratch each morning wasn’t very convenient so I started making crustless quiches for the whole week on Sunday afternoons and it’s been great.

While you can vary what vegetables and cheeses you add to the egg cups, this is one of the versions I enjoy the most. Feel free to serve with a little salsa – it’s delicious.

Ingredients:

  • 2 Tbsp. butter, divided
  • 1 8-ounce package Cremini mushrooms, sliced
  • 1 10-ounce bag fresh baby spinach
  • 12 large eggs (sounds like a lot, but it’s really one egg per quiche)
  • ¼ cup water
  • ½ tsp. each salt and pepper
  • 1 cup shredded sharp cheddar cheese

Directions:

  1. Preheat the oven to 350 degrees.
  2. Coat a 12 muffin pan with cooking spray, be generous.
  3. In a large skillet, melt 1 tablespoon of butter over medium-high heat. Add the mushrooms and cook for about 5 minutes, until lightly golden, stirring frequently. Set aside.
  4. In the same skillet, melt the remaining butter and cook the spinach for 3 minutes, or until fully wilted. Set aside.
  5. In a large mixing bowl (I use an 8-cup measuring cup for easy pouring), whisk the eggs with the water, salt and pepper until fully blended, about 1 minute.
  6. Divide the mushrooms among the 12 muffin cups. Divide the spinach between the 12 muffin cups. Pour an equal amount of the egg mixture into the muffin cups over the vegetables. Sprinkle the cheese equally over the egg mixture.
  7. Place the muffin pan on a sheet tray to catch any drips and bake for about 25 minutes, or until the egg is no longer runny.
  8. Allow the quiches to cool in the pan for about 5 minutes then unmold and let cool completely.
  9. Store in an airtight container. To reheat, place two quiches on a plate, cover with a paper towel and microwave for 60-90 seconds.

Makes 6 servings (2 quiches each).

Hasselback Potatoes

Hasselback Potatoes

Hasselback PotatoesHasselback potatoes seem to be everywhere on Pinterest lately (are you following my boards on Pinterest?) and I loved the concept so I decided to use leftover cheeses from a recent cheese course to create my own version.

The accordion-fanned potatoes get their name from the Stockholm, Sweden restaurant that first served them – Restaurant Hasselbacken. While I use Cabot Seriously Sharp Cheddar and some aged Swiss cheese in this version, any kind of flavorful, melty cheese would work.

Ingredients:

  • 4 baking potatoes (I used Russets)
  • 1 stick of butter, very cold and cut into 16 slices
  • 1 8-ounce bar of cheese, cut into 16 slices
  • 1 tsp. kosher salt
  • 4 Tbsp. olive oil
  • 4 Tbsp. sour cream (optional)

Hasselback Potatoes 2Directions:

  1. Preheat oven to 400 degrees.
  2. Scrub the potatoes and pat them dry with paper towels.
  3. Using a sharp paring knife, carefully slice the potatoes very thinly, without cutting all the way through.
  4. Tuck butter and cheese slices into each of the slits in the potatoes. Sprinkle each potato with salt and drizzle with olive oil.
  5. Place the potatoes in a baking pan, cover with aluminum foil and bake for about 60 minutes or until tender. Remove the foil, baste potatoes with any butter that sits at the bottom of the pan and bake for an additional 15 minutes to crisp up the potato skins.
  6. Remove the potatoes from the oven and serve with sour cream (optional).

Makes 4 servings.

Beet and Herbed Goat Cheese Salad

Beet and Herbed Goat Cheese Salad

Beet and Goat Cheese Salad

Beet and Goat Cheese Salad

Simply roasted beets, tangy goat cheese sweet and tart dressing. What could be better and tastier as a starter to a rich winter meal?

While stacking the beets and goat cheese looks fancy, there’s really no need for fussiness with these comforting ingredients – just get them on a plate!

Ingredients

  • 1 – 2 pounds large beets (golden or red), washed and stems trimmed
  • ½ cup olive oil
  • 1 tsp. each salt and pepper
  • 1 cup balsamic vinegar
  • ½ cup granulated sugar
  • 3 tsp. each chopped fresh flat-leaf parsley and chive
  • 9-ounce log of fresh goat cheese
  • 1 cup raspberry vinaigrette
  • 6 Tbsp. extra-virgin olive oil
  • 1 tsp. each salt and pepper
  • ½ cup pomegranate seeds
Beets Roasting

Beets Roasting

Beet Roasting Directions

  1. Preheat oven to 350 degrees.
  2. Place the beets on a baking sheet lined with aluminum foil. Drizzle with olive oil, salt and pepper. Roast in the oven for 45 minutes.
  3. Allow the beets to cool for about 5 minutes, then, using paper towels, rub the skins off the beets. Cool completely. Cut the beets into ¾ inch slices. Can be roasted 3 days before using if stored in the refrigerator, wrapped in foil.

Balsamic Glaze Directions:

  1. In a small sauce pan over high heat, bring the vinegar and sugar to a boil. Stir to combine then lower heat to low and simmer for 15 minutes, until syrupy. Let the balsamic glaze cool then store in the refrigerator. Can be made up to a week prior to using.

Herbed Goat Cheese Directions:

  1. Place the chopped herbs in a small, shallow dish. Cut the goat cheese so you end up for 12 slices. I use dental floss instead of a knife to get even slices. Run the circumference of the goat cheese slices through the herbs. Refrigerate covered in plastic wrap until ready to use, up to a day before serving.

Assembly Directions:

  1. Create a 5” circle with the balsamic glaze. Spoon 3 tablespoons of raspberry vinaigrette in the balsamic glaze circle in the center of a plate. Place a beet slice over the vinaigrette, top with a slice of herbed goat cheese then another beet slice.
  2. Drizzle a tablespoon of olive oil over each beet stack. Sprinkle with salt and pepper and decorate the plate with pomegranate seeds.

Makes 6 servings.

Cranberry, Almonds and Cilantro Chicken Salad Melts

Cranberry, Almonds and Cilantro Chicken Salad Melts

Chicken Salad MeltsI love chicken salad and many times after buying a roast chicken for a quick chicken noodle soup, I use some of the white meat to make chicken salad.

This version is a bit dressier and unusual with dried cranberries, slivered almonds and fresh cilantro. The chicken salad gets scooped on a lightly toasted English muffin then topped with sharp cheddar cheese for a couple of minutes under the broiler.

Ingredients:

  • 1 chicken breast, either from leftovers or poached, then cut into bit-size pieces
  • Pinch of salt, black pepper and cayenne pepper
  • 1 tsp. freshly chopped cilantro
  • 1 celery rib, finely chopped
  • 1 Tbsp. finely chopped onion
  • ¼ cup light mayonnaise
  • 1 Tbsp. slivered almonds
  • 1Tbsp. dried cranberries
  • 1 English muffin, sliced horizontally then lightly toasted
  • ½ cup shredded sharp cheddar

Directions:

  1. In a medium bowl, carefully combine the chicken, spices, cilantro, celery, onion, mayo, almonds and cranberries. Refrigerate for 30 minutes.
  2. Turn the oven broiler on high. Place the English muffin halves, cut side up, on a baking sheet. Scoop the chicken salad onto each muffin half, top with the cheddar cheese then place the baking sheet under the broil. Broil until the cheese is melted, about 2 minutes.
  3. Garnish with a few cilantro leaves and serve hot.

Serves 2.

Cheesy and Garlicky Pull Apart Bread

Cheesy and Garlicky Pull Apart Bread

Bread BakedPull apart bread seems to be all the rage on Pinterest. When my girlfriends visited last week from Florida, I decided to host a cheese-themed dinner party since all of us are cheese aficionados. What could be a better idea than to serve cheesy and garlicky pull apart bread?

The fun part of this bread dish is that guests can help prepare it and then everyone shares it. The ingredients that can be featured in this type of bread are endless. In my mind, the more cheese the better. Here’s the easy technique to get it done:

  1. Take one loaf of oblong or round bread, like a sourdough loaf, and cut it into a diamond pattern nearly all the way through. Place the bread on top of two large sheets of aluminum foil then place onto a baking sheet.
  2. Add sliced or grated cheese into the slits in the bread. Use any combination of cheeses that melt well that you have on hand: Cheddar, Fontina, Gruyere, Monterrey Jack, etc…
  3. Melt a stick of butter in a sauté pan and cook 2-3 garlic cloves that you’ve minced for a minute over medium heat. Add a pinch of salt and pepper and ½ teaspoon red pepper flakes. Pour the butter mixture into all the slits and over the surface of the bread. Top the bread with chopped scallions and/or bacon bits.
  4. Cover the loaf with more foil then crimp the pieces of foil the bread’s laying on with the top piece to create a sealed pouch for the bread.
  5. Bake at 400 degrees for 10 minutes. Remove the loaf from the oven, take off the top foil and return to the oven for an additional 10 minutes until the surface of the bread is toasty brown and cheese is melted.
  6. Serve the loaf while hot and have your guests “pull apart” pieces of cheesy, garlicky bread.

Enjoy!

Dreamy Creamy New York Cheesecake

Dreamy Creamy New York Cheesecake

CheesecakeI typically like a cheesecake with a Graham cracker crust but when I came upon this version of the New York delicacy, I knew I had to bake it. Be sure you allow the first four ingredients to come to room temperature to avoid lumps in your batter.

Ingredients:

  • 5 eggs, room temperature
  • 2 cups sour cream, room temperature
  • 4 8-ounce packages cream cheese, room temperature
  • 8 tablespoons (one stick) unsalted butter, room temperature
  • 1 ½ cups granulated sugar
  • 2 Tbsp. cornstarch
  • 1 ½ tsp. pure vanilla extract
  • 1 tsp. fresh lemon juice
  • 1 tsp. grated lemon zest

Directions:

  1. Preheat oven to 300 degrees.
  2. Butter the walls and bottom of a 10” springform pan.  Wrap two layers of aluminum foil tightly around the outside bottom and sides of the pan.
  3. In a large bowl, whisk the eggs and the sour cream until lump-free.
  4. In the bowl of an electric mixer, beat the cream cheese and the butter until light and creamy, about 2 minutes.
  5. Add the egg mixture to the cream cheese mixture and beat to incorporate, about 1 minute.
  6. Add the sugar, cornstarch, vanilla extract, lemon juice and lemon zest and beat for 2 minutes.
  7. Pour the cream cheese mixture into the prepared springform pan and place it in a large roasting pan ensuring the springform doesn’t touch the walls of the roasting pan. Place the roasting pan in the center of the oven and carefully pour in enough boiling water in the roasting pan to come halfway up the sides of the springform pan.
  8. Bake for 2 hours and 15 minutes. Remove from the water bath and carefully peel the aluminum foil from around the pan. Allow to cool for 5 minutes, run a sharp paring knife around the rim of the pan to loosen the cake and unclasp the springform pan. Let stand at room temperature until completely cool, about 4 hours. Refrigerate, covered, until well chilled. Remove from the refrigerator 30 minutes before serving.

Makes 10-12 servings.

Inspired by Food for a Hungry Soul.

Coquilles Saint Jacques

Coquilles Saint Jacques

Coquille Saint Jacques

Coquille Saint Jacques

My girlfriend Lisa and I have similar food tastes and when I was menu-planning for New Year’s Eve and mentioned I’d seen a scallop dish I might try…she’d already seen it in Saveur and had earmarked it to show me.

Where I grew up in eastern Quebec, Coquilles Saint Jacques were pretty popular when I was a kid in the late 70s. The dish entailed a base of mashed potatoes topped with a rich béchamel sauce laden with various seafood, including scallops, then Gruyere and Mozzarella cheese were melted over the whole thing. This version is obviously more refined and delicate and features one perfectly-cooked scallop per tasting portion.

Adapted from Coquilles Saint Jacques (Gratineed Scallops), from 150 classic recipes featured in Saveur’s 150th issue

Ingredients:

  • 8 oz. button mushrooms, very finely minced
  • 6 tbsp. butter
  • 3 small shallots, finely minced
  • 2 tbsp. minced parsley
  • 1 tbsp. minced tarragon, plus 6 whole leaves, to garnish
  • Kosher salt and freshly ground black pepper, to taste
  • ¾ cup dry vermouth
  • 1 bay leaf
  • 6 large sea scallops
  • 2 tbsp. flour
  • ½ cup heavy cream
  • ⅔ cup grated Gruyère cheese
  • ½ tsp. fresh lemon juice

Directions:

  1. Heat mushrooms, 4 tbsp. butter, and ⅔ of the shallots in a medium saucepan over medium heat and cook until the mixture forms a loose paste, about 25 minutes.
  2. Stir parsley and minced tarragon into mushroom mixture and season with salt and pepper.
  3. Divide mixture among 6 cleaned scallop shells or shallow gratin dishes.
  4. Bring remaining shallots, vermouth, bay leaf, salt, and ¾ cup water to a boil in a medium saucepan over medium heat. Add scallops and cook until barely tender, about 2 minutes. Remove scallops and place each over mushrooms in shells.
  5. Continue boiling cooking liquid until reduced to ½ cup, about 10 minutes then strain. Heat broiler to high.
  6. Heat remaining butter in a small saucepan over medium heat. Add flour and cook until smooth, about 2 minutes. Add reduced cooking liquid and cream and cook until thickened, about 8 minutes. Add cheese, juice, salt, and pepper. Divide the sauce over scallops. Broil until browned on top, about 3 minutes then garnish each with a tarragon leaf.

Serves 6.

Smoked Salmon Lollipops

Smoked Salmon Lollipops

Salmon LollipopI ran across Chef Eric LeVine’s Smoked Salmon Lollipop recipe when compiling my New Year’s Eve dinner menu. I liked the idea of an upscale amuse-bouche that’s simple to create and can mostly be crafted in advance. I took a short cut by simply using bagels chips to create the ‘bagel dust’.

Ingredients:

  • 6 plain bagel chips
  • 10 ounces smoked salmon
  • 8 ounces cream cheese (don’t use the ‘soft’ kind)
  • 2 Tbsp. green onions sliced thinly
  • 1 tsp. capers
  • 2 tsp. lemon juice
  • ½ tsp. lemon zest
  • ½ tsp. each salt and pepper
  • 10 lollipop sticks (can be found at craft stores or Bed, Bath and Beyond)

Directions:

  1. Pulse the bagel chips in a food processor until they are finely ground, about 30 seconds. DO AHEAD: Bagel dust can be made in advanced and stored in a zip top bag for up to a week.
  2. Combine 6 ounces of smoked salmon, cream cheese, scallions, capers, lemon juice, zest and salt and pepper in a stand mixer with the paddle attachment until ingredients are combined. Refrigerate until firm, at least 2 hours.
  3. Roll the chilled mixture into 10, one-inch balls. Place on a sheet pan lined with parchment paper and put back into the refrigerator to firm up, at least 4 hours. DO AHEAD: Can be done up to this point two days prior to serving if covered in plastic wrap.
  4. Cut the remaining 4 ounces of salmon into 10 julienne strips and wrap around each of the cream cheese-salmon balls.
  5. Push lollipop sticks into smoked salmon balls. Sprinkle a generous pinch of bagel crumbs over the lollipops just before serving.

Makes 10 lollipops.