Mile High Chocolate Cream Pie

Mile High Chocolate Cream Pie

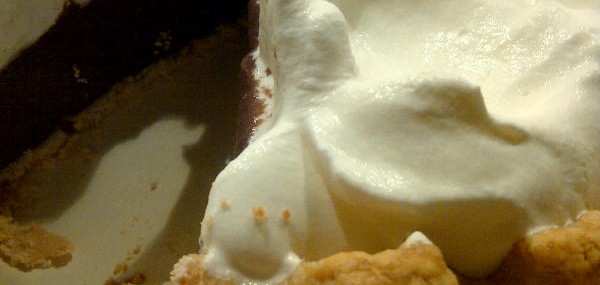
Among my circle of friends, I’m typically the one cooking and baking (and loving it).  This weekend, my two girlfriends from Florida, Eileen and Gloriann, came to visit me to help celebrate my 40th birthday.  To their surprise and my amusement, I put them to work to make me a birthday pie.  The recipe below is inspired by a chocolate cream pie by Hershey and it’s delicious.

Ingredients:

  • 2 ounces unsweetened chocolate, chopped
  • 1 ounce bittersweet chocolate, chopped
  • 3 cups milk, divided
  • 1 1/3 cups granulated sugar
  • 3 Tbsp. all-purpose flour
  • 3 Tbsp. cornstarch
  • ½ tsp. salt
  • 3 egg yolks
  • 2 Tbsp. butter
  • 2 tsp. pure vanilla extract
  • 9-inch pie crust, baked and cooled
  • 2 cups heavy cream, whipped

Directions:

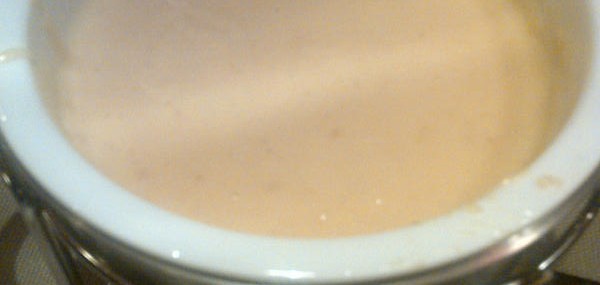
  1. Combine chocolate and 2 cups milk in medium saucepan.  Cook over medium heat, stirring constantly, just until mixture boils.  Remove from heat.
  2. Stir together sugar, flour, cornstarch and salt in medium bowl.
  3. In a small bowl, whisk together the remaining cup of milk and the egg yolks.  Stir the egg mixture into the sugar mixture.   Gradually add the egg and sugar mixture to the saucepan with the warm chocolate.  Cook over medium heat, whisking constantly, until mixture boils, about 2 minutes.  Boil and stir 1 minute.  Remove from heat and add the butter and vanilla extract.
  4. Pour the chocolate mixture into the pie crust.  Press a sheet of shrink wrap directly onto the surface of the chocolate mixture to prevent a skin from forming.  Cool for 20 minutes then refrigerate until well chilled, at least 2 hours.
  5. Top the pie with whipped cream before serving.

8 to 10 servings.


Baked Beans – It’s What’s for Breakfast

Baked Beans – It’s What’s for Breakfast

Traditional Bean Pot

When I was growing up in Quebec, the family would gather at Grandma’s house for baked beans breakfast several times a year.  She’d bake fresh loaves of bread and the aromas would be divine.

Grandma would soak her dry beans overnight then cook them slow and low overnight, with Grandpa adding a little water throughout the night.  The beans were prepared simply: salt pork, a whole onion (that uncle Dan would always get to have) and some molasses.  Grandma would serve the beans on mismatched plates, no two alike, and I’d pour Quebec maple syrup on them and scarf then down – bliss.  I’ve eaten my way around a bunch of cities and this meal is still my favorite breakfast.


This year, with Grandma’s passing, my mom, Diane, decided to fix this dish for us as a sort of an ode to Grandma.  She’d even bought a handsome bean pot for them to simmer in!  I’m providing the recipe below, but it’s not really about making this dish, it’s about the story behind it.  Way to go mom for keeping this tradition alive and the family well-fed!

Ingredients:

  • 2 cups dried white beans
  • 1/2 pound salt pork, cut into 1″ cubes
  • 1 medium onion, peeled
  • 1/4 cup molasses
  • 1 tsp. dry mustard
  • 1 tsp. each salt and pepper

Directions:

  1. Place the beans in a medium saucepan and cover with cold water then cover with foil.  Place the saucepan in the refrigerator at least 12 hours.

  2. Preheat oven to 250 degrees.  Take the beans out of the refrigerator and put on the stovetop on high heat.  Boil the beans for 30 minutes, then, using a colander, drain the water.
  3. Place half of the cubed salt pork in the bottom of a heavy, oven-proof pot or Dutch oven (if you have a traditional bean pot, even better).  Add the beans and top with the remaining salt pork.  Tuck the onion in.  Combine the rest of the ingredients and pour over the beans and pork.
  4. Cover the beans with hot water, place in the oven, covered, and cook for 7-8 hours.  Halfway through the cooking process, add more hot water to once again cover the beans.

Makes 6-8 servings.


Keeping Family Traditions Alive

Keeping Family Traditions Alive

This is the first Christmas the family will spend without Grandma.  I’ve mentioned in past posts what an amazing cook and baker she was and that she had a huge part in my love of food.

One of the items that belonged to Grandma that I was fortunate enough to get was a small 3-section glass dish that she displayed her Christmas treats on.

I’ve made Grandma’s Chocolate and Peanut Butter Treats over the weekend and plan on proudly displaying them on the dish to my guests.

It’s one of my small contributions to keeping traditions alive.

Cheers,

Veronique

Buche de Noel with Browned Butter Salted Caramel Frosting

Buche de Noel with Browned Butter Salted Caramel Frosting

Growing up, my Grandma made jelly roll cake all the time.  A favorite was the vanilla cake with raspberry jam tucked inside and confectioner’s sugar lightly dusted over.  Every Christmas, our family shares a Bûche de Noël, in recent years, it has been purchased because nobody has wanted to tackle making it from scratch.  This will be the first Christmas we spend without Grandma and I have decided to bite the bullet and make our family’s Yule log.  Here is a version I might use, unless I have a chocolate craving.

Ingredients:

Directions:

  1. Preheat oven to 400 degrees.  Coat an 11×17 jelly roll pan with cooking spray.  Line the pan with a sheet of parchment paper and coat the paper with additional cooking spray.
  2. Using a stand mixer, beat the eggs for 5 minutes, until light and fluffy.  Add the sugar, Grand Marnier, zest, vanilla and salt and beat for another 2 minutes.
  3. Add flour in quarter cup additions, incorporating with a rubber spatula very gently. Do not over mix!
  4. Spread the batter evenly into the pan and bake for 10 minutes.  Wait 3 minutes and remove the cake from the pan and onto a large kitchen towel dusted with confectioner’s sugar.  Peel off the parchment paper.  Wait 2 minutes and roll the shorter side onto itself using the kitchen towel as a guide until a tight roll is created.  Chill rolled cake for 30 minutes then unroll the cake gently, removing the towel as you go.
  5. Spread 1 cup of frosting on the cake in an even layer then roll back into a tight log.  Cut a 2-inch piece at one end of the cake at an angle and place atop the cake to create a branch stump.  Frost the outside of the cake, including the stump, run a fork over the surface of the cake to create mock bark then refrigerate until ready to serve.

Serve 10.

Peanut Butter, Banana and Nutella Panini

Peanut Butter, Banana and Nutella Panini

My grandma used to make my sister and me peanut butter and banana grilled sandwiches in a cast iron contraption when we were kids.  This contraption, an early version of a Panini press, had long handles that could be flipped on the stovetop until the bread was perfectly browned and gorgeous.  I miss those days and decided to sort of recreate the sandwich using my modern day Panini press and a little twist – Nutella!

Ingredients:

  • 2 tsp. softened butter
  • 2 slices whole wheat bread (I like oatmeal and whole wheat for this)
  • 2 Tbsp. chunky peanut butter
  • 1 Tbsp. Nutella
  • ½ ripe banana, sliced

Directions:

  1. Heat up Panini press or a grill pan over high heat.
  2. Spread 1 teaspoon of butter on one side of each bread slice.
  3. Spread the peanut butter on the unbuttered side of one bread slice.
  4. Spread Nutella on the unbuttered side of the second bread slice then arrange the banana slices over Nutella.
  5. Top the Nutella/banana slice with the peanut butter slice so that the buttered side of each bread slice is on the outside and the goodies are on the inside.
  6. Place the sandwich in the Panini press and grill for 3 minutes.  Alternatively, place the sandwich on the grill pan (still on high heat) and top with the weight of multiple pans or a pan with a 2-3 pound weight in it and cook 1 1/2 minutes per sides.
  7. Transfer sandwich to a cutting board and cut sandwich diagonally using a serrated knife.

1 serving.

Raspberry Croissant Bread Pudding

Raspberry Croissant Bread Pudding

I recently attended a berry virtual tasting hosted by Driscoll’s and WineTwits and created the following recipe to share with the group.  The results are just as tasty when blackberries are used.

Ingredients:

  • 1 cup heavy cream
  • 2 cup half and half
  • 6 large eggs
  • 1 cup granulated sugar
  • 1 tsp.  pure vanilla extract
  • 4 croissants, cut into1/2” cubes
  • 1 6-ounce container of fresh raspberries

Directions:

  1. Preheat the oven to 325°F.
  2. Heat cream and half and half in a saucepan over medium heat until just simmering.
  3. In a large bowl, whisk the eggs, ¾ cup sugar and vanilla until well combined.  Add a ladleful of hot cream to the egg mixture and whisk well to bring up the temperature of the eggs.  Add the rest of the cream to the egg custard and whisk well.
  4. Add the cubed croissants to the custard and gently push down the cubes into the liquid to ensure they absorb as much custard as possible.  Set aside for 20 minutes.
  5. Lightly coat four 10-ounce ramekins with cooking spray.  Add two raspberries to each ramekin then divide the bread and custard mixture between the four dishes.  Divide the remaining raspberries amount the dishes and sprinkle each with the rest of the sugar, about one teaspoon each.
  6. Place the ramekins on a cookie sheet and bake for about 35 minutes, until puddings are puffed and a toothpick inserted in the center comes out mostly clean.  Serve while still warm with a drizzle of Blackberry Balsamic Coulis and/or a scoop of vanilla ice cream.

Makes 4 servings.

Happy Lazy Sunday, Post Fondue Night

Happy Lazy Sunday, Post Fondue Night

Last night, I had some friends over for fondue night.  We don’t fondue as often as we should because when we do, it’s a great time.  There’s no better way to stretch out a meal than to fondue.

I served a cheese fondue made using Cabot Seriously Sharp Cheddar from Vermont and Victory Headwaters.  Sharp cheese and beer – winning!  For dinner, I typically do a fondue pot with beefy, wine broth for shrimp, chicken and cheese cubes and a pot with hot oil for beef tenderloin.  The dinner fondues are served with three dipping sauces, this time: Sriracha and maple mayo, a Dijon mustard and tarragon mayo and a garlic mayo.  Just a fun concept and please ping me if you’d like fondue tips.

Today is football day at our home and we usually take it super easy on Sunday afternoons.  This means that I typically make dinner in the morning so we can just eat in front of the television later.  Today, I made my Grandma’s amazing meat sauce that we’ll eat with spaghetti.  I double the sauce recipe as it freezes beautifully.

Hope you’re having as great a weekend as I’m having!

Cheers,

Veronique

Lobsterfest in the Comfort of My Home

Lobsterfest in the Comfort of My Home

I’m always looking for new themes for the dinner parties I host and this weekend, I decided to do a lobster party for some friends.

Although a perceived luxury item, lobster can be relatively affordable if purchased in season.  I made sure I held this party while lobsters were on sale at my grocery store and the cost per person was the same as when I buy nice steaks for everyone.  The difference – lobster’s fun and special!

Once of the downfalls of doing lobsters at home is the smell of the crustaceans cooking and the lingering smell in the house for the next week.  I resolved this issue by buying a turkey fryer at my local hardware store.  The turkey fryer comes with a huge metal pot, a strainer basket insert and a burner that can be connected to any standard propane tank.  I set the cooking station outside thus eliminating the mess in the house.

The trick to making a perfectly-cooked lobster is to carefully time how long you have it in the water.  This is the technique my dad’s passed on to me for solid results:

  1. Bring a large pot of salted water to a boil.
  2. Plunge the lobsters, head first, into the boiling water.
  3. Bring the water back to a boil (should take 3-5 minutes).
  4. Let the lobsters cook for exactly 15 minutes then immediately remove them from the water and serve.

This technique is for lobsters up to two pounds.  For lobsters over two pounds, cook for 20 minutes.

The beauty about doing this type of party is that the side items served with lobster can be very affordable and simple.  Boil some red-skinned potatoes, roast some corn, make a tomato salad or cole slaw and prepare a terrific lemon butter dipping sauce for the succulent, tender lobster and you’re set!

Here’s a simple yet delicious recipe for lemon butter sauce that my family’s adopted from Rolande, my step-mother:

Lemon-Butter Sauce

Ingredients:

  • ½ pound (2 sticks) salted butter
  • Juice of 3 lemons
  • ¼ cup heavy cream

Directions:

  1. Bring the butter to a simmer in a medium heavy pan over medium-low heat.  Cook for 3-4 minutes until the milky solids have mostly evaporated.
  2. Add the lemon juice and reduce heat to low.  Whisk in the cream and keep warm until ready to serve.

For best results, serve in a small dish over a candle burner to keep warm.

To finish the evening on a last Maine note, serve a blueberry cobbler like the one I prepared for my guests.  It’s an easy dessert to prepare and a real crowd pleaser.

There’s truly no need to go to a seafood place for lobster.  A fun and affordable dinner party can be prepared in a jiffy that your friends and family will enjoy and appreciate.

Cheers,

Veronique

Strawberry and Nutella-Stuffed Crepes

Strawberry and Nutella-Stuffed Crepes

My Niece Maude

I recently spent the weekend in my native Quebec where I got a chance to breakfast with my two young nieces.  Like their mom, my sister Josée, they love the combination of strawberries and Nutella, the chocolate hazelnut spread.

On the first morning of my weekend back home, the girls enjoyed Strawberry Nutella Treats.  On the second morning, I brought the Basic Crepe Batter I’d made the evening before and fixed Strawberry and Nutella-Stuffed Crepes.  The crepe batter is prepared in advance in a jiffy and the stuffed crepes are simple to fix for the whole family, even on busy mornings.  On this occasion, I added a few freshly-picked blueberries to the strawberries.

Ingredients:

  • Basic Crepe Batter
  • 4 Tbsps. butter
  • 8 Tbsps. Nutella
  • 1 pint of ripe strawberries, sliced
  • Whipped cream (optional)

Directions:

  1. In a large skillet (or crepe pan), melt 1 tablespoon of butter over medium-high heat until golden.
  2. Add ¼ of the crepe batter to the skillet and spread it evenly over the entire surface of the pan by tilting the skillet around.  Cook the crepe until the surface is mostly no longer wet, about 45 seconds.  Flip with a spatula and cook the second side for about 30 seconds.
  3. Strawberry Nutella Crepe

    Remove the crepe to a plate.  Spread 2 tablespoons of Nutella over the crepe then top with ¼ of the slices strawberries.  Roll the crepe, jellyroll-style and served with whipped cream, if using.

  4. Repeat steps 1-3 for the three remaining crepes.

Makes 4 crepes.

Notes:  The batter can easily be doubled or tripled if serving more guests.  The crepes can be stuffed with any berries, and another favorite of mine is stuffing them with a combination of raspberries and blueberries.

Strawberry Nutella Treats

Strawberry Nutella Treats

Strawberry season’s in full force and I can’t think of anyone who loves the little red gems more than my sister, Josée.  When her and her family visited me in New Jersey last, I, of course, had bought strawberries for her.  To my delight, my two nieces have inherited her love for strawberries and here’s a quick but special treat she fixed them one morning.

Ingredients:

  • 2 slices white bread (could use whole wheat)
  • 2 Tbsps. Nutella, hazelnut spread
  • 4 large strawberries, hulled and thinly sliced

Directions:

  1. Toast the bread.
  2. Spread 1 tablespoon of Nutella on each slice of toasted bread.
  3. Cover each Nutella-coated toast with the slices from 2 strawberries.

Makes 2 treats.