Strawberry and Nutella-Stuffed Crepes

Strawberry and Nutella-Stuffed Crepes

My Niece Maude

I recently spent the weekend in my native Quebec where I got a chance to breakfast with my two young nieces.  Like their mom, my sister Josée, they love the combination of strawberries and Nutella, the chocolate hazelnut spread.

On the first morning of my weekend back home, the girls enjoyed Strawberry Nutella Treats.  On the second morning, I brought the Basic Crepe Batter I’d made the evening before and fixed Strawberry and Nutella-Stuffed Crepes.  The crepe batter is prepared in advance in a jiffy and the stuffed crepes are simple to fix for the whole family, even on busy mornings.  On this occasion, I added a few freshly-picked blueberries to the strawberries.

Ingredients:

  • Basic Crepe Batter
  • 4 Tbsps. butter
  • 8 Tbsps. Nutella
  • 1 pint of ripe strawberries, sliced
  • Whipped cream (optional)

Directions:

  1. In a large skillet (or crepe pan), melt 1 tablespoon of butter over medium-high heat until golden.
  2. Add ¼ of the crepe batter to the skillet and spread it evenly over the entire surface of the pan by tilting the skillet around.  Cook the crepe until the surface is mostly no longer wet, about 45 seconds.  Flip with a spatula and cook the second side for about 30 seconds.
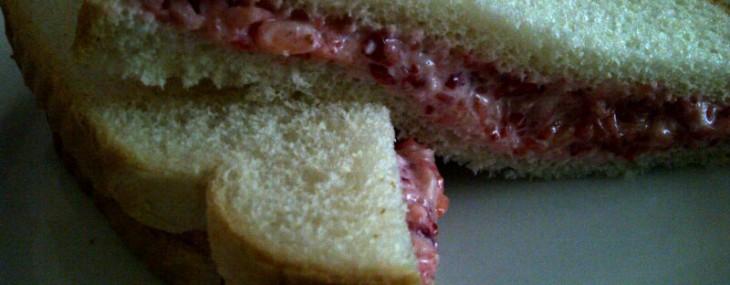
  3. Strawberry Nutella Crepe

    Remove the crepe to a plate.  Spread 2 tablespoons of Nutella over the crepe then top with ¼ of the slices strawberries.  Roll the crepe, jellyroll-style and served with whipped cream, if using.

  4. Repeat steps 1-3 for the three remaining crepes.

Makes 4 crepes.

Notes:  The batter can easily be doubled or tripled if serving more guests.  The crepes can be stuffed with any berries, and another favorite of mine is stuffing them with a combination of raspberries and blueberries.

Strawberry Nutella Treats

Strawberry Nutella Treats

Strawberry season’s in full force and I can’t think of anyone who loves the little red gems more than my sister, Josée.  When her and her family visited me in New Jersey last, I, of course, had bought strawberries for her.  To my delight, my two nieces have inherited her love for strawberries and here’s a quick but special treat she fixed them one morning.

Ingredients:

  • 2 slices white bread (could use whole wheat)
  • 2 Tbsps. Nutella, hazelnut spread
  • 4 large strawberries, hulled and thinly sliced

Directions:

  1. Toast the bread.
  2. Spread 1 tablespoon of Nutella on each slice of toasted bread.
  3. Cover each Nutella-coated toast with the slices from 2 strawberries.

Makes 2 treats.

Top 5 Tips for a Great Grilled Steak

Top 5 Tips for a Great Grilled Steak

The following five steak grilling tips prove that you don’t have to be a grilling or steakhouse professional to serve your guests steaks that taste like you are.


Bone In Ribeye

1)  Buy the Right Cut of Meat

When you think of the best steak you’ve had at a steakhouse, you likely think of how juicy and flavorful the meat was, right?  In an attempt to recreate this savory experience, you must buy the right cut of meat.  This means that you must stay away from the overly lean filet mignon and try one of these top 5 cuts of meat for grilling:

Rib Eye:  The king of steaks, in my opinion.  The marbling of this cut is screaming for a hot grill.  With just a cracking of pepper and a generous coarse salt coating, it will be the best steak you’ve had, especially if still on the bone.

NY Strip:  This is a classic with the right amount of fat and chewiness.

Porterhouse (T-Bone):  Those of you addicted to the filet mignon will still be able to enjoy it while getting a juicy and flavorful NY strip along with it.

Skirt Steak:  This inexpensive cut of meat is ideal for a dinner party.  It’s affordable, cooks quickly and is ultra-flavorful, even without being marinated.

Tri-Tip:  Also known as Santa Maria steak, is the triangular section of the sirloin primal and has become popular with grillers because it’s flavorful, costs less than other prime cuts of meat and is typically about 2 ½ pounds hence perfect for feeding a crowd.

2)  Get a Meat Thermometer

Chefs on cooking programs constantly show folks how to ball up or stretch out their hand to compare the resulting tautness of their skin to what a steak should feel at various cooking temperatures.  Who the heck can remember this stuff, and who needs to?!

Get yourself a meat thermometer for $5 – $10, actually use it and you’ll never fail again when mom asks for medium and spouse asks for rare.  I recommend taking the steaks off the grill five degrees before they reach each of the below temperatures as the meat will continue to cook as it rests:

  • Rare: 130 degrees
  • Medium-rare: 135 degrees
  • Medium: 145 degrees
  • Medium-well: 160 degrees
  • Well: Not provided as meat should never be cooked well done

Once you get comfortable using the thermometer, you’ll get to understand how the meat should look and feel at various doneness and can do away with the handy tool.  This might take you a couple of grilling seasons, but you’ll get there.  In the meantime, arm yourself!

Strip Steak

3)  Allow Steak to Come to Room Temperature

This is possibly the most crucial step to a goof grilled steak.  Remove you steak from the refrigerator at least 30-60 minutes prior to grilling.  Not doing this will result in a steak that’s overcooked on the outside and has a “bullet” of raw/overly-rare meat on the inside.

4)  Steak Grilling Tip – Season your Meat

One of the biggest mistakes home cooks make when grilling steak is to under season the meat.  Marinating some cuts of meat is a good idea, but even more important is to generously coat the entire outside of the meat with olive oil then with coarse salt and freshly cracked pepper.  I’m not talking a sprinkling of salt and pepper folks!  I mean a COATING.  Also, seasoning the meat after it’s grilled won’t do the trick – do it prior to grilling.

5)  Steak Grilling Tip – Let the Meat Rest

Most of us have heard of letting a steak rest after grilling, but how many actually have the patience to wait for a perfectly-grilled steak to rest 5-10 minutes!?

As the saying goes – just do it!  Get your steaks off the grill and onto a plate, then cover them with a piece of aluminum foil and have a cocktail to get your mind off cutting into those ribeyes.

Allowing the steak to rest will help the natural juices to redistribute within the meat without flowing out of the steak when you cut into it causing a dry, tough chewy experience.

Do you have steak grilling tips I’ve missed here?  Please share them!

Happy grilling,

Veronique

Simple Greek Yogurt and Berry Tart

Simple Greek Yogurt and Berry Tart

It’s strawberry season here in New Jersey and I was looking for a simple, refreshing dessert to serve on a warm summer day.  I came up with this tangy tart that features a crust which can be made a day in advance and a filling that’s a snap to prepare.  The addition of blueberries to the ripe strawberries makes it patriotic-looking enough to serve for your 4th of July party.

Ingredients:

  • 1 17.6-ounce container of plain Greek yogurt
  • 1 tbsp. honey
  • 3 tbsps. powdered sugar
  • Zest of ½ lemon
  • ¾ cup black currant jelly
  • 2 cups of blueberries
  • 2 cups chopped strawberries
  • Simple Tart Crust

Directions:

  1. In a medium bowl, combine the Greek yogurt, the honey, the powdered sugar and the lemon zest.  Set aside (can be made up to 4 hours prior to assembling the tart if kept refrigerated).
  2. About 30-60 minutes before serving the tart, in a heat-proof bowl or measuring cup, microwave the black currant jelly for 1 minute, until liquefied. Set aside.
  3. In a large bowl, combine the blueberries and strawberries.  Add the warm black currant jelly to the berries and gently stir to coat each fruit. Set aside.
  4. Spread the yogurt mixture over the tart crust forming an even layer.  Gently top the yogurt layer with the berries and spread evenly in an attempt to completely cover the yogurt.  Refrigerate until ready to serve.

Serves 8.

Notes: The tart crust can be made the day before if cooled then covered in aluminum foil and stored at room temperature.  Try not to assemble the tart more than an hour prior to serving to keep the crust from becoming soggy.

Homemade Caramel Pudding

Homemade Caramel Pudding

I know making homemade pudding is pretty old school with all the available, decent-quality commercial puddings on the market, but there truly is a tremendous taste difference that warrants rolling up one’s sleeves every once in a while.  Here’s a version with a deep caramel flavor you can enjoy on its own or you can use in various recipes.

Ingredients:

  • 2 cups whole milk
  • 1 ½ cups heavy cream
  • 4 Tbsps. (1/2 stick) butter
  • 1 cup brown sugar
  • 3 egg yolks
  • ¼ cup cornstarch
  • ¼ tsps. sea salt
  • 1 ½ tsps. pure vanilla extract

Directions:

  1. Add the milk and cream to a large saucepan and cook over medium heat until small bubbles start to form on the surface, about 4 minutes.  Remove from heat and set aside for later use.
  2. Melt the butter in a large, heavy skillet over medium-high heat. Raise the heat to medium-high and add the brown sugar.  Simmer, stirring frequently, until the mixture caramelizes and begins to have a nutty aroma, about 5 minutes.
  3. Gradually pour the hot caramel mixture into the reserved cream mixture, whisking vigorously to fully combine. If the mixture is lumpy, pass it through a fine sieve.
  4. In a medium bowl, whisk the egg yolks. Add about a cup of the hot liquid to the eggs and whisk vigorously to prevent curdling.  Add the cornstarch and salt to the egg mixture and whisk to fully combine.
  5. Add the egg/cornstarch mixture to the pan with the hot liquid and cook over medium heat until the mixture is thick and just begins to boil, about 3 minutes.  Take the pan off the heat and add the vanilla extract.
  6. Ladle the pudding into decorative cups, cover with shrink wrap and refrigerate several hours or overnight.

Makes about six 4-ounce servings.

Penne with Fresh Chorizo, Buffalo Mozzarella in a Yellow Tomato Sauce

Penne with Fresh Chorizo, Buffalo Mozzarella in a Yellow Tomato Sauce

Penne with Fresh Chorizo, Buffalo Mozzarella in a Yellow Tomato Sauce

I simply adore the sweetness of ripe yellow tomatoes and try to find multiple uses for them since I grow them in my garden every summer.  This dish is simple to prepare and very satisfying.  A great way to use up extra grilled sausages from last night’s BBQ.

Ingredients:

  • 3 cups, yellow cherry tomatoes
  • 10 fresh basil leaves
  • ½ cup extra virgin olive oil
  • ½ tsp. each red pepper flakes, salt and black pepper
  • ½ pound dry penne pasta, cooked one minute less than recommended on the box
  • 4 fresh Chorizo links, cooked on the grill then cut into bite-size slices
  • 1 cup cubed fresh buffalo mozzarella
  • Parmesan cheese, for grating

Directions:

  1. Add the tomatoes, basil, oil and spices to a food processor and pulse for 1 minute, until a smooth salsa is created.
  2. Pour the salsa mixture into a large saucepan and cook over medium heat for 3-4 minutes.  Add the cooked pasta to the sauce and gently stir to coat. Cook for 1-2 minutes.
  3. Add the Chorizo slices and the mozzarella to the pasta and stir to combine.  Cook an additional minute.
  4. Serve with a grating of Parmesan cheese.

Serves two generously with some leftovers.

Notes: Can’t find yellow cherry tomatoes? Substitute with red ones and add ½ teaspoon of sugar to the salsa when pureeing.  Fresh Chorizo not readily available where you are? Simply use another spicy sausage in its place.

5 Simple and Tasty Memorial Day Side Dishes

5 Simple and Tasty Memorial Day Side Dishes

Not sure what to make for your Memorial Day get-together?  Tired of fixing the same old stand-by dishes?  Mix it up a little by serving these five simple and tasty Memorial Day side dishes:

  1. Maple Glazed Parslied Baby Carrots
  2. Queso Fresco Grilled Corn on the Cob
  3. Quick and Easy Pan Fried Smashed Potatoes
  4. Chorizo and Manchego Bites
  5. Zesty Guacamole

If you try any of these recipes, please post a comment to let me know how you and your guests liked them.  Enjoy the long weekend while keeping in mind that there’s more to Memorial Day weekend than the food and celebrations.

Happy Memorial Day!

Veronique

Maple Glazed Parslied Baby Carrots

Maple Glazed Parslied Baby Carrots

This side dish pairs well with just about anything: roast chicken, grilled salmon, BBQ ribs, steaks and more.  It’s simple and delicious.  Tri-color baby carrots make this dish even prettier.

Ingredients:

  • One 16-ounce bag baby carrots
  • 3 tbsp. butter
  • 2 tbsp. Dijon mustard
  • 2 tbsp. pure maple syrup
  • ¼ cup chopped flat leaf (Italian) parsley
  • Salt and pepper

Directions:

  1. In a pot of boiling water, cook the carrots until fork tender, about 5 minutes.  Strain the carrots in a colander and shake to get as much water off the carrots as possible.
  2. In the same pot, melt the butter over medium-high heat and let brown slightly.  Add the mustard and the maple syrup and stir to combine. Allow the glaze to simmer for a minute, then add the carrots, stirring gently to coat them with the glaze.  Turn the heat to low, cover the pot and cook for 3-4 minutes, shaking the pot from time to time.
  3. Uncover, add the parsley, then salt and pepper to taste.  Stir and serve.

Makes 4 servings.


What on Earth is Hutspot?

What on Earth is Hutspot?

Hutspot is a traditional Dutch dish whose meaning, loosely translated, is “mash pot”.  It is a combination of potatoes mashed with other widely available vegetables, onion and bacon.  Some of the traditionally used vegetables are carrots, endive, kale, spinach and turnip greens (this dish made with greens is called Stamppot). This popular side dish is typically paired with meat to create a hearty meal worthy of cool, rainy Dutch Winter days.  Trinetty and Jac, my guys’ Dutch mom and her better half, provided a recipe that I have made some slight tweaks to and I’m thrilled to share it.

Ingredients:

  • 2 medium Russet potatoes, peeled and cut into one-inch pieces
  • 2 medium carrots, peeled and cut into one-inch pieces
  • 4 tbsp butter, separated
  • 2 large shallots, finely sliced
  • 5 bacon slices, thick cut
  • 1/2 cup whole milk
  • Salt and pepper

Directions:

  1. In a large saucepan, cover the potatoes and carrots with water then boil them until tender, 10-15 minutes.
  2. Melt 2 tablespoons of butter in a medium frying pan then sauté the shallots over medium heat until softened and slightly browned, about 5 minutes. Set aside.
  3. In a large frying pan, cook the bacon for about 10 minutes over medium heat until browned and slightly crispy.  Remove bacon from the pan and drain over paper towels – reserve bacon fat.
  4. Place the cooked potatoes and carrots in a large bowl and whip them using a hand mixer over medium speed for about 3 minutes – mixture will still be a bit lumpy.  Add the milk, the remaining 2 tablespoons of butter and the salt and pepper, mixing well to incorporate.
  5. Chop the cooked bacon into bite-size pieces.  Add half the bacon to the mashed potato mixture and stir to incorporate.
  6. To serve, spoon half the mashed potatoes into a bowl, create a well in the potato mixture, add 1 teaspoon of bacon fat to the well then sprinkle half the remaining bacon pieces over the dish.  Repeat with the second portion.

Makes two generous servings.

Strawberries and Cream Sandwiches Anyone?

Strawberries and Cream Sandwiches Anyone?

I sometimes post whimsical recipes that remind me of my early childhood, and this is definitely one of those recipes.

Growing up in Quebec, Canada, my grand-parents owned a lake house the family spent much of its summers.  The place was straight out of the late 50s, totally kitschy and I loved it.  One of the things I loved most about it was spending time with my grandma in the kitchen, and watching her turn the most basic and affordable of ingredients into something prize-worthy.  One of these treats was her strawberries and cream sandwiches, and I’m sharing the concept with you so you can enjoy it with your families.

Ingredients:

  • 4 ripe strawberries
  • ¼ cup heavy cream
  • 1 tsp granulated sugar
  • 4 slices of fresh, white bread

Directions:

  1. In a small, shallow bowl, mash the strawberries with a fork (in this day and age, we might call this muddling).
  2. Add the cream and sugar to the strawberries and continue mashing with the fork until fully blended into a thick mixture.
  3. Spoon the strawberry mixture onto a slice of bread then top with the second slice.  Repeat this process with the two remaining slices of bread.
  4. Cut each sandwich into two triangles (wouldn’t taste the same if you cut across) and enjoy!

Makes two sandwiches.

Notes: Only use the freshest bread and the ripest strawberries for this recipe.  Would be amazing with raspberries, but would need to double the sugar amount.