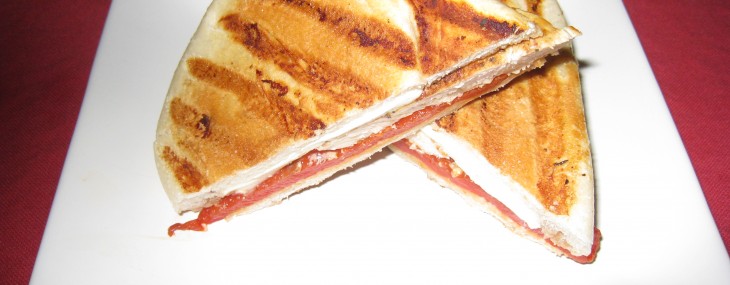
Pat’s Blackened Chicken Panini

Pat’s Blackened Chicken Panini

Chicken Panini

Chicken Panini

This sandwich is a favorite of my guy, so I’ve named it after him.  Don’t have a Panini press?  Don’t fret, use my technique.

Ingredients:

  • 2 tbs vegetable oil
  • 1 skinless, boneless chicken breast, cut horizontally into 4 thin slices
  • 1 tbs blackened seasoning (I use Cajun Classics Blackened Seasonings by Spice World)
  • 1 medium fresh mozzarella ball cut into 8 slices
  • 2 fresh sandwich rolls (I use Portuguese rolls from my local deli)
  • 1tbs olive oil
  • 2 tbs balsamic vinegar
  • 2 large roasted sweet peppers, cut into narrow strips
  • 8 fresh basil leaves

Directions:

  1. Heat oil in a grill pan over high heat (or heat up Panini press).
  2. Spread blackened seasoning over chicken breast slices, and rub in to help adhere.  Place chicken breasts in the grill pan, turn heat to medium-high, and cook for 3 minutes on each side.
  3. Arrange mozzarella slices on each breast and continue cooking for 2 minutes until cheese begins to melt.
  4. In a small bowl, combine vinegar and roasted pepper strips to marinate them slightly.
  5. Using a serrated knife, cut each roll in half horizontally.  Coat the 4 exterior sides with 1 tbs olive oil.
  6. Place a chicken breasts on each roll bottom, distribute roasted pepper strips over the chicken and cheese, top with basil leaves and roll tops.
  7. Place the two sandwiches in a Panini press and grill for 3 minutes.  Alternatively, place the sandwiches in the grill pan (still on medium-high heat) and top with the weight of multiple pans or a pan with a 2-3 pound weight in it and cook 1 1/2 minutes per sides.  See my technique.
  8. Transfer sandwiches to a cutting board and cut each sandwich in diagonal pieces using a serrated knife.

2 servings.

Potato Gnocchi with Pork and Wild Mushroom Ragu

Bon Appetit recipe from the February 2010 issue: http://bit.ly/atNkKQ

INGREDIENTS

  • 1 ounce dried porcini mushrooms
  • 1 1/2 cups boiling water
  • 3 tablespoons olive oil, divided
  • 8 ounces sliced crimini (baby bella) mushrooms (I used a 10-ounce package)
  • 2 garlic cloves, minced (I used 3 cloves)
  • Coarse kosher salt
  • 2 1/2 cups dry white wine, divided (I used a Pinot Grigio)
  • 1 pound boneless country-style pork ribs, cut into 1/2-inch cubes
  • 2 ounces 1/4-inch-thick slices coppa or prosciutto, chopped (I used center-cut bacon)
  • 6 ounces fresh mild Italian sausages, casings removed (about 2 links)
  • 1 medium onion, finely chopped
  • 1 carrot, peeled, finely chopped
  • 1 celery stalk, finely chopped
  • 2 cups crushed tomatoes or crushed tomatoes with added puree (from one 28-ounce can; preferably San Marzano or Muir Glen)
  • 1 cup (or more) low-salt chicken broth
  • 2 bay leaves
  • 1 tablespoon chopped fresh basil
  • Potato Gnocchi (see recipe)
  • 1 cup grated Parmesan cheese

PREPARATION

  • Place dried porcini mushrooms in medium bowl; pour 1 1/2 cups boiling water over. Let stand until mushrooms are soft, about 45 minutes. Using slotted spoon, transfer mushrooms to cutting board and chop coarsely. Reserve soaking liquid.
  • Meanwhile, heat 1 tablespoon oil in heavy large skillet over medium-high heat. Add crimini mushrooms and garlic; sprinkle with coarse salt and pepper and sauté until beginning to soften, 2 to 3 minutes. Add 1/2 cup wine and simmer until crimini mushrooms are soft, about 4 minutes. Set aside (there may still be liquid in skillet).
  • Heat remaining 2 tablespoons oil in heavy large pot over medium-high heat. Sprinkle pork with coarse salt and pepper. Add pork to pot and sauté until browned in spots, about 6 minutes. Using slotted spoon, transfer pork to medium bowl. Pour off all but 1 tablespoon fat from pot. Reduce heat to medium. Add coppa and stir 1 minute. Add sausages and cook until brown, breaking up into small pieces with back of spoon, about 3 minutes. Add onion, carrot, and celery. Cover pot and cook vegetables until soft, stirring occasionally, about 8 minutes. Add remaining 2 cups wine; bring to boil, scraping up any browned bits. Simmer until almost all liquid is absorbed. Add tomatoes, 1 cup broth, bay leaves, reserved pork, and porcini mushrooms. Pour in reserved porcini soaking liquid, leaving any sediment behind in bowl. Bring to boil; reduce heat to medium-low and simmer uncovered until pork is tender, adding more broth by 1/4 cupfuls if dry, about 1 hour.
  • Stir crimini mushroom mixture in skillet into ragu. Season with salt and pepper.
  • Spoon off fat from surface of ragu; stir in basil. Add Potato Gnocchi; toss gently to coat. Simmer over medium heat until gnocchi are heated through, 3 to 5 minutes.
  • Divide gnocchi and ragu among bowls. Sprinkle with some of cheese and serve, passing remaining cheese alongside.

6 TO 8 SERVINGS

Notes:  Ragu can be made 1 day ahead. Cool slightly. Chill uncovered until cool. Cover; keep chilled. Rewarm before continuing. (Was even better the next day, if that’s possible).

Potato Gnocchi

Potato Gnocchi

Bon Appetit recipe from the February 2010 issue: http://bit.ly/9Om4pL

INGREDIENTS

  • 1 1/2 pounds russet potatoes, scrubbed
  • 1 cup (or more) all purpose flour
  • 1 large egg yolk, beaten to blend
  • 1 teaspoon coarse kosher salt
  • Large pinch of freshly grated nutmeg
  • 1 tablespoon olive oil

SPECIAL EQUIPMENT

  • Potato ricer or food mill

PREPARATION

  • Preheat oven to 400°F. Pierce potatoes in several places and bake until soft, about 1 hour. Cool slightly. Cut potatoes in half. Working in batches, scoop hot flesh into potato ricer or food mill. Rice potatoes onto rimmed baking sheet; spread out and cool to room temperature.
  • Line large baking sheet with parchment paper. Transfer potatoes to large bowl.
  • Add 1 cup flour; toss to coat. Form well in center of potato mixture. Add egg yolk, coarse salt, and nutmeg; stir with fork until mixture is evenly moistened (mixture will look shaggy). Turn mixture out onto lightly floured work surface. Knead until dough comes together, sprinkling dough with flour very lightly only if dough is very sticky. Form dough into ball; divide into 4 pieces. Roll each piece between hands and work surface into 3/4-inch-thick rope. Cut each rope into 3/4-inch pieces. Place gnocchi on prepared baking sheet.
  • Working in batches, cook gnocchi in large pot of boiling salted water until gnocchi rise to surface of water. Continue to simmer gnocchi until cooked through and tender, stirring occasionally, about 4 minutes. Using slotted spoon, carefully transfer gnocchi to bowl. Drizzle gnocchi with olive oil and toss to coat.

Serves 6-8.

Notes: Gnocchi can be made up to 2 days ahead. Cover and refrigerate.

There’s Nothing to Eat in this House Part 2

There’s Nothing to Eat in this House Part 2

Anchovy & Tomato Pasta

Anchovy & Tomato Pasta

This is the 2nd installment in the “There’s Nothing to Eat in this House” series (see part 1 here: http://bit.ly/dbucAf).

As typical for me, Friday is the day before my weekly trip to the grocery store, so the fresh food on hand is limited.  Here’s a quick and VERY tasty dish I whipped up using basic ingredients from the pantry and from leftovers.  I had leftover fresh bruschetta “salsa” in the fridge, so I added it, but chopped tomatoes with 1 clove of chopped garlic and some basil will also work:

Ingredients:

  • Thin spaghetti, 1 portion
  • 3 strips of lean bacon
  • 1/4 cup olive oil
  • 1/2 tsp red pepper flakes
  • Salt & black pepper
  • 1 anchovy filet, from a oil-packed jar
  • 1/2 cup fresh bruschetta salsa
  • Shaved Parmesan

Directions:

  1. Cook a portion of thin spaghetti according to package directions, drain
  2. Place 3 bacon strips on a double layer of paper towel then top the bacon with 1 sheet of paper towel.  Microwave for 2 minutes.  Remove from the microwave, let cool and then break into small chips.
  3. Heat olive oil in a sauté pan over high heat until nearly smoking, about 20 seconds
  4. Add the anchovy filet and break up with a wooden spoon, then add the pepper flakes, salt and black pepper and cook for 30 seconds
  5. Turn the heat down to medium, then add the cooked bacon and the tomato mixture and sauté for 3 minutes
  6. Toss the pasta into the mixture, coating well
  7. Serve pasta with shaved parmesan and a sprinkling of black pepper

Serves 1.

Notes:  Don’t panic about the anchovy filet.  You won’t be able to taste it in the final dish, but it adds an interesting flavor.  I always keep a small jar of anchovies in oil in the fridge for dishes like this one.

Stay tuned for more quick dishes from the pantry!

There’s Nothing to Eat in this House

There’s Nothing to Eat in this House

Shrimp Cappellini

Shrimp Cappellini

I’m always amazed to hear people say that they can’t find anything to eat at their house.  Anyone with a decent pantry should be able to turn up a simple delicious meal in minutes.

Today, Friday, is the day before my weekly trip to the grocery store, so the fresh food on hand is limited, but I made a tasty Shrimp Cappellini lunch with the following basic ingredients from the pantry and with shrimps from the freezer:

Ingredients:

  • Dry Cappellini, for one person
  • 1/4 cups olive oil
  • 1/2 tsp red pepper flakes
  • Salt & black pepper
  • 5 medium shrimps
  • Shaved Parmesan

Directions:

  1. Cook a portion of cappellini according to package directions, drain
  2. Heat olive oil in a sauté pan until nearly smoking, about 20 seconds
  3. Add pepper flakes, salt and black pepper to the oil and cook for 30 seconds
  4. Add  shrimps and sauté for 3 minutes, ensuring not to overcook
  5. Toss the pasta into the hot oil mixture, coating well
  6. Serve pasta with shaved parmesan and a sprinkling of black pepper

There are tons of other simple ideas such as the Shrimp Cappellini that you can easily made from pantry foods.  Share your favorites!

Soft Boiled Egg

They say a banana is the world’s most perfect food, but a soft-boiled egg with the right seasoning and a dollop of mayo might just be ‘it’ for me.

Perfect Egg

Perfect Egg

Directions:

  1. Place room-temperature egg in a small saucepan. Cover with cold water so there’s about 1-inch of water above the egg.
  2. Put saucepan over high heat.  Allow to come to a boil, then immediately remove from heat.  Allow eggs to stand in hot water for 5 minutes.
  3. Drain hot water and place the egg on an egg cup or small saucer.
  4. Cut a small ‘cap’ off the top of the egg, exposing some of the soft yolk.
  5. Season with sea salt, cracked pepper and a small dollop of mayonnaise.

Maple Taffee on Snow (Tire sur la Neige)

Maple Taffee on Snow 2

Maple Taffee on Snow 2

As my family began getting ready for the food frenzy my visit to Quebec would bring on, one thing that my oldest niece, Maude, wanted to be sure my sister would fix for us is Tire sur la Neige, or Maple Taffee on Snow.  This treat is one most popular at sugar shacks during maple syrup season, but great anytime there’s snow outside.

Ingredients:

  • 2 – 3 cups maple syrup
  • Freshly gathered snow packed tightly into a wide, low container

Directions:

  1. Maple Taffee on Snow

    Maple Taffee on Snow

    Pour the maple syrup into a medium saucepan and bring to a boil on high heat.  Reduce heat to medium and simmer until it reaches 240°F on a candy thermometer, approximately 4-5 minutes.

  2. Using a ladle,  drizzle some of the hot syrup onto the snow, making certain not to cover the entire surface (you can re-pour additional syrup after the first round of taffee is gone).
  3. Let the taffee set for a minute then pick up by rolling on a fork or wooden chopstick.

Notes:  Don’t have snow where you live?  Finely-crushed ice from a blender would work!

Grandma's Chocolate and Peanut Butter Treats

Chocolate and Peanut Butter Treats

Chocolate and Peanut Butter Treats

These treats come straight from my childhood as my Grandma made them for the holidays as far back as I can remember.  She’d make a double batch and freeze the finished treats so we’d have them well into the new year.

Ingredients:

  • 1/3 cup grated paraffin wax
  • 8 ounces milk chocolate chips
  • 1 cup smooth peanut butter
  • 2 cups powdered sugar, sifted
  • 2 cups puffed rice cereal

Directions:

  1. Melt paraffin and chocolate in a glass or metal bowl placed over a pot of simmering water over medium-low heat.  Don’t allow the bowl to touch the simmering water.
  2. Add peanut butter to the melted chocolate and blend well until fully incorporated.
  3. Stir the powdered sugar into the mixture.  Remove from heat and add the puffed rice cereal, making certain that the cereal is fully coated with the chocolate mixture.
  4. Drop spoonful of the mixture on a wax paper-lined cookie sheet and cool.  Refrigerate cooled treats.

Makes approximately 24 treats.

Notes: Paraffin wax can be found at most grocery stores in the canning section where Mason Jars are found.  Only use consumable wax such as Gulf Paraffin Wax.  Grate the paraffin using a box grater or microplane.

Cherry Blossom Treats

I’m Canadian and one of the candy bars I loved as a kid was the Cherry Blossom.  This treat features a thick chocolate, peanut butter and coconut shell with a tasty cherry syrup and maraschino cherry center.  The Cherry Blossom is a treat I always look forward to having when I go visit my folks in Quebec, and my mother shared the recipe we’d made when I was a kid.

Cherry Blossom

Cherry Blossom

For the chocolate treat:

  • 1 cup semi-sweet chocolate chips
  • 1/4 cup grated paraffin wax
  • 1 cup confectioner sugar
  • 1/2 cup crunchy peanut butter
  • 1/3 cup grated coconut
  • 12 whole, red maraschino cherries

Chocolate treat directions:

Combine all the chocolate treat ingredients in a microwaveable dish and microwave in 1 minute increments, stirring after each minute, until the mixture is nearly completely melted, 2-4 minutes.  Stir mixture thoroughly to ensure any un-melted bits are completely melted.

Cherry syrup:

  • 1/2 cup cherry liquid from a red maraschino cherry jar
  • 1 cup confectioner sugar

Cherry syrup directions:

In a small bowl, combine the liquid and the confectioner sugar, stirring until a thick syrup is created.

Assembly directions:

  1. Wash and dry a Styrofoam egg container, cut off the lid with scissors then oil each egg compartment well.
  2. Take melted chocolate mixture and cover each egg compartment with a thick coating using a spoon.  Work fast as the mixture will harden quickly.  If the mixture gets too hard, microwave it for 30 seconds.
  3. Add a cherry and about 1 tablespoon of cherry syrup to each egg compartment, then use additional chocolate to create a ‘lid’ for each treat.  Ensure the chocolate ‘lids’ seal in the syrup completely to avoid leaks.  Cover the egg container with cling wrap.
  4. Refrigerate overnight or at least 12 hours.  Unmold each treat carefully, then wrap each treat with aluminum foil.  Keep refrigerated.

Yields 12 treats.

Notes: You could use a cardboard egg container, but you’d need to line it with cling wrap that you’d then oil thoroughly.  Paraffin wax can be found at most grocery stores in the canning section where Mason Jars are found.  Only use consumable wax such as Gulf Paraffin Wax.  Instead of using oil on the egg container, you could also use cooking spray.

Quebec Cretons

This spreadable meat dish is similar to pâté but with more texture.  Cretons are a very typical eastern Canada dish served at breakfast time on toasted bread.  Cretons are sometimes also served on a cheese platter.

Cretons

Cretons

Ingredients:

  • 1 lb ground pork
  • 1 lb ground veal
  • 2 onions finely minced
  • 2 tbsp chicken bouillon granules
  • 1 1/2 tsp garlic powder
  • 1/4 tsp pepper
  • 2 tsp salt
  • 1 pinch of ground cloves
  • 1 cup evaporated milk
  • 1 cup water
  • 1 envelope flavorless gelatin

Directions:

  1. Place all the ingredients (except gelatin) in a heavy saucepan.  Mix well and bring to a boil.  Reduce heat to medium, and simmer for one hour, stirring often.  Turn off heat.
  2. Mash down the mixture with a hand potato masher to a coarse consistency.
  3. Incorporate the gelatin to the mixture.
  4. Cool completely, then stir the mixture.  Put mixture in small containers and refrigerate or freeze.

Will last in the refrigerator for up to 2 weeks or up to 3 months in the freezer.