New Jersey Blueberry Dumplings

New Jersey Blueberry Dumplings

It’s blueberry season in New Jersey where I live and, while I love them fresh with Greek yogurt, I also like them in baked goods.

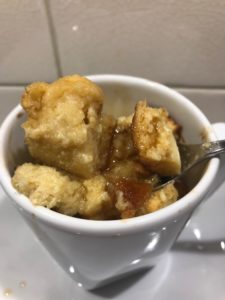
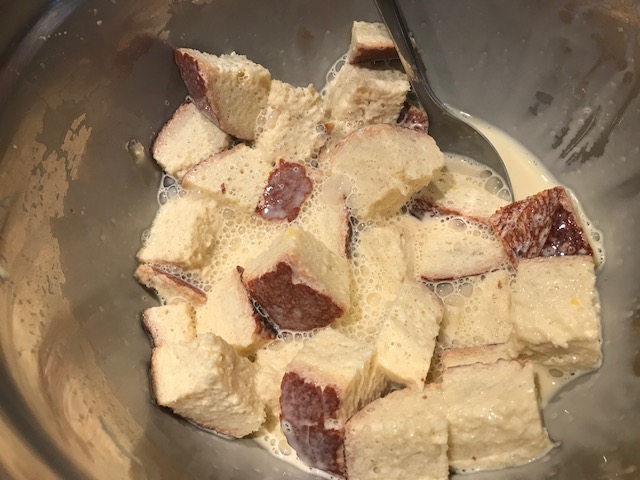
I was going to a potluck where I offered to bring dessert and thought….why not do something different than my usual Very Berry Cobbler and steam some of my Great-Aunt Eva Rose’s dumpling batter over bubbly, jammy blueberries? I made the dumpling batter the morning of the party and kept it refrigerated then I made the “jam” and cooled it then brought both items with me to the party and just steamed the dumplings when we were ready to eat dessert. Easy peasy!

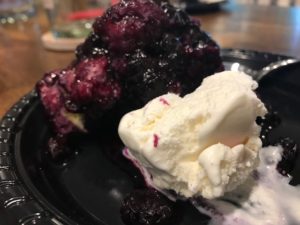
I list the vanilla ice cream as optional, but come on, it’s sort of required on a hot berry dessert. You can skip it, but I don’t recommend it.

Dumpling ingredients:

  • 1 cup all-purpose flour
  • 1 tsp. baking powder
  • 1 pinch of salt
  • 1 large egg
  • 2 tsp. melted butter, cooled
  • ¼ cup whole milk

Blueberry “jam” ingredients:

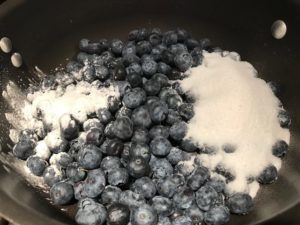
  • 2 cups fresh blueberries (or you can use thawed frozen)
  • 1 Tbsp. cornstarch
  • ½ cup granulated sugar
  • 1/2 cup water
  • Zest of ½ lemon
  • Vanilla ice cream, optional

Dumpling directions:

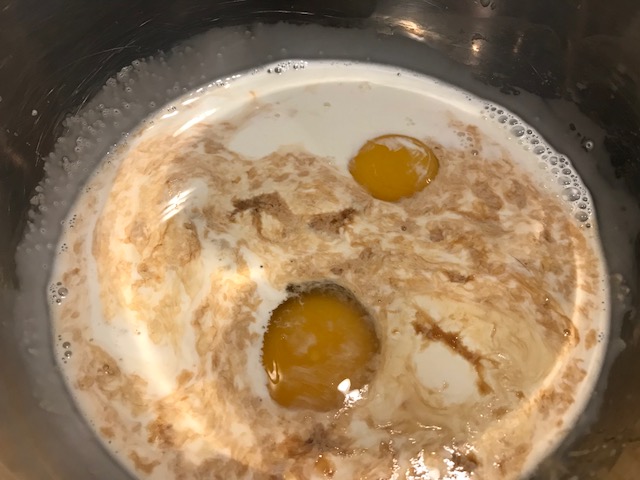
  1. In a medium bowl, combine flour, baking powder and salt.
  2. Add egg, butter and milk to the flour mixture and mix to incorporate. Do not overmix. Dumpling batter will be lumpy.
  3. Refrigerate for at least 30 minutes or up to 8 hours.

Blueberry “jam” directions:

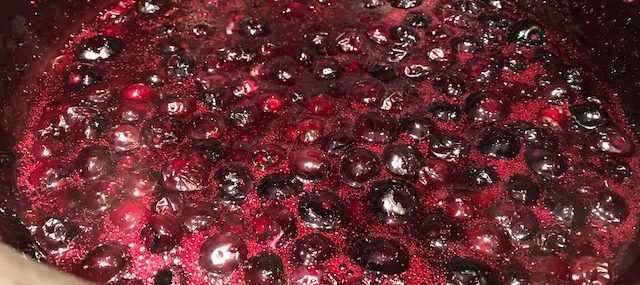
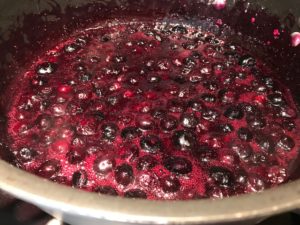
  1. In a large saucepan with a lid, add all the ‘jam’ ingredients and bring to a boil over medium-high heat. Lower the heat to medium-low and simmer for about 15 minutes, until the “jam” is thick, stirring and mashing the berries a little as the mixture cooks. This can be done a couple hours before ready to make the dumplings.
  2. When ready to cook the dumplings, heat the berries over medium heat. Lower heat to medium-low and drop cold batter by the spoonful over the berry “jam” so that there’s batter over most of the surface of the “jam”. Cover with a lid and cook for 10 minutes.
  3. Serve with ice cream.

Makes 6 servings.

Chive Sour Cream Salad Dressing

Chive Sour Cream Salad Dressing

This Chive Sour Cream Salad Dressing was something we used on fresh green lettuce during the summer months in Quebec when I was growing up when the days were warm and eating outside was de rigueur.

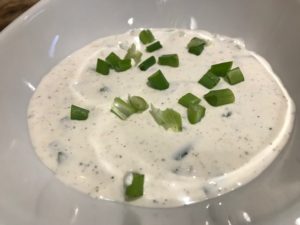
It’s a really simple, tangy dressing that you can make a day in advance if kept in a container with a tight-fitting lid. I use canning jars for this as it’s easy to shake up the ingredients before pouring over the greens.

I typically use chives in this salad dressing, but use whatever fresh herbs you have on hand. Cilantro and basil are particularly delicious. Serve the dressing cold on cold lettuce for extra freshness.

Ingredients:

  • ½ cup sour cream
  • ½ cup heavy cream (could use half-and-half)
  • ½ tsp. each salt and pepper
  • 1 Tbsp. finely chopped chives
  • 1 Tbsp. chopped green onion
  • Zest of half a lemon
  • One large head of Freshly-washed lettuce greens, torn in bit size pieces

Directions:

  1. Combine all the ingredients except the lettuce greens in a medium canning jar and shake well until all the ingredients are fully combined (could use a bowl and whisk also).
  2. Pour the dressing over the greens, toss to coat well and check for seasoning. I typically add a couple big pinches of salt and re-toss.

Serves 4 guests.

Tangy Carrot and Celery Slaw

Tangy Carrot and Celery Slaw

In the summertime, I’m always looking for easy and tasty recipes for side dishes to serve at outdoor parties. While I love my mom’s potato salad is always a hit, I was looking for a tangy, vinegary slaw to serve. I found the perfect slaw in this week’s Blue Apron box! It’s made with sweet carrots and crunchy celery with a bit of heat from the sweet piquante peppers.

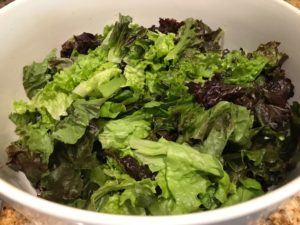
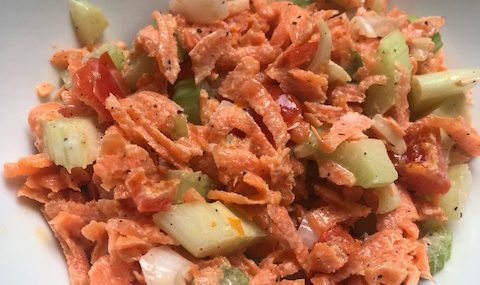
Sweet piquante peppers are found typically jarred and are also known as peppadew peppers. They’re great on sandwiches, in salads and in this easy slaw recipe. 

The recipe can easily be doubled or quadrupled based on the number of guests being fed. I even scooped this slaw on tacos and it added great crunch and tang.

Ingredients:

  • 2 Tbsp. mayonnaise
  • 2 stalks of celery, sliced
  • White part of 2 scallions, diced
  • 2 medium sized carrots, peeled and grated on the large whole side of a box grater
  • ½ ounce sweet piquante peppers (about two peppers), roughly chopped
  • 1 Tbsp. red wine vinegar
  • 2 Tbsp. olive oil
  • Pinch each of salt and pepper

Directions:

  1. In a medium bowl, combine the mayonnaise, sliced celery, scallions, grated carrots, chopped piquante peppers and vinegar.
  2. Drizzle with olive oil and season with salt and pepper. Set aside to marinate, stirring occasionally, at least 10 minutes, but no more than an hour.

Makes two side servings.

Maple Bread Pudding Mugs for Two

Maple Bread Pudding Mugs for Two

I love bread pudding. The custardy bottom and the slightly crispy top make for a perfect dessert that can be changed up based on the season and most importantly, what’s in the house. I had leftover sourdough bread from last weekend’s party, so I used two thick slices of that for these two mugs.

Maple Bread Pudding
Maple Bread Pudding

At my home, I’m the only one who likes bread pudding….my guy calls it peasant food and he means that in a negative way! I love the comforting dish and recreated it in mugs, just enough for two people (or for one person, in a double serving).

This bread pudding variation pays homage to my Quebec roots and is made with and then topped with Quebec maple syrup. Oh yeah, and topped with maple-scented gelato also…..why not!?

Ingredients:

  • 2 thick slices of day-old bread (or 3 slices of standard cut bread)
  • 2 large eggs
  • ½ cup light cream (whole milk would also work)
  • 4 Tbsp. pure maple syrup DIVIDED
  • ½ tsp. pure vanilla extract
  • Maple-scented or vanilla gelato/ice cream, optional but not really

Directions:

  • Preheat the oven to 350 degrees.
  • Spray the inside of two 8-ounce oven-proof mugs with cooking spray (could use ramekins also).
  • Cut the bread into 1” pieces.
  • In a medium bowl, whisk together the eggs, cream, 2 tablespoons of maple syrup and vanilla.
  • Add the bread to the bowl with the egg mixture and stir until fully combined. Allow to sit for 10-15 minutes so the bread soaks up as much of the egg mixture as possible
  • Divide the bread/egg mixture between the mugs. Place the mugs on a small baking tray and bake for 30 minutes, until the tops of the bread puddings are lightly golden and the custard is set.
  • Serve each mug while warm with the remaining 2 tablespoons of maple syrup and a scoop of gelato/ice cream.

Makes 2 servings.

Easy Wedge Salad with Blue Cheese Dressing

Easy Wedge Salad with Blue Cheese Dressing

Every summer, I try to reinvent the wheel when I host outdoor parties when it comes to food. What do I serve that’s tasty, different, can be made in advance and that my guests will enjoy? Another challenge is to find a side or starter that’s refreshing in contrast to the heavier food served at grilling parties. My answer, the mighty wedge salad.   

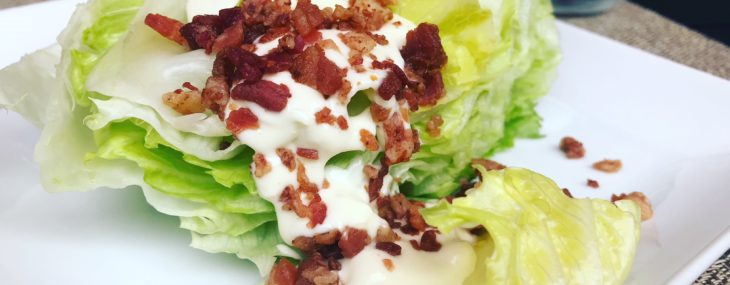
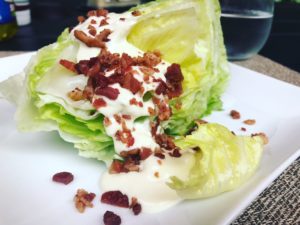
It’s not innovative but it’s pretty close to perfect on hot summer days with its crisp, cold lettuce, decadent blue cheese dressing and fun toppings that can be customized to please your guests.

Another perk of this easy side dish or starter is that it’s very affordable. You can easily get four servings out of a head of iceberg lettuce and I oftentimes get six servings out of a larger head.

A fun way to serve a wedge salad is by serving the toppings on the side so that each guest can add or omit whatever toppings he/she likes…..think salad bar!  

Ingredients:

  • 1 large head of iceberg lettuce, cut into four or six wedges
  • About 2 cups chunky blue cheese dressing, homemade or store-bought
  • 1 cup crumbled blue cheese (optional)
  • 1 cup cooked bacon, crumbled (optional)
  • 1 cup cherry/grape tomatoes, chopped (optional)
  • 3 scallions, chopped (optional)

Directions:

  • Place a wedge of lettuce each on cold salad plate.
  • Drizzle a few tablespoons of blue cheese dressing on each wedge.
  • Optional: Top with crumbled blue cheese, crumbled bacon, tomatoes and scallions.

Serves 4-6 guests.

Easy Wedge Salad with Blue Cheese Dressing
Serves 4
An easy and tasty salad for summer parties that guests will love.
Write a review
Print
Prep Time
10 min
Total Time
10 min
Prep Time
10 min
Total Time
10 min
Ingredients
  1. • 1 large head of iceberg lettuce, cut into four or six wedges
  2. • About 2 cups chunky blue cheese dressing, homemade or store-bought
  3. • 1 cup crumbled blue cheese (optional)
  4. • 1 cup cooked bacon, crumbled (optional)
  5. • 1 cup cherry/grape tomatoes, chopped (optional)
  6. • 3 scallions, chopped (optional)
Instructions
  1. • Place a wedge of lettuce each on cold salad plates.
  2. • Drizzle a few tablespoons of blue cheese dressing on each wedge.
  3. • Optional: Top with crumbled blue cheese, crumbled bacon, tomatoes and scallions.
Notes
  1. A fun way to serve the wedge salad is by serving the toppings on the side so that each guest can add or omit whatever toppings he/she likes…..think salad bar!
Food & Wine Chickie Insider https://www.foodandwinechickie.com/

Strawberry Maple Butter

Strawberry Maple Butter

Every late spring, I make it my mission to go strawberry picking at Donaldson Farms, and amazing local farm. My love for picking berries started a long time ago when my grandma would take me to pick wild/wood strawberries in Quebec as a toddler. She’s sit me in the field with a pail and tell me to pick berries around me. Of course, that ended up with me eating the strawberries around me, but it’s a very fond memory nonetheless.

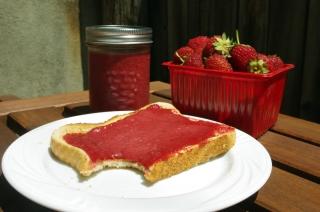
Cultivated strawberries are so easy to pick as farmers have rows and rows of plants with an abundant amount of berries on them. Within a few minutes, I have more strawberries that I know what to do with!

One way I like to use up my fresh berries is by making a very simple butter using maple syrup from back home in Quebec. This butter can be used on toasts, waffles, pancakes/crepes and in a multitude of ways. It keeps a couple of weeks in the fridge and it’s delicious!

Hope you make it out to a u-pick-it berry farm near you, it’s a fun and tasty activity for the whole family.

Ingredients:

  • 6 cups of fresh, chopped strawberries
  • 2/3 cups maple syrup
  • 1 ½ cups unsalted butter, cut into pieces
  • 1 Tbsp. pure vanilla extract
  • Pinch of salt

Directions:

  1. In a large saucepan over medium-high heat, add the chopped berries, the maple syrup and the butter. Bring to a boil then lower heat to medium-low and cook for 30 minutes, stirring occasionally.
  2. Turn the heat off, add the vanilla and salt and stir to combine.
  3. Puree the berry mixture in a blender or food processor until smooth, 30 seconds or so. You may need to puree in batches if your food processor/blender is on the small side.
  4. Pour the strawberry maple butter in small glass jars and refrigerate until ready to serve.

Makes 6 small canning jars.

Cheers,

Veronique

Chicken Bites with Tarragon Dipping Sauce

Chicken Bites with Tarragon Dipping Sauce

These Chicken Bites with Tarragon Dipping Sauce are a great little dish to make when company comes over and you don’t want to slave over a hot stove at the last minutes.

Chicken Bites
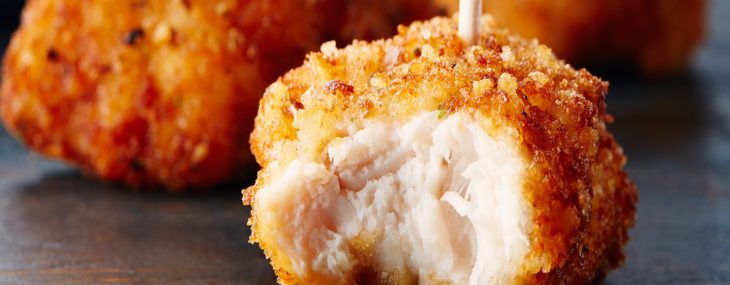
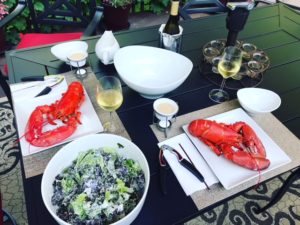
I make the tarragon dipping sauce the day before and keep it in the refrigerator until I’m ready to serve the dish. This saves some time and keeps you out of the kitchen and with your guests come party time.

The bites will please adults and children and I often double the recipe as they’re a huge hit at parties. You could make the bites a little ahead of time and fry just 8 minutes then reheat in the oven, or my favorite, the toaster oven, for 2-3 minutes right before you want to serve the bites.

Bites Ingredients:

  • 2 cups peanut oil
  • 4 boneless, skinless chicken breast halves, patted dry and cut in 1½ inch bites.
  • 1 cup bread crumbs
  • ½ cup grated Parmesan cheese
  • ½ tsp. poultry seasonings
  • ¼ tsp. garlic powder
  • ½ tsp. dry thyme
  • 1 cup buttermilk
  • ½ tsp. each salt and pepper (plus additional salt for seasoning the cooked chicken)

Dipping Sauce Ingredients:

  • 1 cup sour cream
  • ¼ Dijon mustard
  • ½ tsp. dry tarragon or 1 Tbsp. fresh tarragon
  • 4 drops of hot sauce
  • Pinch of salt and pepper

Bites Directions:

  1. In a heavy saucepan or ideally a deep cast iron pan, warm the oil over medium-high heat until the temperature reaches 350°F.
  2. In a medium bowl, combine the bread crumbs, Parmesan, poultry seasonings, garlic power, thyme and ½ teaspoon each of salt and pepper.
  3. In another medium bowl, add the buttermilk.
  4. Dip the chicken in the buttermilk, shake to remove excess and toss in the bread crumb mixture to fully coat each piece. Add the coated chicken to the oil and cook in batches for 10 minutes, or until golden brown. You don’t want to crowd the pan with too much chicken or the oil will drop in temperature and your chicken will get soggy from oil penetrating the chicken instead of cooking the exterior. Place cooked chicken on paper towels and season with a pinch of salt.

Dipping Sauce Directions:

While the bites cook, in a medium bowl, add all the ingredients and whisk well to fully combine. Serve with the bites.

Serves 6-8 as appetizers/hors d’oeuvres.

Two Cheese Baked Macaroni

Two Cheese Baked Macaroni

I love making big batches of marinara sauce and freezing some for easy weekday dishes. I took out 2 cups of sauce from the freezer and added it to some cooked ground beef, combined that with leftover Ricotta cheese and the recipe came together in the time it took to boil the macaroni and it’s tasty and satisfying….and cheesy.

Ingredients:

  • ½ pound macaroni pasta (I use Delverde brand)
  • 2 Tbsp. olive oil
  • 1 pound ground beef, I use 20% fat
  • Pinch of salt and pepper
  • 2 cups Easy Marinara Sauce (or other marinara sauce)
  • ½ cup Ricotta cheese
  • I cup grated Mozzarella cheese

Directions:

  1. Preheat oven to 400 degrees.
  2. Cook pasta 1 minute short of the directions state on the packaging.
  3. In a large sauté pan over medium-high heat, warm the oil. Add the beef, the salt and the pepper and cook, stirring frequently, until the meat is no longer pink, about 5 minutes. Lower the heat to medium and add the sauce. Cook for about 10 minutes, stirring occasionally.
  4. Add the cooked pasta and the Ricotta to the sauce and gently toss to combine. Place the pasta in a baking dish, top with the Mozzarella and cook for about 15 minutes, until the cheese is melted and golden brown.

Makes 2 generous entrée-size servings.

Cheese Stuffed Poblano Peppers

Cheese Stuffed Poblano Peppers

Poblanos are mild chili peppers with lots of great flavor and just a bit of spice. The peppers originated in Puebla, Mexico and can also be found dried, where they’re known as ancho chile.

Cheese Stuffed Poblano

I’m always looking for low-carb side dishes to serve when we grill meats. That’s not easy as we often go to carby sides when we grill…potato salad, mac & cheese, pasta.

Last weekend, I’d made some of my fresh salsa (chopped tomatoes, cilantro, lime juice, jalapeno and minced onion) for another meal and thought…what if I used this tasty salsa to top a stuffed poblano!? This was a well-received and easy-to-make side dish that we served alongside grilled pork chops. One other thing I loved was that I was able to make these in the toaster oven so I didn’t have to heat up the whole kitchen with my standard oven – winning!

You can make these peppers in advance, cool them then reheat them for a few minutes in a 425 degree oven – party perfect!

Ingredients

  • 2 large poblano peppers
  • 1 Tbsp. vegetable oil
  • Pinch of sales and pepper.
  • 4 ounces grated Cheddar/Jack cheese mix
  • Homemade or store-bought salsa
  • 2 Tbsp. Crema Mexicana or sour cream
  • ½ lime

Poblano Cheese Stuffing

Directions:

  1. Preheat oven to 375 degrees.
  2. Find a flat spot on the poblano and lay it on your work surface. With a sharp paring knife, cut the top of the pepper (leaving the end and stem intact) to make an opening for the cheese to go into.
  3. Rub the oil over the peppers then salt and pepper the interior.
  4. Divide the grated cheese between the two peppers, note that you may have too much cheese depending on the size of your peppers.
  5. Place the stuffed peppers on a baking sheet and cook for about 20 minutes, until cheese is melted and beginning to brown.
  6. Top each pepper with fresh salsa and a drizzle of Crema Mexicana (or sour cream). Squeeze the lime over the peppers.

Makes two side dishes.

Pancetta and Sundried Tomato Creamy Spaghetti

Pancetta and Sundried Tomato Creamy Spaghetti

Here’s a new installment in the “There’s Nothing to Eat in this House” series featuring an easy pasta dish. When lunch plans get cancelled at the last minute and the fridge is low on supplies because I’m heading out of town, I make pasta with pantry and fridge staples.

Pancetta and Sundried Tomato Creamy Spaghetti
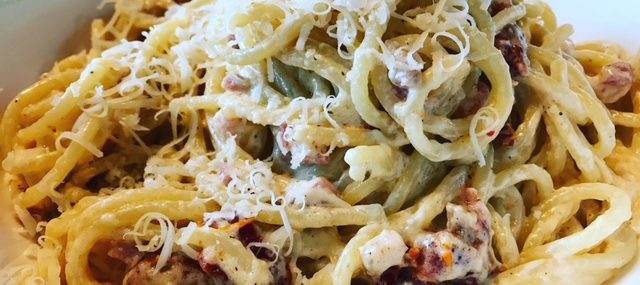
Today, I had some leftover pancetta so I sautéed it with some jarred/in oil sundried tomatoes then added a bit of light cream and freshly-grated Parmesan for a tasty, creamy sauce. I then tossed some Delverde spaghetti (best dried pasta ever) in the sauce and BOOM, there was a tasty, quick lunch ready to eat in 20 minutes.

Ingredients:

  • 1 Tbsp. olive oil
  • 2 Tbsp. diced pancetta
  • 2 Tbsp. chopped sundried tomato
  • ½ cup light cream
  • ¼ cup plus 1 Tbsp. freshly-grated Parmesan cheese, divided
  • 1 ½ cups cooked spaghetti (or other cooked pasta)
  • Pinch each salt and pepper

Directions:

  1. In a large sauté pan over medium-high heat, warm the oil.
  2. Add the pancetta and cook for 2 minutes, until lightly-browned.
  3. Add the sundried tomato and cook for another minute.
  4. Reduce heat to medium-low, add the cream, and cook for a minute, stirring to prevent scorching.
  5. Add the ¼ cup of cheese and cook an additional 30 seconds.
  6. Add the pasta to the sauce and cook for 30 seconds until well-coated in sauce.
  7. Season with salt and pepper then top the pasta with the tablespoon of Parmesan.

Serves one.

Cheers,

Veronique